Butter vs oil is a question I have in many sweet bakes. And maybe you too?
…And so I tested this fun debate in a cake (cupcake 🧁), which is a great application way to test in case you’re curious.
…Plus I LOVE cake!
And it’s not difficult to make basic moist cake with 4 ingredients you may already have on hand in your refrigerator and pantry: flour, egg, milk, and a fat (…plus you want to add a rising agent and sweetener for an elevated cake experience).
…Ah, but which fat to use?
My difference between butter and oil cake notes are below…
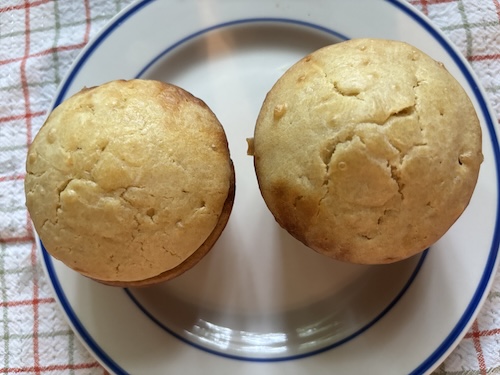
Btw, can you guess which is which?
…The muffin or cupcake (depending on your perspective) on the left is baked with butter, and the one on the right is baked with canola oil.
But that could have been any type of edible cooking oil, like healthy light olive oil. And it includes coconut oil (one of my fave oils to bake with).
Depending on what final effect you want to have on your cake, you will want to ask yourself and consider: should I use butter or oil?
Some things I tested with both were: taste (of course! 😋), size, and texture.
But all things are not created equal because butter has water.
Oil does not…. remember, the old saying that oil and water don’t mix (as they’re opposites and oil repels water).
Because of this fact, butter will need less liquid in the final cake batter. And also less flour for the butter batter to get a similar texture batter to the more liquid oil batter, before baking.
For moist cake texture modification (for 1/4 cup butter or oil), you can use:
3/4 cup gluten/all purpose flour with butter (or 1 cup flour for oil)
3/4 cup milk of choice with butter (or 1/2 cup milk for oil)
And so… you can see a slight butter vs oil variation changes a recipe.
Where you have your choice of fat.
If you have both available, choose wisely!
…It’s a matter of preference (or what you have in your kitchen).
And if you can’t remember which to use, use the path of least resistance (aka easy) as your guide… that’s what I do!
Think of store-bought box cakes as a standard model in this case…
Most the box cake ingredients on the back of the box list adding (your) oil.
It yields a more consistent cake.
It’s also easier overall as most people have an oil bottle handy and ready to go, that’s sitting at room temperature in a cabinet.
Unlike butter, that needs to be creamed for a cake batter, but only when conditions are favorable.
Butter needs to be softened, which means it needs to be out at or warmed slightly in some way to room temperature.
…So the baker has to remember to bring out butter of the refrigerator in time or heat it up as an extra prep step. You can do this if you have a pep in your step!🦶But not all of us do… or by the end of the week.
…And that prep in butter vs oil difference alone is a BIG difference that can delay a cake being made and baked. 😊
I know it would be for me as I don’t usually think to take out the butter and eggs (🧈+🥚) in advance.
…And I bake a lot! So oil is more practical for that reason alone.
And for a taller final cake, oil turned out better in my simple cupcake test.
But before you determine oil as the winner for moist cake!… see the notes below (because you could change your mind 💭).
Size – Butter vs oil
For size, there’s a HUGE difference. The cupcake on the right is oil and the muffin looking one on the left is made from a batter with butter. They came from the same baking pan out of the oven (and only the slight modifications above).
Taste – Butter vs oil
Butter vs oil don’t make a big taste difference in a cake if you use a mild tasting oil.
In cookies, pastries, and other sweet bakes, butter vs. oil can and will make a big taste (and other) difference.
But for cake… if you have both butter and oil on hand, think easy cupcake or easy cake! 🎂
Texture – Butter vs oil
So then, the other important question is about texture. You would think since an oil cake is taller, it would have a nicer texture.
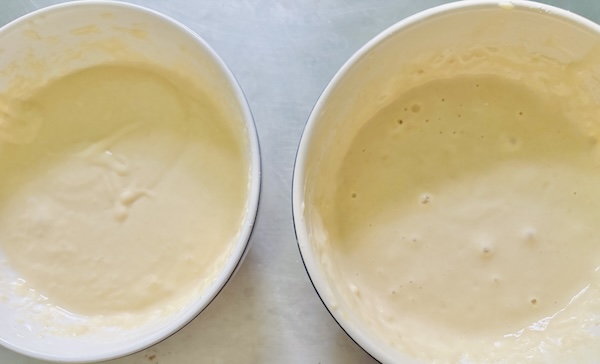
And before it goes in the oven, the batter I made looks slightly different. The butter one on the left has more of the pretty “ribbon effect.” The oil one on the right reminds me of sourdough starter 😁
But they look similar in amount of water/flour (from above quantity modifications).
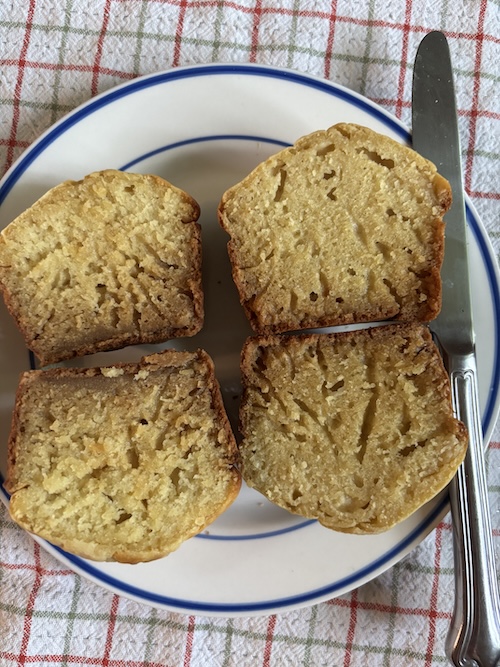
But out of the oven is what matters… AND surprise!
The cakes look similar, but the butter one on the left is slightly better with more of a pronounced crumb if that is important to you.
And as you saw above, the exterior (before you slice into) will look about the same except for height difference.
So if you want more of a homemade-style traditional cake, use butter. And for a southern cake, use butter 🧈
But for an easier, sky-high taller cake, use oil.
Modern, easy cakes = oil.
So there you have it!… butter vs oil in a cake.
I pick oil almost ever time for a cake, but there’s one other point to consider in my low-sugar baking world…
It you want to use a sweetener that’s not granulated or brown sugar, such as honey (that also I tested for this butter vs oil cake test)… butter and honey are a sweet pairing.
They go hand-in-hand in taste.
And if you’re using coconut milk (vs other milks) like I like to use, it goes well with oil in cakes.
Regular milks will be better with butter. They are slight preferences but the more you bake from scratch, the more you recognize them.
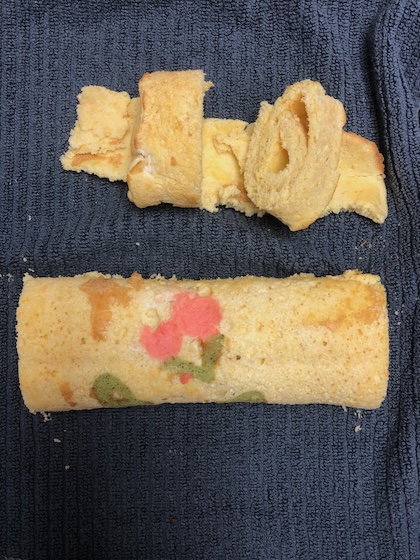
Sponge cake roll is one that I embrace as a cake fan, and because cake fun is how I happy roll. And the cake texture does live up to the sponge name, like this sponge cake…
That looks like it will be sent off as a spring letter (onto an eating table).
…And you can make your own sponge cake with your own personal design 💌
It’s easy to make a unique imprime pattern (your imprint) where you bake the cake batter pattern you make for a minute on the cake pan, and then add and spread the rest of your batter on top to complete the bake off (or like I saw on The Great British Baking Show bake off).
And while you may be wondering how easy this is to make, I’ll first say it’s easier to make than it looks.
Below I give you the shortcut ways…
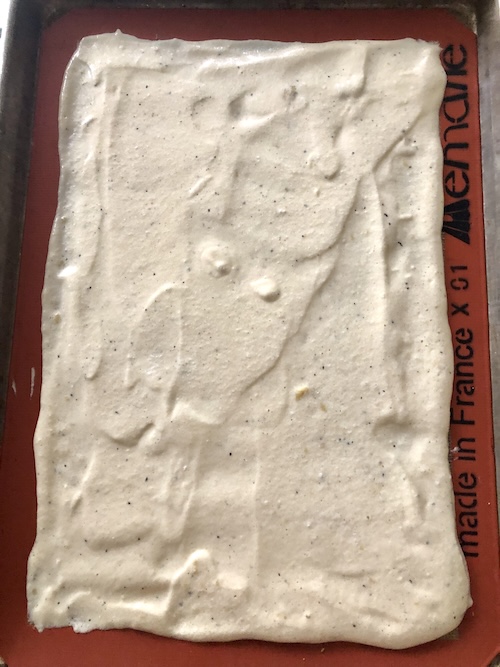
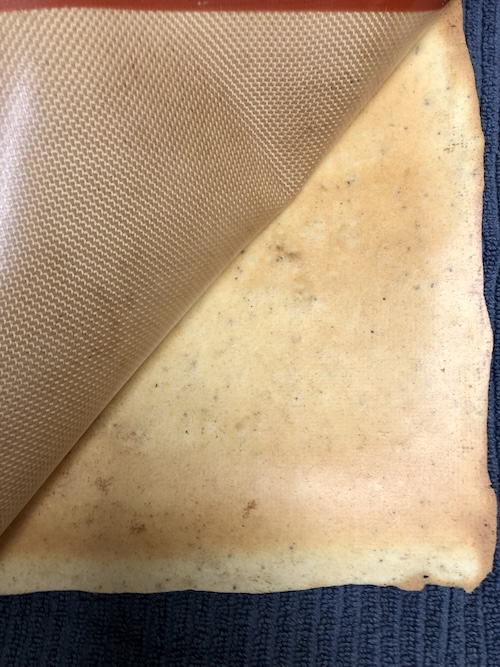
That starts with making the batter that you spread onto a silicone baking mat. One shortcut is you don’t need to go to the pan edges. Because the batter should hold its own without sides.
…Because it’s a wet batter, but never runny.
…Which is also a good battery test for your batter on how it will turn out.
And if you use a silicone baking mat (or a Silpat) with orange lined edges, you can use those edges as guidelines for where to stop. Because it’s tempting to go to the pan edge.
Your batter spread doesn’t have to be ruler straight, as the ends will get cut off at the end after baked,
And if use a half or full pan (12″ x 18″ or 20″) for your bakes, they make silicone mats that fit perfectly. Metal pans were the ones I saw daily in hotel and restaurant kitchens when I managed catering events and parties.
They will work well for this application. Like on this 12″ x 18″ pan setup with a thin layer of the batter recipe. And you can make a smaller rectangle if you want a thicker sponge. That’s up to you!
Then bake for about 12 minutes. Most other cakes can take 45 minutes or longer to bake… but this is a sponge cake roll that’s a quick bake, and that can save you minutes.
Thank you, magical oven!
And you’ll know it’s baked done because the sides will be baked done, just before they brown. And if the cake edges brown, that’s okay as you can cut those off later, but that’s your sign to take it out of the oven.
But the best way is to check the oven at the timer 12 minute mark. I could’ve pulled this one out at 11-and-a-half minutes, but I wanted to give it a few more seconds.
When it’s out of the oven, peel warm off the Silpat. You may have to wait 1-3 minutes, as it’ll will be super hot. Use your safe gloves. But don’t let the sponge cake cool before rolling it up because the cake needs to be shaped warm-hot, or it will likely cake break later.
And peeling is so satisfying to do, especially for the scrapbooker in me that likes to work with her hands and anything that’s like paper. This one is edible paper. 😊
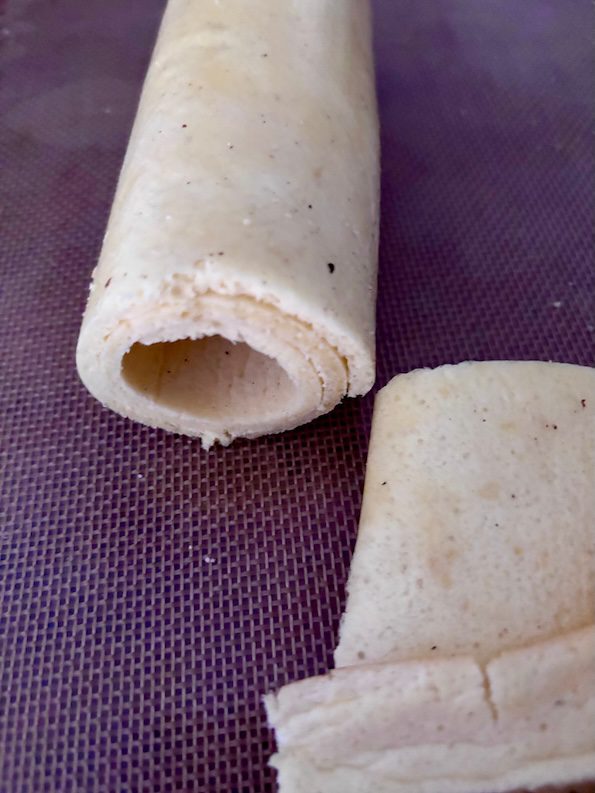
I rolled this one tight on a separate kitchen towel, but a fast shortcut is to roll up the peeled-off sponge cake on the silicone mat you baked it on. No kitchen towel needed.
Then it can be rolled all-in-one, and then clipped or tied up temporarily like a scroll to keep the spiral swirl shape, until it’s cool. 🍥
So you decide how you want to roll it up.
Tip: Roll it tight like a sleeping bag as it will tend to spring back some. Even for a spring roll like this one. 💕
So if you just keep in mind that A LOT of action critically happens with a sponge cake roll when it’s piping hot out of the oven, you’ll be golden! (With most other cakes you don’t do anything with it, until it’s cool.)
…So be ready!
And then after cooled, either resting at room temperature or chilling in the fridge, your efforts will be rewarded with a nice swirl if you’re lucky…
The final part is deciding what you want to fill your sponge cake roll in. You can do this in stages, like frosting a cake.
So you don’t have to make all the cake decisions at once if that’s overwhelming, or you don’t have a final sponge cake vision. You can keep decorating for the next day.
I often don’t decide in advance, and change it up as inspired with how I feel when it turns out. Then I decide the enhancing flavors and colors. It’s like naming your baby after he or she is born.
So you can bake the cake (with or without a pattern) and then decide on the filling and final zhugh (toppings) later. And that makes it your own cake personality.
Yessss!… It can be so much more than just cake. It can be filled with a jam or stuffed with whipped cream or ice cream… use your delicious food pairing imagination.
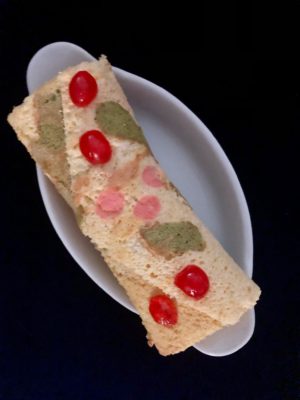
For my healthy tastes, I often like to use a thick Greek yogurt. But here I turned it into a raspberry jelly roll to keep it light. You can even make a chocolate balsamic glaze to go with melted chocolate…
This is a fun sponge texture cake that you can bake quicker than most regular cakes, and add your own pattern and flavors.
Course Dessert
Cuisine American
Author Brandy @ Healthy Happy Life Secrets
Equipment
Silpat or silicone baking mat
Baking pan
kitchen towel (optional)
baking spatula
Ingredients
3largeeggs, separated
1/2cupplain flour
1/2splash of lemon juice, cream of tartar, or white vinegar (for egg whites)
1Tbsporange or lemon zest (optional)
1tspbaking soda
1/8tspsalt (or pinch of salt)
1/4cupjuice (pineapple, lemon, or orange)
1tspvanilla extract
1/3cup granulated sugar
Cake filling (jam or Greek yogurt for healthier version)
Instructions
Separate egg whites from yolks. Tip: it's easier to separate eggs cold and straight from the fridge. Then let them warm to room temperature.
In a bowl, beat egg yolks and add in sugar. Add juice and vanilla.
In the same bowl, mix in flour to make a slightly thick batter.
In a separate mixing bowl, beat egg whites until stiff peaks form. Add in cream of tartar, lemon juice, or white vinegar to help stabilize.
Gently hand fold in fluffy egg whites (a little at a time so it's more evenly mixed in as the yolk batter is thicker).
Spread batter onto a rectangular baking sheet/pan with a silicone mat (Silpat recommended) or baking sprayed parchment paper. Level batter with a spatula or knife.
Bake at 325°F/165°C for 12-15 minutes. Watch closely toward the end/12 minute mark until the edges are baked but not browned.
Immediately or within a few minutes from warm-fresh-out-of-the-oven, peel off cake from the mat or paper. Then roll up in silicone mat (or a towel) into a spiral log. Clip or tie up so it stays rolled tight.
Let cool for 20 or more minutes at room temperature or in the fridge for quicker results.
Then cut off cake roll ends.
Add filling of choice (Greek yogurt for healthy). Plate and enjoy!
Notes
You can use all monk fruit sugar but it will not have the same texture as granulated sugar. Combining both can make a happy medium.
Work-Life Balance is the way for daily joy and a recipe for a more happy and healthy life.
…These days on those missions, workers are choosing work-life balance, joy, self-care, wellness, and delaying gratification of traditional retirement. Because our world has changed, and you can work anywhere these days.
And you can create your own job in the growing Creator Economy.
That’s one hopeful and healthy reminder that you can do anything in this Life. And a small way to plant your intention is by growing an avocado plant. 🥑
The easy steps are below to grow a healthy plant from an avocado seed. 🌱
Small ideas like this encourage our daily joy that help move you to take action (that moves the needle).
And if you’re at a job that started great and then took a downward spiral or is stagnant, you are not alone!
So many are waiting on their DREAM JOB to show up and out.
From my lens of holding dozens of corporate management positions, it doesn’t exist. I hoped and hoped… and still hope, but evolved into writing my own job description that has given me more joy.
And you can do that today wherever you are to gain your happiness without delay in your dream work-life balance life… and doing what you’re meant to do… creating, helping others, and solving world problems.
Without delay.
You can hit publish, empower yourself to step in, or pick up the phone and connect. The world is big and wide and you don’t have to look far.
Working for an employer is jut one way that helps you get experiences and learn skills while contributing your time, effort, labor, and mind. And you get paid in exchange.
But empowering yourself as your own boss in your domains is the cherry-on-top… where you get the best of all worlds and feel unhindered.
And when you think of it like that, you can create so much good exchange in this world.
And also always be useful doing meaningful work. That helps your growth.
And when work doesn’t grow or we’re no longer contributing, then we know it’s time to move on… and that’s healthy good for everyone involved.
…And if you’re like me, ormaybe I’m odd (or old-er 😉)… I never want to retire. I think work is part of purpose and the right kind helps us stay young.
Redefining work is where it’s at!
I believe you should love working your passions, interests, and gifts you’re good at that you enjoy.
Maybe because I’ve had so many experiences, both good and bad.
Early on, I loved my teen job where I had very little responsibilities.
That was good for that youthful time. I had fun. And the reward was development and growth and taking on new, impactful challenges while saving money to buy a car.
But I wouldn’t go back to that as I’ve outgrown those fun, no-real responsibility jobs. It doesn’t suit or align with my identity. It’s a mis-match like wearing Love’s Baby Soft fragrance would be.
And finding where you fit now is where you get the most out of this world.
At some point, you fully realize that you only have this one life you get and you won’t get this time back.
And that you have so much more to give than a lowly position that’s replaceable by another body or teen.
You’ve gathered experiences, and grown into a wiser brain that can be put to good use for the world you and I share.
In my walk, that’s the realization I had disappointment after disappointment collected, one job role after another for a couple decades.
I didn’t feel like my contributions and impact was commensurate to my knowledge and what I had to offer the world.
The corporate jobs at-hand sucked all my energy and most my hours for the week.
So I kept going and growing, even though the jobs looked respectable and good on paper.
And I eventually landed myself into freelance writing work the year of the pandemic when many of us career pivoted.
I also started this healthy and happy blog that year.
As a writer, I found work-life balance that didn’t just mean working from home. That’s one aspect or benefit.
It also meant choosing to prioritize health, and a healthy lifestyle over stress (high Pitta).
I could write all morning and then be ready for something else in the afternoon. I wasn’t chained to a desk or forced to attend office meetings that wouldn’t matter in a year (or sometimes even the next day).
There was work-life balance in every way.
I could find emotional freedom feeling calm during unplanned yoga time and not have to wait until later.
And I could run errands when others were at work.
I could also avoid public mobs and heavy traffic patterns that I grew up with in the DC metro area, that’s now the worst traffic.
And staying aligned, I vowed never to work jobs without some (healthy and happy) passion EVER again… and/or loving or believing in the people and mission I work directly for.
I realized work-life balance with PASSION WORK EXISTS where you get paid for your efforts. It’s not a pipe dream.
That was my new HIGH bar to keep reaching for.
…And I haven’t been disappointed putting in the risk and effort tradeoff.
And if you were to reach for your abundance and believe your dreams to come true, balance and passion work EXISTS for you!
You can leapfrog to work-life balance sooner rather than later in your choice.
…From those who did, I’ve only heard that the only regret they had was that they didn’t do it sooner!
Maybe that’s the motivation you need.
And helpfully could be for you… am I wrong?
Some are consciously walking off the job for their personal lives, health, and safety… choosing work-life balance and creating the life they want in work, life, and balance.
People on the job these days have to wear so many different work hats while multi-tasking life.
It’s no wonder so many people have ADHD signs, brain fog, and burn out symptoms that they need to medicate.
Today post-2020, it’s much more acceptable for us to slow down, take self-care sabbatical time, and pivot work and careers more often without harsh judgment.
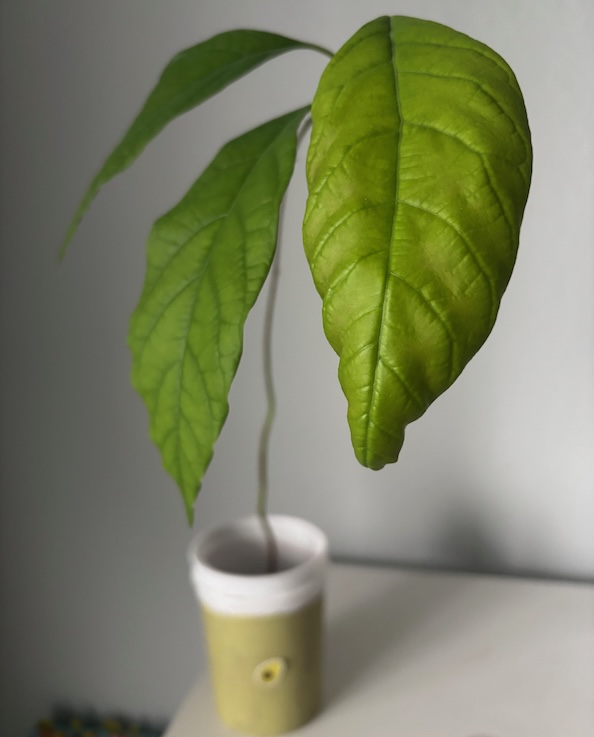
And in my work-life balance pivot to a healthy lifestyle, I started this hobby of growing healthy avocado plants as a metaphor…
How to Grow an Avocado Plant from a Seed (a healthy reminder for work-life balance)
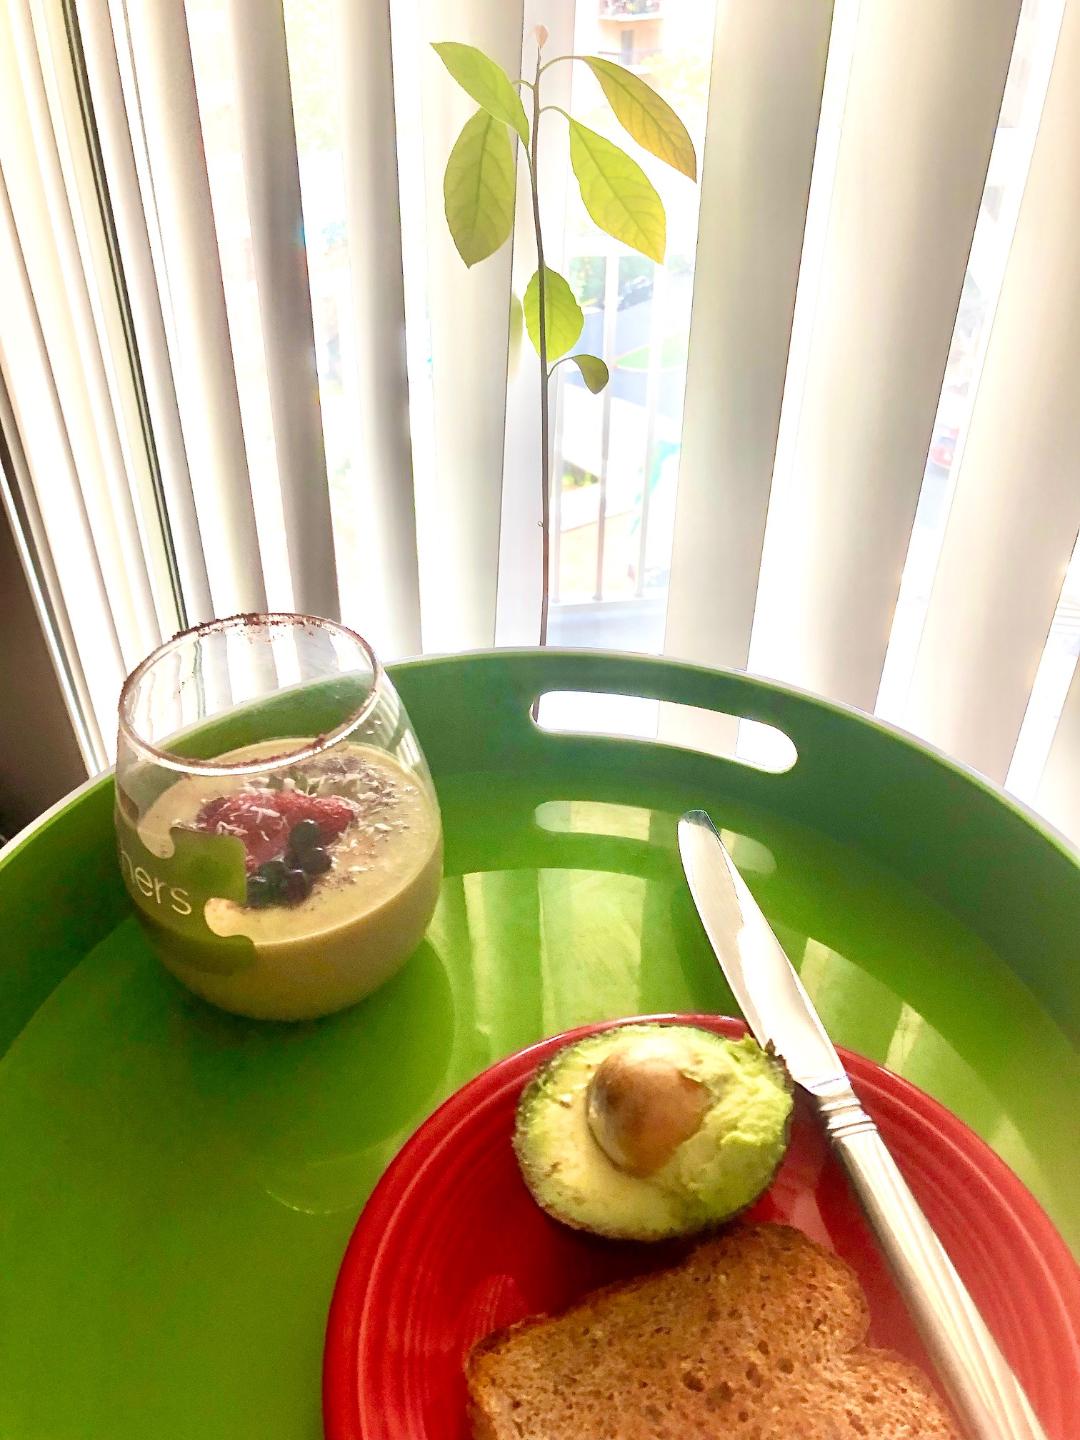
…One day I took a baby avocado seed and grew it to an avocado plant after my breakfast with a plant-based avocado smoothie.
It’s such an easy thing to do.
You don’t need a green thumb.
And the plant doesn’t need much window space or light in case you’re in an apartment with limitations like I was.
An avocado plant is like a Peace Lily plant you sometimes see in offices. They do not need a lot of natural or artificial light, so you can enjoy them indoor in a shaded spot. 🌱
These are the steps to how you get your plant going and growing:
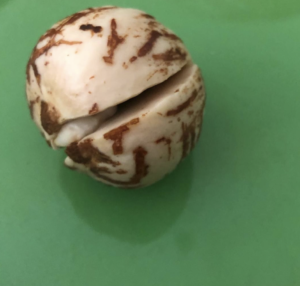
Rinse off your avocado seed. Peel off the brown paper-ish skin shell. I think this step gets often missed from others I’ve talked to. This helps to let the root grow.
Your nails are the better way to get the shell off without scratching the seed.
So you’ll want to do this when you haven’t just gotten your nails done. 💅
Then when you have a bald seed, you’ll see it bare looking like a peanut (light beige) color in a walnut shape.
You’ll want to fully moisten some paper towel and wrap over the seed, and then place the wet seed in a plastic bag and leave alone in a cool/shaded spot in your kitchen where you visit often.
Leave for a week or two, and then check in on it. By week two, add more water if needed. Keep it soaked.
After some more time, you’ll start to see a crack in the avocado seed and a budding root.
The fault line means birth is happening (a happy baby seed 🌱).
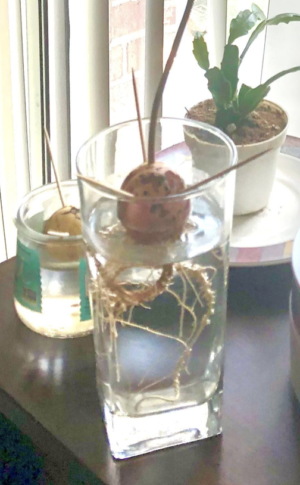
When the root grows to about a thumbnail’s length, place 3 toothpicks in the seed and prop it over water in a glass or cup with fresh room temperature filtered water reaching the root.
Keep it in a shaded spot.
Keep checking and filling up the water to about the same level, and changing out if it looks cloudy and has too much debris.
If you notice any root rot or slime, gently clean it off and you can rinse your seed off if the water gets dirty.
Gradually over the weeks and months, move your new baby avocado to a sunnier spot indoors. And when your glass is full and you have substantial roots growing, plant into a larger glass so the roots aren’t crowded.
The avocado plant is an amphibian plant (living in water and then soil).
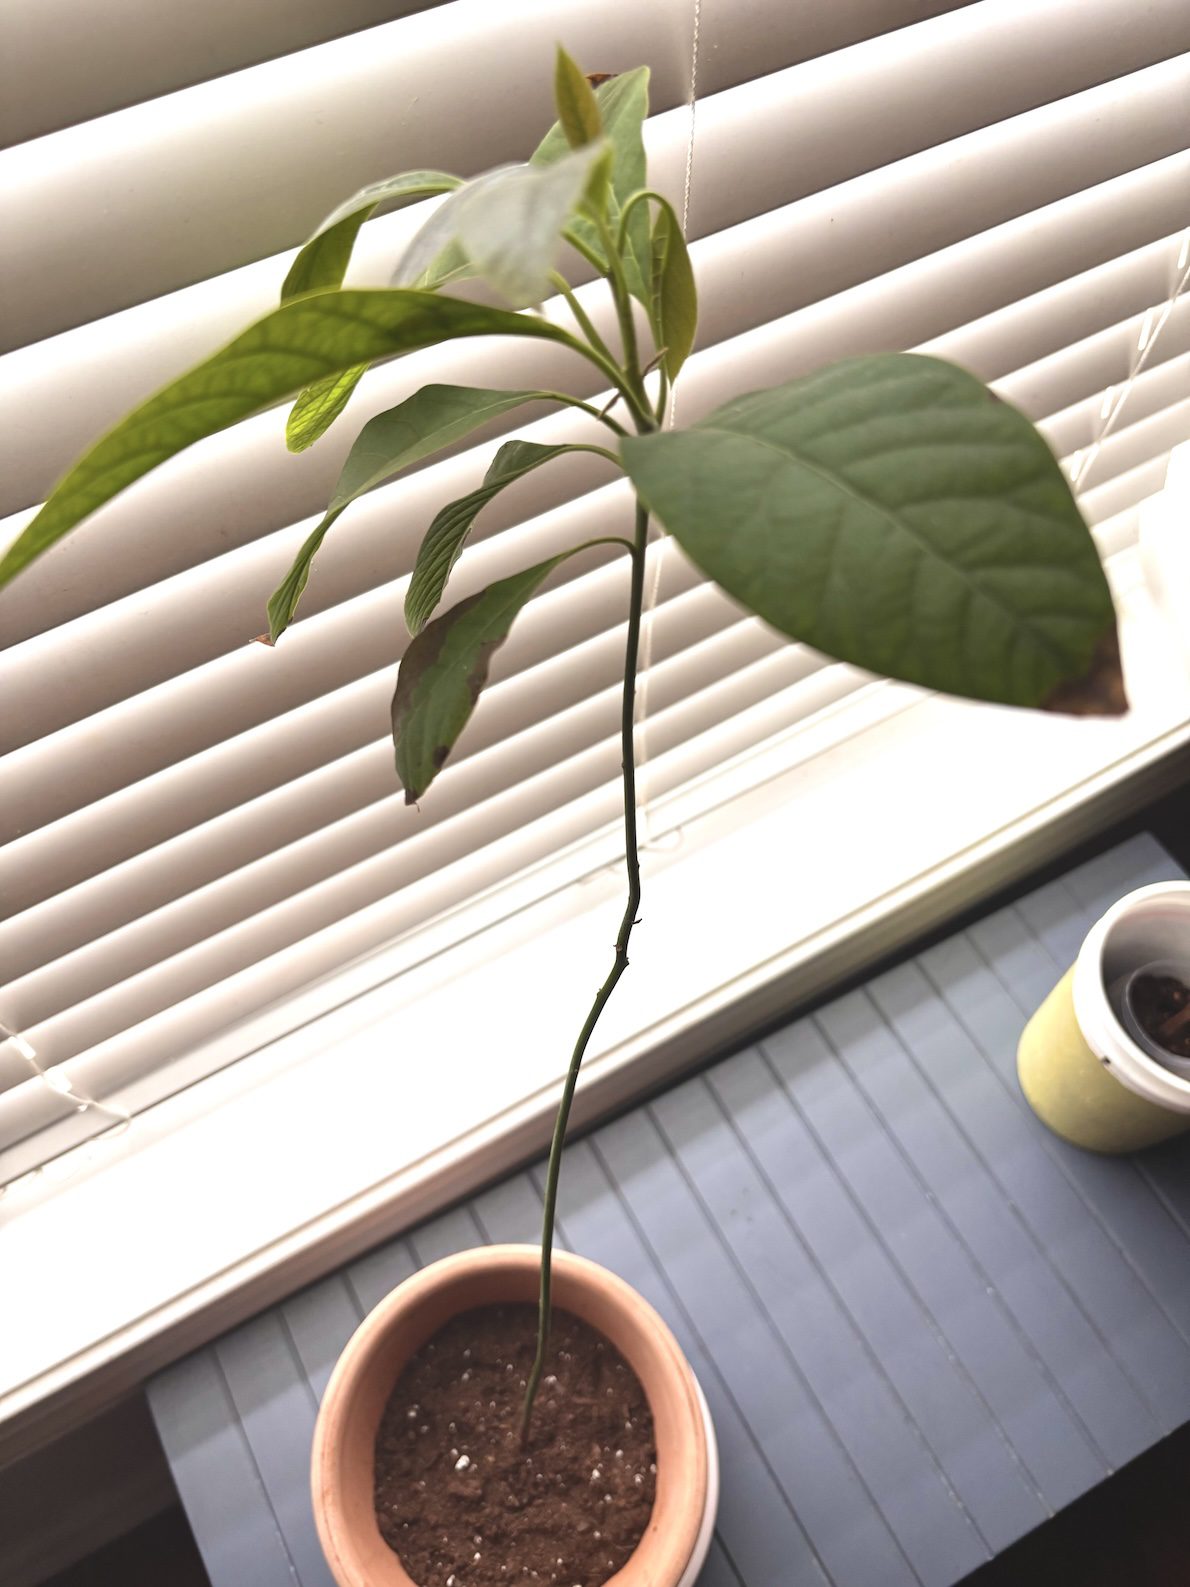
Eventually, after months or years will go into potting soil. I waited 2 years before planting mine in soil.
Waiting until there are leaves is a good idea.
Keep this article as reference, so you can review the steps (and not get too antsy to plant in a soiled pot). 🪴
And the longer you keep your growing avocado plant living in water instead of dirt, the stronger the roots get before you give it life on earth soil. This ensures stability for growth.
After a few months or so, you’ll see some good progress with green leaves and a stem that goes up and root that goes down like described in the cute All I Really Need to KnowI Learned in Kindergarten book 😉
A few leaves are the sign to add a pot with soil.
You can water every few weeks or less. Do it when you remember (ssshhh, talk about low maintenance! This plant is great for brown thumbs (🙋🏻♀️), lazy gardeners, or frequent travelers… and no worries, as you don’t need a plant sitter!).
Daily or weekly, check in with your plants when you can pause and work-life balance. 🪴 The leaves will tell you if it needs water.
After you enjoyed your avocado on toast or with a meal, you can plant your seed for an avocado plant for daily enjoyment. It's perfect greenery for an apartment or bookshelf where you can grow your own plant when you have a brown thumb or want to appreciate avocado abundance. This a great project for adults and kids! 🌱
Author: Brandy @ Healthy Happy Life Secrets
Materials
drinking container or glass
toothpicks
paper towel
Instructions
Clean off your seed. Larger round to medium seeds work better.
Peel off the brown outer layer so you see the bare seed flesh that has a peachy flesh color. Tip: Do this when before you go to the nail salon as you will need to use your finger nails. Knives and sharp objects won't do the job without damaging the seed. It may be easier to wet soak the outer layer first to make it easier to peel off.
Take partial paper towel and full soak seed with water. Wrap around the entire seed, but don't leave too much excess paper.
Place the seed in a sealed plastic bag (works best) and set in a darker, cool room temperature place in a place you don't forget about.
When the paper towel starts to dry out over the days, moisten with fresh filtered water. Keep repeating this step. One day you will see a middle crack in the seed. This is to allow the root to sprout and grow that can take a few weeks. Be patient! And if your seed crack breaks the seed (no worries and don't give up), keep the seed half that has the root.
When you see an obvious root bud growing, you can place 3 toothpicks evenly around the seed and set in a drinking glass or container with a rim. Glass works nicely so you can see the roots from the outside. Then add water so the bottom and middle of the seed is "bathing" in the water, but the top of the seed does not need to be submerged in water.
Over more weeks, you will see a green stem grow upward and eventually leaves will sprout (months later). Enjoy and keep adding water to your glass as your seed roots are thirsty. The roots will eventually outgrow the glass where you may then choose to transplant to a larger vessel. This is a great easy project for the Kindergardener in each of us where the roots go down and the plant goes up!
Fruit roll up is a happy memory from when I was a kid. 💭
They were a sweet and light snack from the grocery store that melted in the mouth.
It was (and is) a cross between fruit + candy.
They came wrapped up in their own packaging and were attached to cellophane that I liked to play make things with when I was young. They were rolled up like scrolls.
Almost like the Dead Sea Scroll minus the ancient writing.
…And not that far back, my young days was when posters were the rage so anything rolled up meant happy entertainment or enjoyment.
Playing around, I haven’t had a fruit roll up like those until now as an adult. 😋
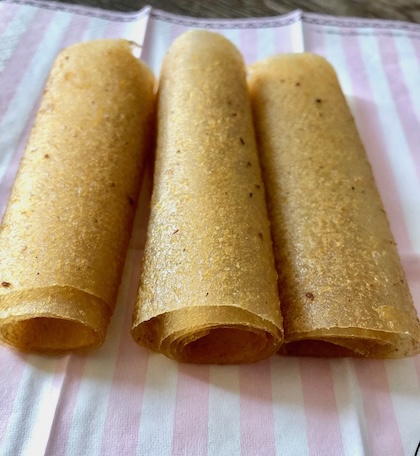
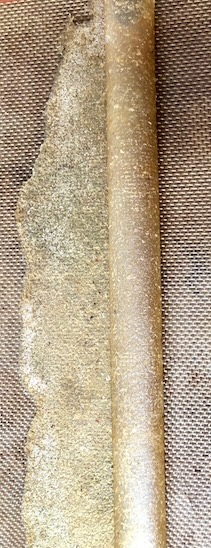
Decades later and these parchment paper looking treats are naturally preserved…
These were like the ones that ruined me to never want any other fruit roll up wannabes. 😅
These are the REAL DEAL.
Making these fruit roll ups bring me joy (...and maybe for you too?) because they resembled packaged old-fashioned fruit roll ups that you would buy at the store… minus additional sugar that’s not needed for these.
As thin as they are like sheets of music, these stack up nicely! 🪵…
Thin as paper and pretty as rice paper too.
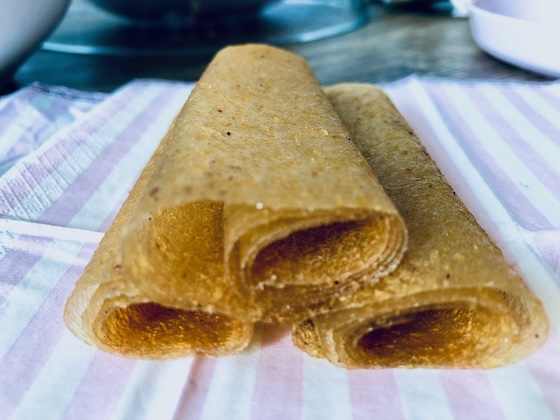
They’re as durable as leather.
Technically they fall in the leather fruit category but are as smooth and supple as suede.
My mom was a dressmaker, so she played a role in influencing my fabric choices where I learned lighter materials are usually higher quality.
And I’d agree about that with this light leather fruit material…
These feel light and feathery (not leathery) and are very apple healthy! 🍏
Plus, they last for weeks at room temperature.
Made with apple they are a great fall snack that can be made year round.
It’s almost like wrapping paper… or maybe it’s an old map or a key to hieroglyphic history. However you want to call it, it’s a SWEEET fruit roll up.
Oh, and kidding aside, the BEST part is (…can you tell I’m getting excited that it just gets better? 😊)…
You can make these in your home oven in one hour and 20 minutes with just 5 minutes of prep time.
How’s that for predictability?
…Seriously it’s that easy!
They are fun (and dare I say relaxing) to make and everyone of all ages will love them! 💕
They make a great sweet snack without any artificial ingredients.
And actually just 2 sweet and natural ingredients that make a perfect duo. 🍏🍯
Using applesauce, you don’t even have to turn the stove on to cook down apples and de-core them… and they will turn out even better. Because for one, the apple fruit roll up will be more even.
…The first time you make them, don’t freak out because they turn transparent on a baking sheet.
Don’t worry, it’s there. 😀
…I tried that once with Aquafaba because I heard you could make meringues that way… and POOF! I wish I could say that was magic, but it was more like a trick. 🪄
They dissolved into thin oven air… but I digress.
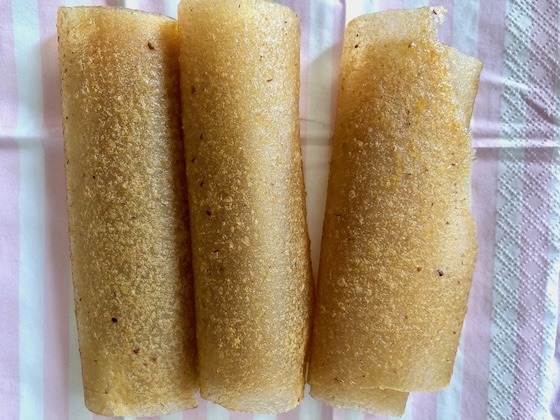
These fruit roll ups will turn out… I promise.
These are the proof…
I’m so happy to share these with you through the screen. And I hope they make your day like they did for me the first time I made them. 🍥
(And maybe this will keep the kiddos staying happy and cavity-free as low-sugar goodies with plenty of sweetness… that are substitutable for a certain candy holiday 🎃).
And if you’re into experimenting (like I am gladly doing with sweets), you can try other flavors.
Keep in mind they will take longer to bake with more complex ingredients.
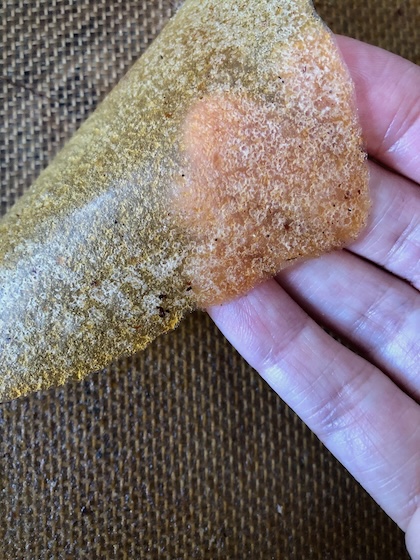
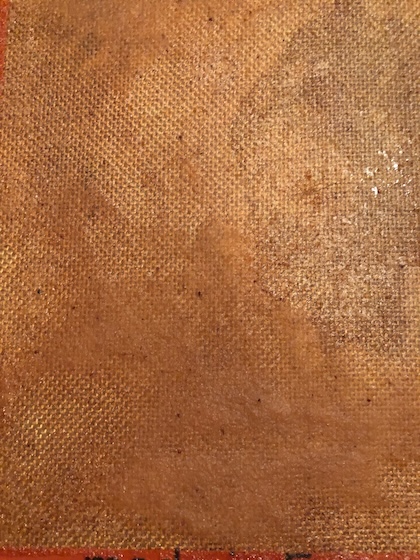
You will know when you touch or look at the baked fruit roll up whether it’s dry and done, or half-baked and almost there….
In this one, you can see here that the dry section is on the upper right area and the rest of the fruit roll up is not done… simply pop it back into the oven.
Change the time but don’t mess with the temperature.
This one took another 20-25 minutes to finish… and was worth the wait. ⏲️
These are no fuss-no muss apple fruit roll ups you can bake in under 2 hours. This will make 4 - 4 inch roll ups that are about 9 inches long.
Course Snack
Cuisine American
Author Brandy @ Healthy Happy Life Secrets
Equipment
Silpat silicone baking mat on sheet pan
Ingredients
24 ounceapplesauce cups, unsweetened
2tbspraw honey (high quality)
Instructions
Thoroughly combine apple sauce in a bowl and add honey. Tip: use a high quality honey with a smooth consistency.
Smear the mixture into a thin layer on a Silpat (silicone sheet) laid out on a baking pan. Tip: Use different light to check that there are no "holes" that show up with shadows.
Bake on 200°F/100°C for 80 minutes. Tip: if you add or experiment with other more vibrant colors and flavors, they can take significantly longer. You'll know it's completely done, when the fruit roll up is one uniform color and dry throughout to the touch.
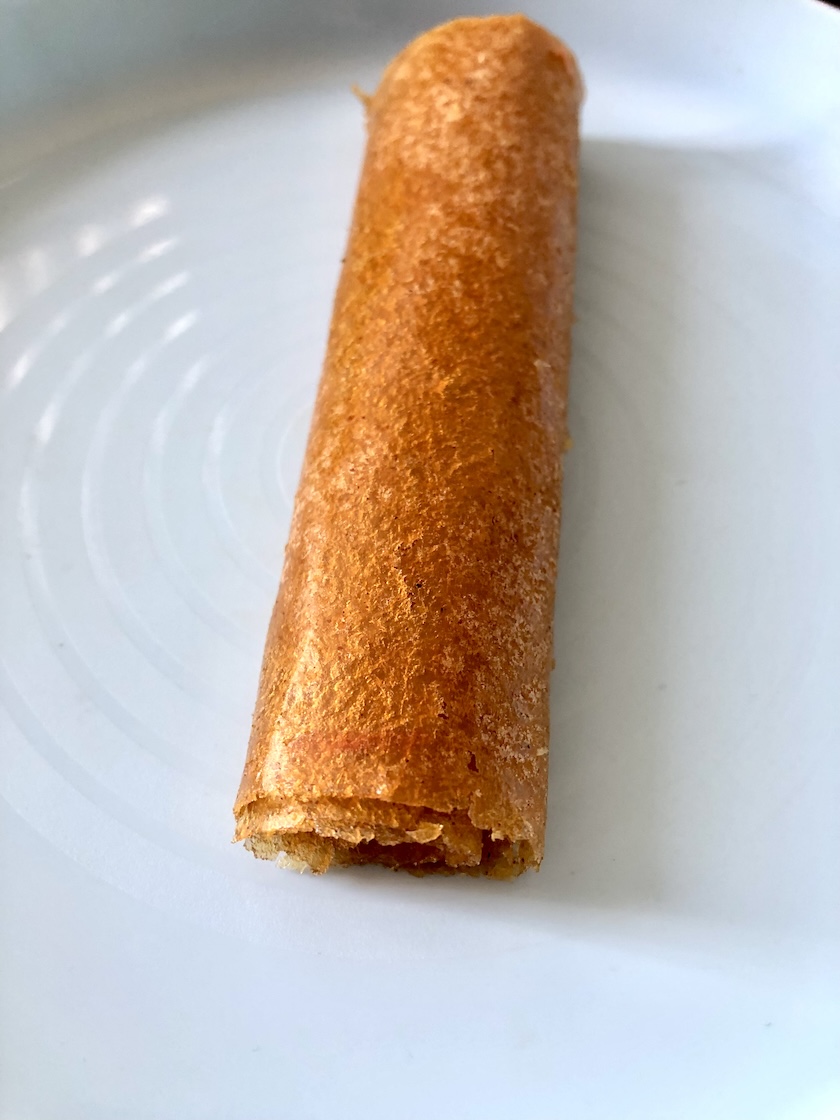
Let cool completely and then start to peel at one corner and then slowly peel up the entire fruit roll up. Roll up, slice, and enjoy!
The Great British Bake Off season means baking time, so that’s what this light-hearted foodie is sharing about today to lean into the happy! 😋
…And as a show fan, I get giddy like a school girl. I’ve even got my hair put up in a high up side ponytail like a teen to match my feelings. 🤸🏻
Oh, but don’t worry… this will probably be my only giddy post on the show if you’re not a fan (yet). I’ll be back on the healthy earth channel 🌱 next week… so stay tuned. 📺
…And tuning this week into The GBBO also known as the Great British Baking Show 🇬🇧 is the alarm for me (and us home bakers) that it’s time to fall B-E-ake!
But before we bake, can you guess what this is?
It’s NOT butter. And it’s not fondant even though it makes a good food illusion 💭… but neither are good to eat on its own so that rules those out.
…Well, hang on to your hat (for that finished thought), and keep reading as it will make more sense when I spill the butt-ah…
Btw… in the States, we like our good sense, scents, and cents, as we’re multi-faceted and have many preferences to show.
We’re similar to our neighbors across the pond where we have adopted some nifty baking ways. Isn’t that right, Rahul (our beloved Great British Bake Off friend)? 😊… and we love that! 🇺🇸
I also love that we get to idea mingle with our UK friends that unite the kingdoms through our grams (Instagram and convertable baking gram measurements). 🇬🇧
…and isn’t it about worldly T-I-M-E!?
Cheers! 🎉 (as in thank you in Brit-English and cheers 🥂).
Oh, and did I mention we’re getting mini-Brit speaking lessons from the show’s entertainment side? 🐿️
One lesson note-to-self: I’ll now know to bring more pants than trousers and trackies to the U.K. next time. 😉
But all-in-all, we have a lot and even more in common… both countries speaking some English-variety. We’re also closest in time zones when you consider the other Old World countries.
…And GBBO o‘clock 🕰️ helps us bridge the ocean divide. 🥧
But I will add… it’s a little weird seeing the show baked creations before the episode airs on Netflix.
…Ah, but a few seasons in… like most watchers from the States, I’ve gotten used to the spilled (butt-ah 🧈) beans. 🫘
Plus I grew up in the simpler dialup era so no complaints (not my style).
Which btw, I think I saw one of those ☎️ this week and a green sewing machine that brought me back to my youth where we had one of those in the house.
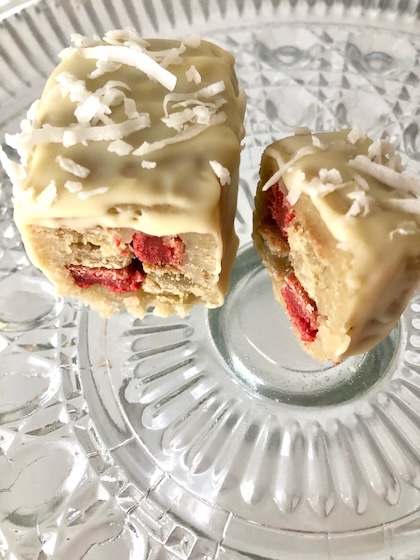
…Plus I learned a new mini checkerboard technique a.k.a Battenbergs that I heard about from the show. 🏁
And that’s what I was baking up this week in my no-pressure tent? 🎪 Well.. sorta, but not exactly!
…I get excited about sugar talk that goes straight to my head 💭… I forget for a brief moment that I’m a low-sugar baker in the comforts of my kitchen.
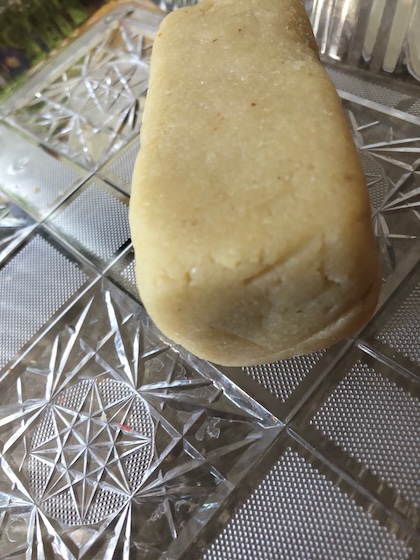
So swept back to reality, a MINI Battenberg marzipan dessert is fitting. Because a mini one has very little sugar.
…And this one is reaallly small! …Good for maybe a big Barbie food table.
But too small to bake a cake in unless you’re Barbie baking for Ken and then it’s never too small. 💖
But for the rest o us, an all easy marzipan sweet bite can be made in minutes. It’s like playing with Play-dough.
…So that’s what I turned my butter illusion into. And making a fancy pattern marzipan is still less time than baking.
But I couldn’t leave my oven cold.
Because butter talk inspires baking. Especially on The Great British Bake Off.
…So I made a healthy delicious bake, but instead of butter (or butt-ah) I used an ingredient you may or may not have heard of… MCT oil.
It sounds like a pharmacy prescribed oil, but it’s OTC… and healthy! Now we’re back on track. 🌱
The healthy fat food supports weight loss, helping the body make ketones for energy that then gives us more energy.
It’s a form of coconut oil that most or all of us know. 🥥
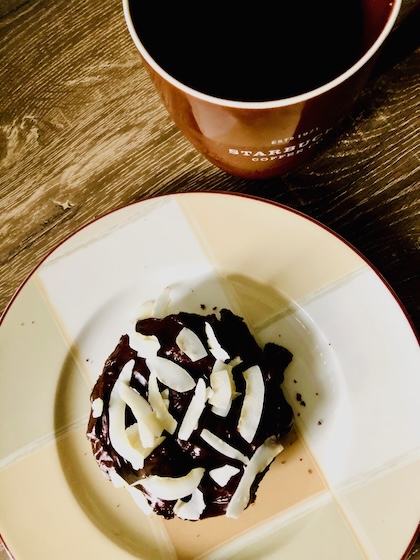
And so I thought only fitting to make a healthy chocolate donut.🍩
That was made coconut tasty with organic unsweetened coconut chips that also make delicious snacks on their own!
Healthy coconut flour was used to lean into the tastes of chococonut (say that 10 times). The gluten-free flour makes a denser no-rise bake that’s great for pancakes or ONE donut here…
…that’s btw how us baking peeps fit into our fave jeans so we can better thrive in our mind-bodies 😊 where we’re all slightly different tuned that’s good to celebrate in our turning world.
Speaking of jeans👖…my baking genes wouldn’t fit in The Great British Bake Off fiery baking tent. 🎪
The show competitors got that competitive gene.🙌👏🏽
…And it looks like all of them this season were very blessed.
For the rest of us, we’re watching TheGreat British Bake Off and doing our stress-free baking. And on that note, you can enjoy with a best melted chocolate dessert.