Journal ideas are a great way to grow in personal development.
And personalized gifts like journals with specific themes or words inside are unforgettable gifts.
I have a friend who has the gift of giving memorable personalized gifts (where she would write something nice or attach a thoughtful card).
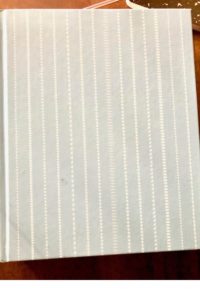
I knew she had the gifting gift from the first gift she gave me which was a blank hard-bound Hallmark journal with heavy ivory parchment pages (that’s thicker than resume paper).
It had this popular in the day vintage book pattern, but with a mint green color. I don’t think Martha Stewart would mind me showing off one of her cookbooks I’ve held onto.
I remember my friend even said she didn’t think I would like a diary with a locket.
Looking back, journal ideas would have been different when you know it wasn’t read by someone else.
Those were the old-fashioned letter and journal writing days for memories.
Today, journal ideas on paper are good for purging emotions and a form of meditation. They are productive way to release thoughts and feelings, gain revelations, and a quiet practice to slow down.
Journal Ideas for Personal Growth
If you’re feeling stuck in life, writing in a journal or composition book… or typing thoughtful words on a computer is a great exercise to help you gain clarity.
It’s an easy action step that can give you the next breakthrough.
And you feel accomplished and calmer when you address areas of your life you may not have if left in your brain.
Journaling can be a good means to an end and help process what you haven’t figured out just yet.
Written details bring out solutions.
Gratitude Journal Ideas (#1): So one area you can start with is appreciation.
You can write a gratitude journal that lists out what you’re grateful, small and big.
So if someone showed kindness, you could write that down. And your mind will blow that up.
After then after you process or noodle through your journal ideas, thoughts, and feelings, you don’t need those in-between or bridging memories anymore.
So you could toss them out in our growing paperless world, and that can be freeing like burning a piece of clothing that you no longer wear or an old identity you were holding onto.
You can use prompts like:
I am grateful for ___________ today.
I appreciate _____________ in my life.
Revelation Journal Ideas (#2):
Reviewing your old journal writing you wrote can be eye-opening and fun.
You can laugh at life and discover who you’re becoming.
We are meant to grow and change.
You’re no longer in the process of where you were when you wrote the journal entry.
Your habits have changed and you’re in a different season.
the sadness stings or hardships have changed and hopefully lifted.
Some things you wrote could even put a smile on your face. Some are worth repeating (like re-reading) for the laughs.
And some journal ideas could be reminders for a future dream you can pickup today.
Prayer, Quotes, and Hope Journal Ideas (#3):
Using Scripture, quotes, and heartfelt mantras can be super helpful for uplifting, encouragement, and reminders that we all need.
They can get us to our next moment when situations are tough.
We can lean on others’ ideas that helped them through similar troubles that got them through.
That adds a ray of hope. 🌅
And you can use your journaling for shadow work. Sometimes we didn’t get what we needed in our past.
So we can add reminders like:
I am loved.
I am never alone.
S.W.O.T. Journal Ideas (#4): Using the SWOT Method In Your Journaling
S.W.O.T. stands for strengths, weaknesses, opportunities, and threats.
SWOT is a tool for strategic decision-making that I learned in my later college years.
We drew a lot of grids in business school and this one I’ve used for many areas of life to slow down and make decisions without regret.
I’m more practical than impulsive, but this is also great for those who are.
When applied to a writing tool, like in journaling, it can help you to process thoughts and evaluate from a more objective (higher) point of view.
You can count the pros and cons (and probably save time and money from hiring help) to make better decisions.
It can help you slow down (to ultimately speed up) and help you avoid making a wrong choice.
You can start by thinking of what your current strengths and focuses are today.
And then, what could hold you back (weaknesses and threats) from going all in?
Sometimes you discover it’s nothing or it something you can grow and change in you… that’s the best kind of SWOT journal ideas…
Then write what opportunities you have to move forward on.
Look for answers to know where you’re headed in your destiny and next steps.
If you want to transform your life, and you don’t have a chance or want to take a radical sabbatical now, you could meditate and journal for a few minutes a day in this season that can help propel you into the next one.
Low sodium healthy soup is easy when you make your own!
I have 3 recipes below with carrots, mushrooms, and potatoes that you can make (with low sodium and sea salt if you like).
Before 2020, I never made my own soups. And today, I only keep a backup can in my pantry.
And you can too!… if that’s what you aspire to even if you don’t know how JUST YET.
But with delicious plant-based ingredients, you can make soup broths that you easily turn into clam chowder with a potato soup base.
You impress yourself and everyone you make the soup for!
After you learn to make homemade soups in simple steps, you’ll probably not go back to store soup cans as these have delicious natural flavors without all the sodium!
And you’re doing your body healthy good. And probably saving a few dollars if that matters.
And these are the 3 easy healthy soup recipes I’m sharing below:
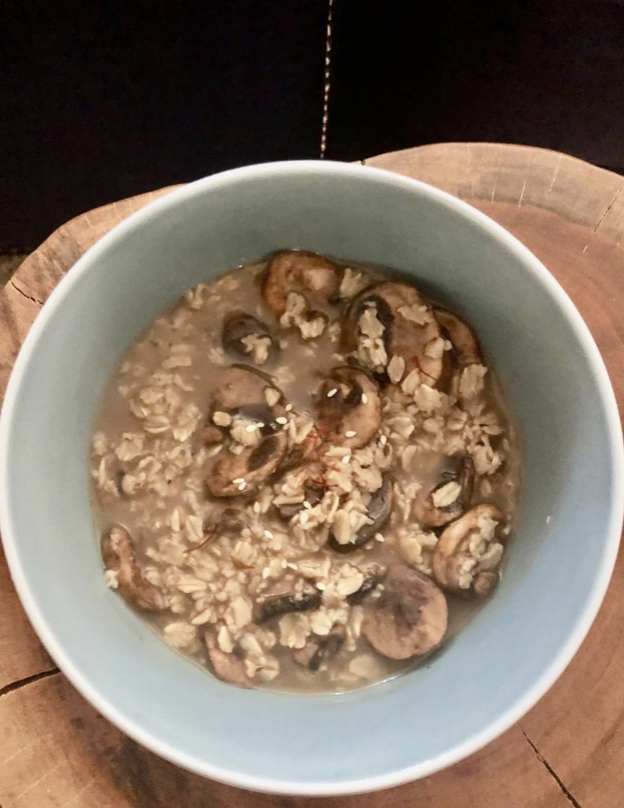
1. Mushroom soup (with old-fashioned but not-out-of-style oats)
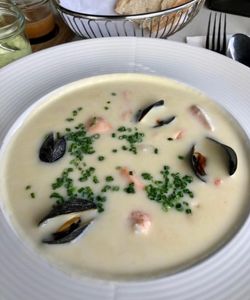
3. Clam chowder (New England style that’s my personal favorite made from potato soup)
At this time, I’m involved in a Beta chef’s cooking healthy eating group collaboration with RDs that provides culinary teaching and recipe input to a healthy strategy program.
I love food, and my background includes working with thousands of party planning events (and started my career in hotel catering that you already know if you’ve been reading some of my previous blog posts).
I’d hardly consider myself a chef-ette, but I have always had an adult culinary arts interest. 🧑🍳
…after hotels, I left the hospitality industry and went into more traditional Corporate America work, and then came back to the hospitality working world doing Mediterranean-cuisine (Lebanese, Spanish, and Italian) event planning for about a dozen foodie restaurants.
That’s really when my good food (gastronomy) tastes and senses were re-ignited and I had a chance to re-marry with my “food is medicine” approach to life.
And marry salt from two food worlds.
Salt Talk For Your Low Sodium Healthy Soup Making
For soups, I avoid iodized salt. I don’t usually add table salt (like the ones in the packets) unless that’s all that’s available and the food isn’t already salted.
I alway buy “unsalted” ingredients when given an option.
If you eat out or eat prepared foods from groceries and restaurants, then you probably get enough salt. And probably more than enough salt in our highly processed foods.
On a DASH diet, lowering sodium is the recommendation.
When I’m cooking, I use sea salt (non-iodized) for everything and everyday use.
And then I use coarser natural sea salts like Celtic sea salt (or Himalayan or fleur de sel) for preparing meats to be baked in the oven, and for certain cooked vegetables.
Celtic sea salt is great for your rubs and on top as a garnish (not so much in mixing). The crystals are larger so they don’t blend as great as smaller salt granules. And I also Himalayan sea salt for additional healthy minerals.
And the gastronomic person in me, says coarser salt is absolutely necessary for the right flavor and texture on veggies like Brussel sprouts and edamame if you want a culinary meal experience (and not a bland one). Salt is as important as the veggie itself.
You can get away without using salt on certain veggies like broccoli or okra that hold their own tastes. If you add them to soups, the salt is usually already added.
So here are the 3 easy healthy soups that’ll help you with your salt cravings…
Cook mushrooms in a pot of covering water until soft, and add slow-cook oats. Mushrooms are immune-boosting and are alkaline. Cook until mushrooms are soft.
If you want, add a drizzle of cooking sherry, truffle oil, and saffron to get culinary fancy and balance umami tastes.
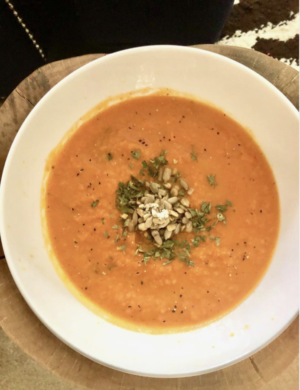
Cook carrots on medium heat. When soft, mash carrots. For smooth and easy-to-make soup, sdd to your Magic Bullet or blender and pulse a few times until it's to your smooth texture liking.
Add ginger spiced and chopped ginger bits (if you prefer for a more pungent bite good for Kapha). You can also use ginger juice for less chunks, and spices.
Zhugh with sunflower seeds and dried parsley if desired.
Cook carrots in water until soft, then mash and grate or squeeze ginger juices in the soup. You can finish off with alt-milk for a creamy-effect or just leave as is. That’s probably the way a.k.a. without ginger I would’ve preferred as a child 🧒🏻).
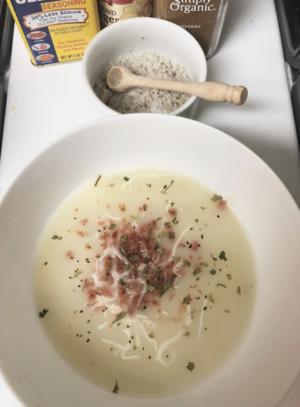
Easy Potato Soup or New England Clam Chowder
This low sodium healthy soup is easier to make than you may think! You can make delicious chowder from a simple potato soup base.
Peel and cook common Russet potatoes in a pot with water. You would do the same step if you were making mashed potatoes.
Then decide if you want a creamy soup. And if you do, pour out some of the water and then mash potatoes in the same stovetop pot. Still with the stove heat on, add in your ready-to-eat clams (3 large potatoes to about 5 ounces of clams you can cook or use a can).
I like to zhugh up with aromatic herbs, either fresh or with ground herb spices like cilantro, parsley, oregano, and/or basil.
If you’re not sure if you should add any herbs into your soup (if you’re feeding others), then parsley and thyme spices are less strong (more universally likable) and can be added in of left to individual tastes.
Potato base soup
If you’re looking for a few easy-to-make snack ideas to go along with your healthy soup recipes or just to eat on their own, you can try…
Another different twist and take on changing up tastes, is this idea… instead of adding salt, you could add a ‘lil vinegar to your potato snacks and soup.
I like to add ACV vinegar but you could also try malt, red, or white vinegar… they’re healthier and also give the food a bit of a tangy bite.
I like to also add my daily spices (turmeric, black or white pepper once in awhile). I skip needing any salt after all those changes 😉.
So hopefully you are soup-er excited to make your comfort homemade and easy healthy soup recipes, and maybe you even choose to change up a way that you snack.
When you get tears of joy (😂), your body is set in joy motion. You feel something and that can get you to move and take good action.
You get to experience freeing moments like you’re on top of the world, and your mind is joyfully elevated. This helps your mental health and outlook. And when your mind is happy, your body feels the connection. That’s Ayurveda in a nutshell.
Well… except it’s not that cut and dry (…I don’t think anything is these days). I wrote some personal notes below at the end of this post, from over a decade of intentional-balanced and healthy-minded living
I think it’s safe to say, we all have different body goals. One of mine is to stay looking young for as long as nature will let me. I can’t stop gray hairs from coming, but I can avoid the stressful grays that started in my mid-20s.
And our preferences are different, like in music…
For me and maybe for you, that can be in listening to a song that strikes a chord inside, like Adele’s emotional songs or the empowering words from a Lauren Daigle song.
Lyrics matter to me more now than they used to when I’d hum along to anything that had an upbeat vibe. It’s a good idea to be choosier about what we put in our minds (and body) if we want certain results.
And in modern Ayurvedic living, you choose as it’s not rules-based but certain practices work because the body is intuitive.
In other happy moments, seeing someone else happy can leave us smiling. Or when they have tears of joy, we do too.
And in another moment, that could be laughing out loud (does anyone even use LOL anymore…besides me? 😊).
And btw, I get a good laugh in watching The Great British Baking Show. I’ll spare you the witty, but clean jokes swirling in my head. But, that’s what sets it apart from every other baking competition. It’s standup (filmed) comedy or silly, tongue-in-cheek banter… oh, and beautiful bakes too.🍥
And it’s easy to love and relate to all the friendly contestants (and be glad you’re not under the pressure!). Read-dy?…Now Bake.
Just kidding. (I can’t say lol since I just called myself out on it).
But, anyway… in life, you’re usually witnessing your life from and with other people even if it’s through a computer or television. Even if we feel like we live in a bubble, our energy permeates through social media and our connections made. It doesn’t take a plane ride… it takes nanoseconds for our energy and atoms to travel.
And that’s the relational power we have in this life. Along with our connecting breath.
Next time you think about it, pair your tears of joy (or routinely adding daily eye drops) with a special breathing exercise called Pranayama, that’s a controlled way of breathing.
Here’s how you do Pranayama breath. Blow out all your air through your mouth. And then inhale breathe in a big gasp of air through your nose. Hold your breath for about 6-8 seconds. And then let out a big exhale through your mouth as you had started with. You can feel a burst of concentration/clarity in your mind. The mind fog is lifted (even if it’s temporary) and it can feel like you just had a shot of espresso or strong matcha tea.
In doing the breathing exercise, you’ve just relaxed and massaged your body from the diaphragm muscles to your vital nerves that impact your brain, breathing, and the body parts that regulate your stress. Sounds like a big deal… it is.
But we forget. And living in purpose is everything to intentional balanced living.
You get to feel alive! And that may be the that’s-what -I’m talkin’-about prescription you need, especially if you have constant stress in your life. You can try to find areas of life where you can shed tears of joy.
You can practice breathing purposeful daily wherever you are, so remember to do this regularly or when you next feel anxiety or a breather moment.
This can be another purposeful move where you step outside where you spend most of your day. Like when you’re out and see a work of art that moves your heart and stirs your soul. That can be from nature or something that is living and breathing like a baby-making cooing sounds or a dog with a wagging tail you see walking outside.
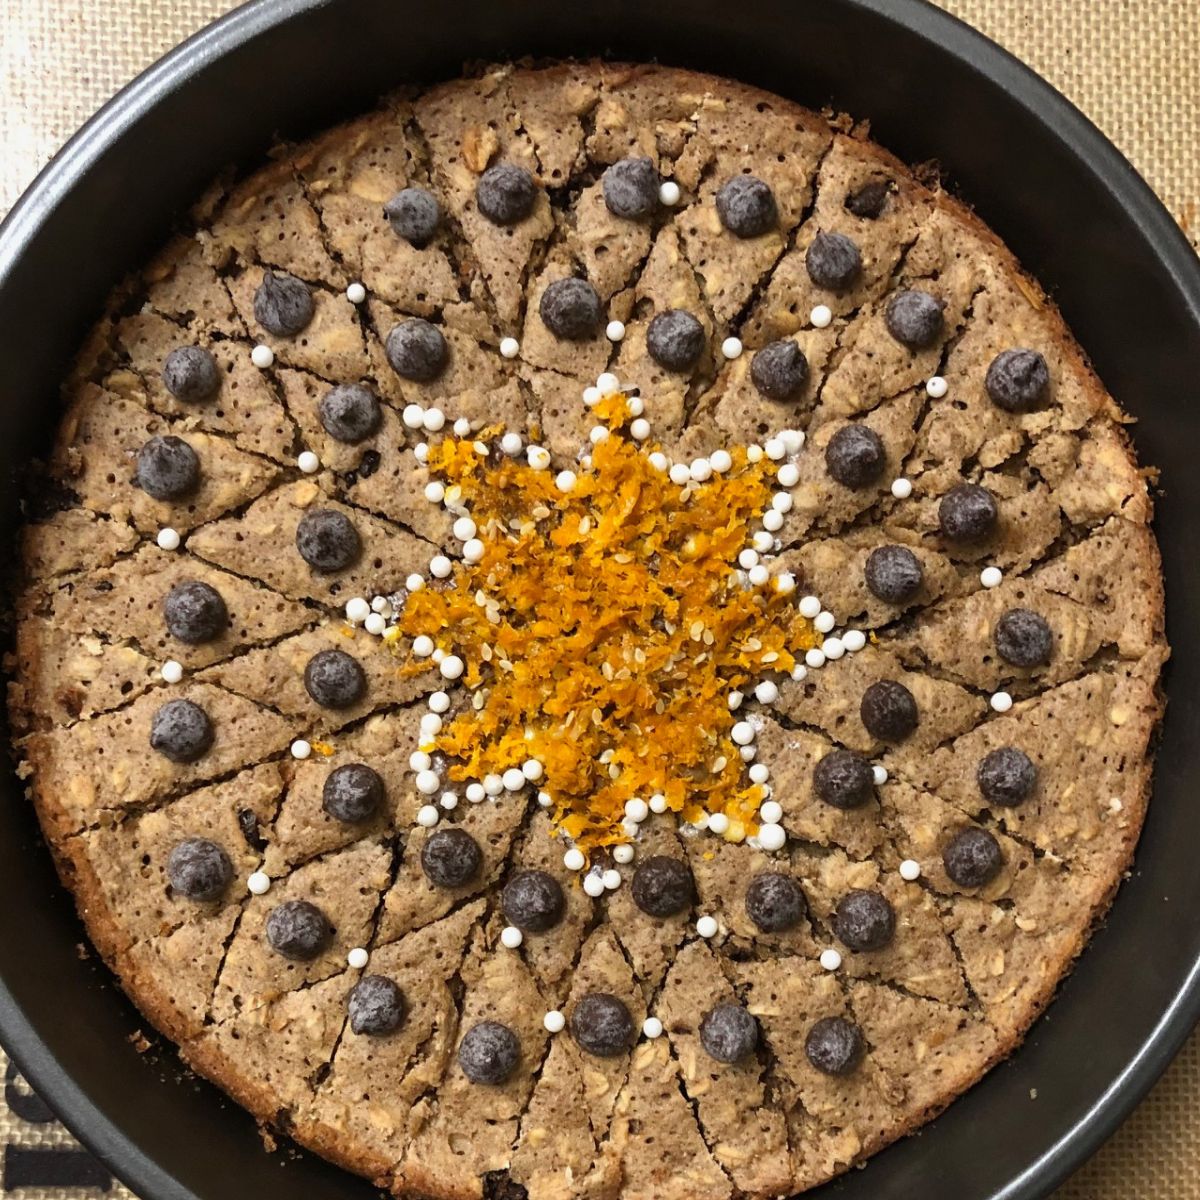
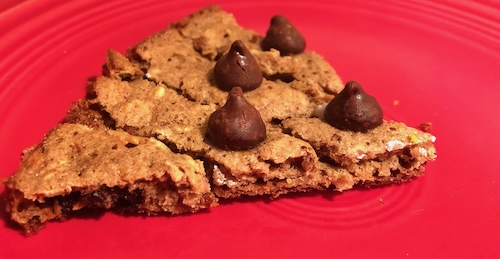
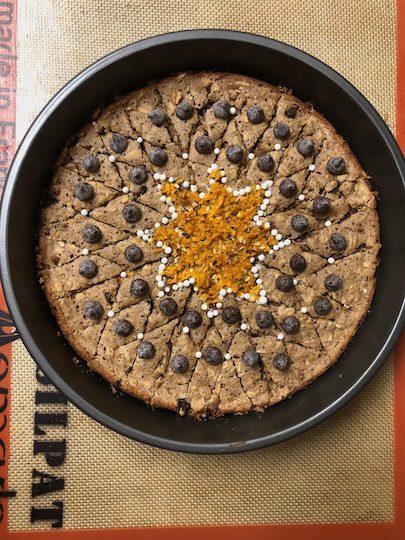
Chocolate oat cookie with an orange center is one delicious cookie that can be shared in a star formation.
O-range you glad?
Below is the cookie pattern and tips to find your purpose from passion and in life’s patterns.
Because passion is a sign you’re on the way to your life’s work or purpose.
My food passion led me to these cookies I baked, and started out as a catering manager for a DoubleTree Hotel, as full circle. 🍪🍪
Star design chocolate oat cookie recipe below. 🍪
But I believe…
We all have a second act in us for a passion purpose in life. And that’s how I felt when I started to question the culture we live in and our individual purpose.
The longer you live and explore the full possibilities, you get to see and decide if you’ve been looking out from the wrong lens in some areas of your life, like a passion purpose in life. ✨
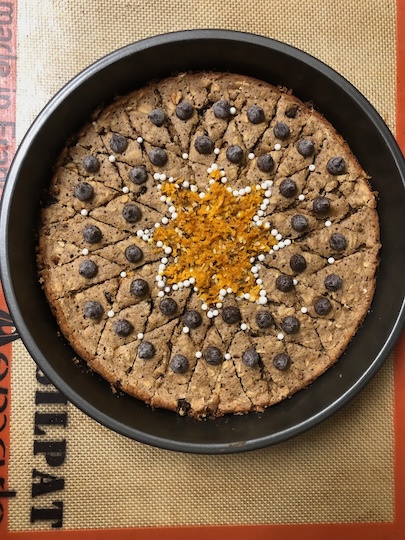
You can use the star cookie pattern as a guide or inspiration. 🍪
This is a cool kaleidoscope geometric star pattern you can add to any cakes, brownies, or soft cookie(s).
Author Brandy @ Healthy Happy Life Secrets
Equipment
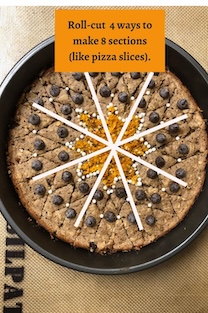
pizza roller/cutter or knife
Instructions
Make 4 cuts to make 8 pie shaped wedges.
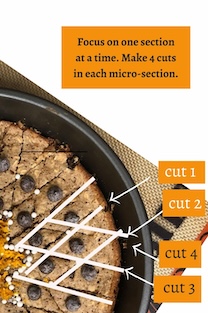
Within each wedge, make two parallel diagonal cuts (see photo).
Do this for each wedge until you're done. You will end up with a kaleidoscope star pattern that's tear-and-share fun and easy to eat.
You can walk into your passion purpose if you take strategic steps (and that’s what this blog post is all about).
I’ll start with my humble adult story…
I got married later in life (at least I thought).
I didn’t enter marriage in my twenties (something I recommend waiting on). Like most, I went through big changes from 25-30.
That’s pretty typical of getting your feet off the ground as a newer adult.
By 28, I kept getting the same answer back that I was changing and trading in my caterpillar feet for wings. I didn’t know what I didn’t know and my 180-degree career switch in high-tech data (from the hospitality business) was a metaphor.
I knew that if I wanted any semblance of a life outside work like my business college friends had, I needed to jump ship into different waters.
I had no idea how and had no real job connections other than the internet. There was no LinkedIn, lol.
But I knew that if I took the risk, then a new door could open. I believed whatever direction I was headed in would happen without yet knowing why. And it did.
I experienced what work-life balance was for the first time. I also got married.
And I had time for relationships and self-care. It didn’t take long for me to realize that I still had a past that I hadn’t addressed but was affecting the way I thought and acted, especially in my marriage.
At that time, I didn’t know childhood wounds existed into adulthood as PTSD.
I didn’t connect-the-dots to how events from decades ago could show up in my marriage. The brain is messy and complex like that.
It’s easy to stay unaware about the lens from which you see out into your life (and even these days in a more open and knowledge-aware society). And that affects your daily thought life and outcomes.
It’s a lot easier to be critical of others and notice how they behave that’s different than you.
And if you’re married, you’ve probably been tested, as marriage like no other relationship will make you go into deeper places you’ve never explored. You’ll meet each other’s ego.
Intimate bonding will highlight those insecure dormant spaces that need addressing like a UV blacklight spotlights stains.
A marriage relationship can make the partners want to fix everything that’s not how each would have done as a single person.
Marriage can be a tough bootcamp and why it’s such a great training ground for personal growth (and I’m all for it!).
And so is building a business from a passion purpose in life. Even though not everyone likes that kind of testing ground to move up.
And that described what I experienced. Then years later, I lost my work-balance job from a massive corporate layoff.
And my marriage came to a peaceful screeching-halt end suddenly. And the business foundations I started, crumbled.
I relocated back to where I grew up and started over with a more mature lens. These events eventually helped me to find my individual purpose.
It started with a blogging journey back in 2009 and then put aside for about a decade. That was my passion purpose in life then.
And one day, I started writing a funny lesson learned story from a hot tea kettle burn on my finger. I submitted for publication and have never stopped writing since.
Long story short, writing never left my veins. And in the messy middle (by design), I found the path leading to a passion purpose in life.
And this leads me to 3 ways I can share (from my journey) how you can walk into your passion purpose this season.
Start Over (Finding Your Passion Purpose In Life Could Depend On It):
Don’t be afraid to start over.
Be okay with the unknown as all of life if you think about it is uncertain. Taking gut and heartfelt risks is worth the chance!
If the timing is right, be brave, and don’t look back (at least not at your decision right away). You’re wisely guided internally.
It’s easy for any of us to wrap our identity in jobs and titles and rationalize why we can’t leave (they’re handcuffs whether they’re golden or not).
In my case, I grew up and worked in the most politically powerful and driven metro mover-and-shaker Washington DC culture, where people will run circles around you if you don’t pull over or speed up.
And I’m convinced it’s the area where the corporate rat race phrase came from 😂.
In my corporate work, I quickly learned that everyone working for someone is replaceable. And lessons learned yearsss later, that letting go of the fear of losing a job is so freeing and liberating. And not something to be scared of. It’s the ticket to your personal happiness and success.
When I was laid off after six years of success at a corporate job, I was literally in shock. I mean, one day your job existence is there, and then POOF!… the next day you wake up and it’s gone.
If you purposefully stay in the mindset of choosing to design your quality life, then you’re always nimble and heading towards your north star pointing passion purpose in life.
The uncertain journey isn’t prescriptive, all roses, or without doubt, but your creative purpose is in there and you can eventually do what you love and love doing (or else why pursue?) even if you’re not creative.
We all have a passion purpose in life. In This One Life.
Plus, in control of your own destiny, you will never be bored! Getting there may take some years, wrong turns, and grit (almost an inevitable formula for the best things in life!)… but it’s so rewarding and worth the effort.
…If you’re starting over, that’s a sign of growth into your purpose. New starts can be a deliberate choice, but often you’re blindsided with a job or relationship loss or change, health scare, or an unexpected move.
Anything can happen suddenly, even though it could be years in the making. You could become a 10-year overnight success (or land your dream job) with a new starting point or unintended re-route.
When there’s a fresh new beginning, your senses are heightened and you soak up more like a sponge. You feel life (and alive)!
The alternative is staying on the comfortable course. When life is busy, in the messy middle, that is when you can grow comfortable… until you’re not. Life doesn’t work the way it should. You feel stuck. And maybe discouraged.
Those are times you look deeper inside yourself and into what else you got in your bag o’ tricks. And you’ve got so much more than you know today!
You just have to start digging for your today passion purpose in life that can change tomorrow.
It’s actually more methodical (than scary) and sensible if you think about it… you only get this one life to do what you want with it.
Look at those on America’s Got Talent.
They’ve worked so hard for decades on their talent that they started from nothing but an idea and a dream. 💭
And they’ve failed forward plenty. But they didn’t give up.
…And they know each fall and fail is one step closer to success. And when they end up on the AGT stage, they never look back. And their big break success takes off.
Starting over may be just what you need to go to the next level in your unique part of this life.
After you meditate, think, or pray about it, and you get a form of A-ha confirmation that excites you and makes sense to you for that next step, then you and the shining Galactic Universe celebrate with a burst of fanfare (a new kind of Big Bang theory 🎉).
And when you go all in, they and all your support fans in your life will go to town to help you in your belief. You figure out your unique unstoppable path. And what you were destined to do.
So these are the steps I would recommend (and I did to find my self-taught writing passion):
Discover Your Hidden Talent(s):
Maybe you have started an interest years ago that you never fully saw into fruition, and now is your ripe time. Or you want to know what your hidden talent is if you have uncovered it… you DO have one (and probably more than one).
That I’m certain of!
If you want to know what that is, then I encourage you to keep looking and more deeply as it’s there on the tea leaves and in between your yoga poses if that’s your jam.
You can also find it in your hobbies, interests, and activities you’ve dabbled in that excited you for a day or a season.
Those outlets and past times made you feel good, and maybe even felt a sigh-of-relief from life’s busyness and stressors.
We all find time to do the things we want and love, even if we’re SUPER busy. It doesn’t have to be just one interest, as it can be a category especially if you’re a Vata and like to multi-task…
Such as, when I was in corporate work, I’ve always had a side interest in scrapbooking, painting art, and creating (anything) where I got lost in my project…
This is my graphical representation of the show 🍰
And that’s what The Great British Bake-Off (or The Great British Baking Show in the U.S.) past and present contestants do. They have day jobs and baking is their side gig or hobby, so they are on the show happy to be there. It’s another outlet for them.
OK, I have to pause the serious reel here for just a minute ⏳… I was laughing so hard over the baking show comedy last week in the current episode series. Are you familiar with the show?
…If not, I’m gonna give you a 30-second program interrupt and let you in. 😊
The comedy is there in every episode (it’s not hard to find like your hidden talent can be, haha.)
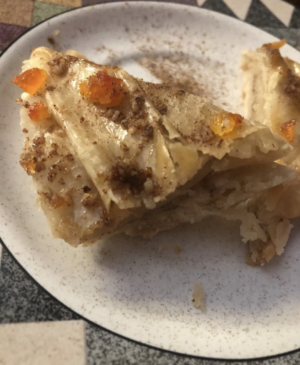
…And there’s a funny sound bite clip from one show episode that I’m reminded of where the contestants are tasked with making baklava and phyllo dough during Pastry Week.
One of my favorite contestants from the season episodes, is Giuseppe who mentioned he had never made either before because it’s a hassle and easier to just go out and buy.
It’s funny on two levels because 1) with his lovely and classic Italian accent, it sounded like another English word to Matt (one of the tent sidekicks) he was talking to, and 2) because the challenge was for him to make the painfully hassle-filled baklava under 3 hours, and cut in a star design (pattern below 👇).
Btw, the star pattern looked a little like this healthy inspired chocolate chip oatmeal orange cookie I baked from show inspiration (it’s as good as the DoubleTree Chocolate Chip cookies I used to work-live and breathe as a Doubletree catering manager, but a lot less calories!):
Food was (and is) a passion purpose.
It would’ve tasted just as good if I didn’t make the design. But we know Life can be a hassle by our design. Thank you, Giuseppe from Great British Bake Off! 🇬🇧
And in the hassle, we learn the pattern (process) and that enriches our life (and we gain clarity) to the next challenge and steps moving towards our greater purpose and into our happiness.
I had to get out of that needed Time Out laugh… and now get back to the serious.
…On that note, I have found these two mindset shifts and responses that have made the biggest impact on finding purpose.
Let Go:
Deeper awareness (the A-ha’s) can be humbling and freeing, and a little of both (as it was for me). Living in a get-ahead culture can have damaging internal consequences and allow for pride and ego to grow.
The ego hates to let go. And it hates quiet time. I have an entire chapter in my book Empowered Happiness.
So to outsmart my non-serving ego, I first had to scrape out the believing invincible thoughts I grew into from my teens and into my 20s.
And after I saw the drama thoughts for what they were, I saw life as fragile (and not invincible).
And that taught me to play a more active role in my thought life. And if you’ve ever encountered people who don’t know how to change their daily thoughts, then there’s a good chance their ego is playing them.
The reality is that’s how most people you work with operate.
Seeking awareness (going from dark to light) is a learner trait and a growth mindset. Something I’m attracted to (and maybe you are too).
And with that lens, over time, I gradually made the shift to taking control of my thought life observing the crumbs fed and changing them.
And those ‘lil daily mind re-routes led into better knowing, taking better steps, and fewer missteps.
The temporary disconnects were favors in disguise as they helped to turn the ship around and steer into the right passion purpose in life path.
And, along with letting go of what I couldn’t change (also referred to as the Serenity Prayer).
Letting Go may not be your brain’s natural way. It’s not mine. But by letting go, you can bypass the messy middle, the in between neither here nor there, and get to the happy fulfilling place faster.
Here are two things that could help you let go (and get there faster):
1) If there’s nothing you can do about it, then deliberately forget about it. Trust it will work out. Release your mind-body from worries, release resentment, and offer forgiveness.
For your own good and growth. Even if you’re not there yet, assume the position and you’ll get there soon. What you put your attention to shows up in your life… and probably pretty quickly!
2) Stop caring so much for matters that don’t need your attention. That’s when things can be taken too personally or blown up in mind importance (but not really that important).
The ego loves to cling and accumulate past and old ideas (that shows up as a Kapha imbalance)
In Ayurvedic mind-body terms. (they’re always connected), that’s letting go of being needy or cloying. That’s a sign of a Kapha imbalance even if that’s not your natural way (or it worsens as you’re emotionally charged up around that one specific person).
Without letting go, you can stay stuck. And without moving on, you can also stay stuck.
A move-on sign can be when a door closes, or when you don’t get a full night’s rest, waking up at 3 am with worry thoughts, or you still don’t know why.
If it was because you needed to use the bathroom, you would fall right back asleep. …so if you determine that’s not it and this becomes more nights than not, then try a pivot. Your purpose is calling!
Our wise body-mind is so much more intuitive than you we are as the decision-makers.
And that’s why it’s possible to tell what is going on with you now by the food you’re attracted to, and what your annoying body symptoms are trying to tell you… the stuff I get excited about (restoring, optimizing in balanced living, and prevention).
Staying in shape, good self-care, and getting the balance (sattvic in Ayurvedic terms) helps you do the healthy things for optimal, purpose-driven living.
And there you have it!… good snack tips as you grow one day closer to your passion purpose in life. 🌱
The pattern is easy when you know what it is. But like life, you don’t know until you try, have experience, and look back. So try making 3 cut lines and then focus on each wedge (your passion and purposes). And when you’re done and look at your completed lines, you’ve found your full-circle groove. 😉
7 Habits of Highly Effective People are habit principles you can use in most aspects of your life. I learned this from teacher and author, Stephen Covey who taught from his principle book: 7 Habits of Highly Effective People.
Planning events is all about habit creation that builds confidence for the next event!
I can’t think of anything more work adrenaline-filled than putting on a moving-part event production. That’s how I felt when I would plan and then orchestrate large events with over 100 guests, where the habits from 7 Habits of Highly Effective People were put to good use.
Setting up event success meant planning milestone meetings with chefs and managers (and plenty of meetings with myself) with a 5 P’s mantra: Proper planning prevents poor performance.
That’s not a personal mission statement, but it’s a success value statement. In my event planning, I learned many powerful lessons that can be applied to personal change and growth.
On event nights, the party starts at the ready time or at least the staff and I have to be ready.
That’s when we know whether the prep work laid out hours beforehand pays off with a successful event. And this actually starts weeks and sometimes months in advance by planning menus, setup, and details with planners and chefs.
Each event is like its own wedding event even though it may have fewer mini-events and agendas.
The first two habits (of 7 Habits of Highly Effective People) always took center stage to anticipate changes:
1. Be proactive
2. Begin with the end in mind
During the parties, when there were too many moving parts, being in the moment, keeping focused on the guests, gauging the temperature of the room, and checking in on the party host (be proactive) was part of event success (begin with the end in mind).
And in your daily life, you probably don’t plan events (or not in a live event space today anyway)…but most of us plan our daily event schedules.
So most of us are planners. On the calendar, you can (and may already) practice be(ing) proactiveand begin with the end in mind habits.
One effective way is, if you only have an activity that requires a bi-weekly (or bi-anytime) habit… and to succeed with those tasks, you could fill the non-weeks or time with another activity so that your mind has to search for the “either/or” activity.
If you don’t create a weekly placeholder activity then you could unintentionally forget/skip the bi-weekly intended one. The mind needs a replacement to substitute.
If it’s an every other day activity, then you could fill that same activity time for another activity, that follows a daily habit (or the habit stacking concept most of us have come to love and know from the more recent Atomic Habits by James Clear).
It’s much easier for the habit to stick (and for consistency to happen) when you have an “automatic” method programming your mind.
That’s easier and in event planning, that’s the “you got this” feeling in event planning when you’re on top of everything and proactive. You’re not writing everything down in those critical seconds needed to make a decision.
Most professions have these “make or break” moments. For a surgeon in a hospital emergency room, if the doctor has to look up procedural answers then, that’s not a good sign.
And in event planning that I know, being reactive with situations is crushing and it can be a snowball effect where the plates come out late or cold. And there’s a complaint about the room temperature and drinks.. and in those humbling times, you can’t wait until the end of the event, that’s only a matter of time.
To get to the proactive level takes planning, proficiency, and experience that creates confidence. And that starts from building consistent habits.
Consistency is the end-all, be-all that builds progress, and confidence and works for every important habit that I can think of at least. You consistently follow a habit. And when a better habit idea comes along, you replace that habit.
But consistency isn’t without downfall. It can be at odds with creativity, so consider looking at them as the yin-and-yang, or the sugar and the salt in baking that give the balanced spice in life.
And using solid principles like that from Stephen Covey’s 7 Habits of Highly Effective People can improve your effectiveness.
They can help you in life’s productivity and also deeper areas like finding your life’s purpose, a proactive choice that can easily get los in life’s busyness and commotion of what’s seemingly urgent but not important to you.
You’re headed in the right direction when you keep developing yourself and pivoting. You keep practicing new skills, putting one step in front of the other and looking at your compass.
The Universe is constantly guiding you and offering an invisible hand to help you and give you a hand up.
The healthy and growth mind set knows that a re-route is to help you move up in the climb of your life and get off the roller coaster ride.
If you begin thinking with the desired outcome end in mind, then your process in the middle is improved when you set your eyes on the end goal.
You can better Ready, Fire, and Aim.
And when you stay focused and open to feedback using habits #3 and #4 from seven Habits of Highly Effective People:
3. Put first things first
4. Think win-win
These days prioritizing what’s important is more blurred than in the past.
Most of us live a double life to some degree with our digital lives and real lives, so putting first things first (habit #3) is not the easiest thing and can be complex.
Both lives are authentic. Your sweet spot is what makes you stand out and the skills that you’re good at that are relevant.
The biggest competitor you could run into for a win-win approach (habit #4) can be yourself and your moods (we used to blame much more on others). We’re now a more openly aware and collaborative society.
Being able to give is a gift. It’s a win-win.
There’s a cosmic exchange when you give your energy away in optimism, and then the world dances. When you give your time (service) or money (generous giving), that can also create buzz and impact for your endeavors.
When you can start looking at how you fit in the world, not selfishly, but what you can give in the abundant overflow you’re given in personality, gifts, and talents, then you can grow to your highest and best use purpose (habit #2).
In self-awareness, then you can create a continuing growth environment (kaizen is the Japanese word in business terms) for you and others around you (habits # 5-7):
5. Seek first to understand, then to be understood
6. Synergize
7. Sharpen the saw
“You have two ears and one mouth,” I remember Author Stephen Covey saying in his workshops.
Listening is more importing than talking.
Habit #5 summed up: Hearing, selective listening, and active listening are 3 different processes. The first is naturally automatic, the second is tuning in/out when multi-tasking, and the third is focusing, taking notes, and coming up with unique ideas from what you heard in your frame of reference and experiences.
In my event planning days, if a client had an issue, it was best to listen to them, then give them available options based on what they communicated (habit #5) and let them decide which options to take (habit #6). Seasoned event planners know how to do that every time, and let those dialogues roll off their tongues (habit #7). And that way the client felt in charge and if things didn’t go as planned, then they owned part of the outcome. That’s the behind-the-scenes smoothness in event planning.
And that helps in most ways when you work with others. If you fill them in with communication nd what you’re up to, there’s a greater chance they can fill in and help in ways you wouldn’t even know how, now.
Habit #6: 1+1=3 or synergy is exponential growth that happens when you have collaboration. And when you keep adding/evolving collectively to what you’re doing, then you’re getting better. By default, you’ll avoid the things you didn’t like or “been there done that,” and keep seeking newer, better ways for yourself. That leads to growth and…
Habit #7: Evolved learners focus most of their time on the present moment and not on the past or future that hasn’t happened.
They know where they’re at and that the past brought them to where they are today. And without the past, they would not have learned (from their history) what they need to do to improve.
And when you get out of the negative emotions of that headspace or focus on the happy memories, you can feel good and alive.
When you can reflect, you can see why things happened and how they helped you even though it didn’t seem that way when you were learning the lesson.
Everything happens for a good reason (believe that!) and sometimes that takes a little longer to realize… and, at every turn you are gaining a little more confidence in who you are becoming.
And you gain a clearer vision for the future and better strategies that you can better evaluate from time to time.
In events, dessert were always a must. Baklava was on the Mediterranean-Lebanese restaurant menus. We didn’t make baklava in-house, but you can with this low-sugar recipe. 🥮
Easy Phyllo Dough For Baklava Dessert (Mediterranean Olive Oil Healthy)
Make phyllo dough from scratch! It's not as difficult as it sounds... and dare I say fun!
Course Dessert
Cuisine lebanese
Author Brandy @ Healthy Happy Life Secrets
Equipment
pasta machine maker
Ingredients
2tbspolive oil
1cupflour
1cupwater
pinch of salt
honey
chopped nuts
dates, orange, and cinnamon (optional)
additional bench flour (to prevent sticking)
Instructions
Making phyllo is a lot like making homemade pasta, but much thinner.
Make a mound and a hole in the middlle where you can add the olive oil and slowly add water. Knead for about 5 minutes and then form a dough disc. Let rest.
Roll out as thin as possible and then you can slip into the pasta maker if you have one, adjusting until you get to the thinnest setting (e.g. 1). It will look opaque but the hope is that there will be no holes.
Cut into strips that you will use as layers for the baklava.
For the baklava, you can brush honey and top with chopped dates and nuts (walnuts or pistachios work well) on every other layer if you make 7 layers ending with the top layer with honey and nuts. Sprinkle each layer with cinnamon and orange zest if you like (good for Ayurvedic Vata balancing!).