
Remember how you were feeling alive in your last dreamy vacation where you immersed yourself in a new culture you’ll never forget? Or maybe that was a staycation where you got time away for yourself to relax and do nothing, or just lay by the pool. I can relate to both!
And, I love rooftop views!
Beautiful rooftop view of Bologna, Italy
…When Life couldn’t be any better. Vatas love this Cloud 9 feeling from heightened senses in different places, Pittas love the getting back to productive routine, and Kaphas love their homey comforts and sleeping in their own bed again.
Life is good and one big harmony for everyone when you’re feeling alive and good again! And you can feel this way in all these different ways because you have all these traits in you (in varying degrees).
Wherever you are, take those feeling-alive dreamy vacation feelings with you. I do!
Sprinkle those joyful feelings throughout the rest of the 365 days. Here’s an example of a typical practice I have.
When I first start my workday, I look at a small framed piece of inspiring artwork in front of me (and I can take an inspiring desk calendar with me wherever I go). It puts a peaceful smile on my face. All is well. 🧡
I also keep a changing-up scenery screensaver on my computer. This is super important for a Vata! But if you like to see the same image over and over again, then find a framed image or words that inspire you.
For now, I have a Matisse postcard image in front of me that is just as good as if I took a look at the image in an original museum painting because I choose to see from the lens that I’m not missing anything.
Visuals are oh-so-important and especially so if you don’t have a vivid imagination. Colors play into the mix. That’s why people feel differently when they wear different color pieces of clothing. Do dogs react differently to different colors? You betcha!
I had one that loved the boldness of red (that’s the same color that bulls run to). And so do us, people. Except we’re a bit more refined and complicated with our color palette choices… more on that below.
As A Vata, if you are one like I am, you’re constantly changing things up and inspired to change at least the colors, if not the clothing style or the entire room (and hopefully your spouse or roommate doesn’t mind. Your dog won’t) 😉. Continue reading “Experience Feeling Alive Every Day”
Balanced living and wellness is the best way to live a life worth living.
That’s what people discover after they’ve hit rock bottom or they’ve run ragged for long seasons.
When you reset to your calm and whole equilibrium essence, you find your life meaning, purpose, and happiness now and in this season.
That improves mental health that’s delicate to protect for longevity.
If you live every day busy and stressed, even if it’s doing the thing that lights you up and gives you purpose, like owning your own business or being the CEO in your household, you can still feel burnout.
If you don’t develop a strong enough reason WHY for what you’re doing, then you can gradually feel unhappy because you can be missing the meaning piece. Why does the business or my family give me purpose?
Getting to those deeper reasons, you can find it has nothing to do with security or a sense of belonging as you could get those from a solid work career or a community of friends.
It could be more about spiritual alignment, personal growth, and discovering more of who you are.
If you were a rose flower, even during blooming season, your intact delicate petals could become brittle, and fall off under wind-blowing conditions.
But if you knew your purpose and greater giving impact was to be naturally beautiful, fragrant, healthy, and alive, and that your inner beauty helps to spread love to your environment and the world, then you would be able to embrace chaos and changing environmental situations.
You can get your unique raison d’etre (reason of being) when seeking meaning and purpose this season which requires your focus, mindful space, and deeper thought.
Quiet time, introspection, and journaling can bring that wisdom out of you.
If you are body-mind balanced in balanced living, then you can tune in more acutely because when you’re healthy you can do infinitely all that you’re capable and willing to do in alignment.
A healthy body-mind provides the starting foundation for your inner wisdom to grow.
To be healthy, it’s important to find time to soak in what your body is conveying to you in each season of your unique life and take time to nourish your naturally resilient but unique body.
The one and only body you will get and can transform if you wish. A simple daily task of moisturizing your dry skin (the largest organ in your body) can be a healthy body-mind exercise especially if you’re a Vata and have those tendencies.
You could stop to smell the roses daily and sense all their pretty features like bright and pastel colors… subtle rose scents (great for a judgmental mind)… soft and silky smooth texture …and balanced intricate design.
In those mindful moments, you can connect with yourself, and realize how you can make an impact in your life and others this season of life… Time you will never get back. Losing time can be a motivator (Your Why) as it has been for me.
Before I was conscious of body imbalances, I didn’t realize I had fallen rose petals from lack of self-care attention. I may have noticed random petals and brushed that off as nothing.
Had I been more in tune back then, I could have adapted and thrived better to my seasonal situations to keep the petals blooming.
And I would’ve reached my higher frequency instead of survival mode in a modern rat-race work life. You can miss out on fulfilling years of personal growth and finding your whole self that way.
Looking back, I went through the motions. In the season when I had a Kapha imbalance, I couldn’t get myself up an hour earlier than I desired and accumulated more than one of everything.
When I had a Pitta imbalance, I noticed acne in new spots and was more critical than usual.
Multitasking BTW is the epitome of a lack of mindfulness.
Out of living balanced, inconsistent symptoms show up, such as accumulating body weight, feeling impatient, being withdrawn or slower than usual.. and so much more!
When I learned how to restore my gradually stored up appearing imbalances, then I had a new framework and perspective for tackling all that I wanted to do in a loving way and productively.
More importantly, being the person I wanted to be (…and you can too!).
You could be fully aligned with the creative flow (even if you think you’re not creative or in this season). You gain clarity and laser focus (and feel unstoppable, and not starting and stopping).
You can be your super-productive self while still enjoying some of the uneventful days of this season. They don’t matter in balance.
Finding unique joyful activities you love can help to prevent burnout. And proactively learning how to naturally restore your body-mind balanced self and balanced living is how you can start to be your healthiest self (and the best rose in your life).
Each year can be your best year because you make the most out of it and see how what you did brought you to where you are.
Encouragement for today… you every day feel better than the day before if you proactively look for how to intervene and get those wholesome perspectives and wisdom.
If yesterday wasn’t the best, you have a low bar to surpass today. If yesterday was great (hopefully it was) then today you can follow in those footsteps, and also keep trying new things. You keep going and growing.
As busy humans, we have complex lives. One day, we can be pivoting, and the next day looking for more happiness in our lives while handling the necessary tasks in the here and now.
Some of our specific situations can sometimes leave us feeling drained, tired, anxious, worried, annoyed or irritated. If you feel any of those symptoms, you can do something about it.
Your body and mind imbalances can change from season to season and can show up in many ways. The mind and body keeps memory and score.
As part of this season, I hope (and challenge you if that’s what you need!) that you will take time to find your specific purpose, meaning, and take some extra balanced, self-care time out.
6 Productive Take Time Out Activity Ideas For Balanced Living (So You Don’t Burnout!)
Every day, try and choose at least one of these “time out” activities that can be for 10 minutes or more per day. If you only have 5 minutes, then take those 5 minutes.
If you feel guilt about taking time away from whatever your busy list is (work, family, etc.), recognize the feeling, and reason with yourself that this prevents you from burning out in the long run.
When you come back to your busy life, take note that nothing significantly earth-shattering has happened. The more you can record evidence for that, the less guilt if any, you can feel. And then you also gained quality time for yourself, and you feel healthier and happier, and the people around you notice.
Breathing time. If you can’t remember the last time you paid attention to your breath inhale and exhale breathing, then you’re probably too busy to be mindful and too busy this season. Be intentional and come back to it for your health and balanced living.
Break time. In between busy activities, take short breaks to get mindful, Doing laundry, making a snack, pouring water, and looking at nature or a plant that’s moving or growing as you read this and go about your regular day, can be satisfying to a balanced body-mind. If you feel tensions, then something could be off.
Use mind space and relaxing your body, as your break time theme. You could be standing up, taking a walk, or sitting on the deck, and watching the world go by, looking for productive future thoughts to enter. You can start with something you look forward to. If you find yourself pacing or your mind is racing, step outside into new surroundings and air.
Silent time to get a peaceful mind. Have moments in the day where it’s completely quiet in your surroundings, or you put on white noise or a quieting headset.
Let ideas pop into your head. This means not watching the television.
This means tuning out the sounds from your immediate world that can come from another room.
You can meditate, but I suggest keeping your eyes open so you can take a look at your surroundings for inspirational ideas.
“Me time.” I grew up in a decade where it was a less sensitive world than today. People weren’t as aware or empathetic.
Taking “me time” sounded selfish to others, but then our society became more open to the idea that when you practice self-care and self-love, you have more love to give to others (time, space, and forgiveness).
Thankfully living in a more transparent world frees you to be a better you.
If you find pride creeping up, you can have a daily intention or practice to be grateful.
Find gratitude time. Pause and think of a few moments this week that you’re grateful for.
Write them down in a journal or on the back of a temporary envelope if that will help better solidify those temporary memories in your mind.
You can do this while you turn on the news. With sad headlines, you can have deeper compassion, and that helps you find gratitude, meaning, and contentment in your life.
This can improve your daily happiness and feeling good about what you do have and how you can contribute and make an impact to serve and help others.
Gaining an internal and grounded perspective can keep you feeling peaceful and in control, instead of living an up and down daily roller coaster lifestyle based on the highs and lows going on in your life.
If you’re feeling frustrated or defeated:
Find organize task time (or time to piddle around and tidy up). If you feel overwhelmed or are unwinding from the day, doing mindless tasks can feel good and be productive.
You can use this time to also catch up on podcasts or listen to music to get calm and back to your usual self.
If you have more time, you can do a rainy day project like organizing a file, bookshelf, or drawer. Make it fun.
You can create a good memory by stuffing a good ‘old photo, some stickers, or memorable words you write on paper, and add them to your project.
When you’re done, you’ll feel better for your small, but mighty in your mind daily achievement. That can be all your mind needs to relax and get back to the mood you want.
And in the future when you pick up the tangible memory you just made, that can put a smile on your face again. Small tasks can make big differences.
Have a good (no, have a GREAT) balanced living week!
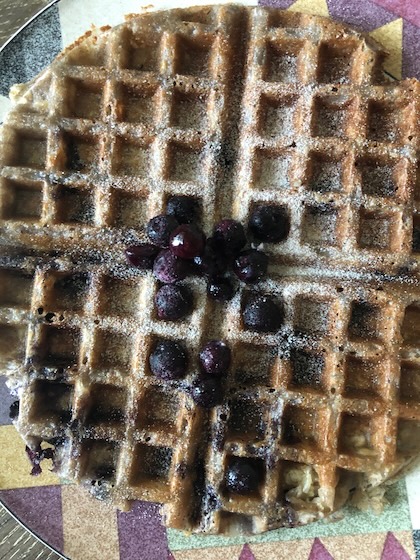
Short on eggs, you can make this easy recipe in 3 minutes.
Course Breakfast, brunch
Cuisine American
Author Brandy @ Healthy Happy Life Secrets
Ingredients
1tbspblueberries, frozen
1/2cupoats
1/2cupmilk or plant-based milk for dairy-free
1tbspwhole wheat flour, plain flour, or gluten free flour
1tspneutral oil
Instructions
Mix ingredients and add to your medium hot waffle maker. This is a liquid-y batter. Add more oats to fill in if it becomes too liquid in spots. This is a very forgiving recipe and great for lazy weekends!
Cook for about 3 minutes or until easy to pull in one piece off the waffle iron with a fork.
Flip the bottom for the top as often that's better cooked.
For healthy version, dust collagen powder on top instead of powdered sugar.
Cold brew coffee from scratch when you have no electrical power may seem impossible especially with your dead machine staring at you with no lights on.
But not only is fresh coffee possible, it’s healthier.
I’ve been drinking cold brew coffee (or homemade coffee) from scratch coffee as my possible and preferred way since 2019 when I was in Italy. And lights were on.
Coffee shops are on every corner, but I couldn’t drink a coffee in the AM on an empty stomach or with a sugary pastry something (customary in Italian culture 🇮🇹).
Because empty calories don’t soothe the gut (or my gut, in this case)… and sometimes feeds the bad bugs. The gut has a a big role in our health and our happiness (where most of the happy hormone, serotonin is made)
…And on that note, I’m a drink-coffee-in-the-afternoon type-of-girl because the caffeine messes with me and my upcoming sleep. And I didn’t grow up drinking coffee. I started drinking coffee later in life.
And after I discovered that it’s a healthy plant-based drink (polyphenols) in many ways… it also has the downsides of being acidic. So on an empty stomach (with food as a cushion), it’s easy to feel the heartburn effects.
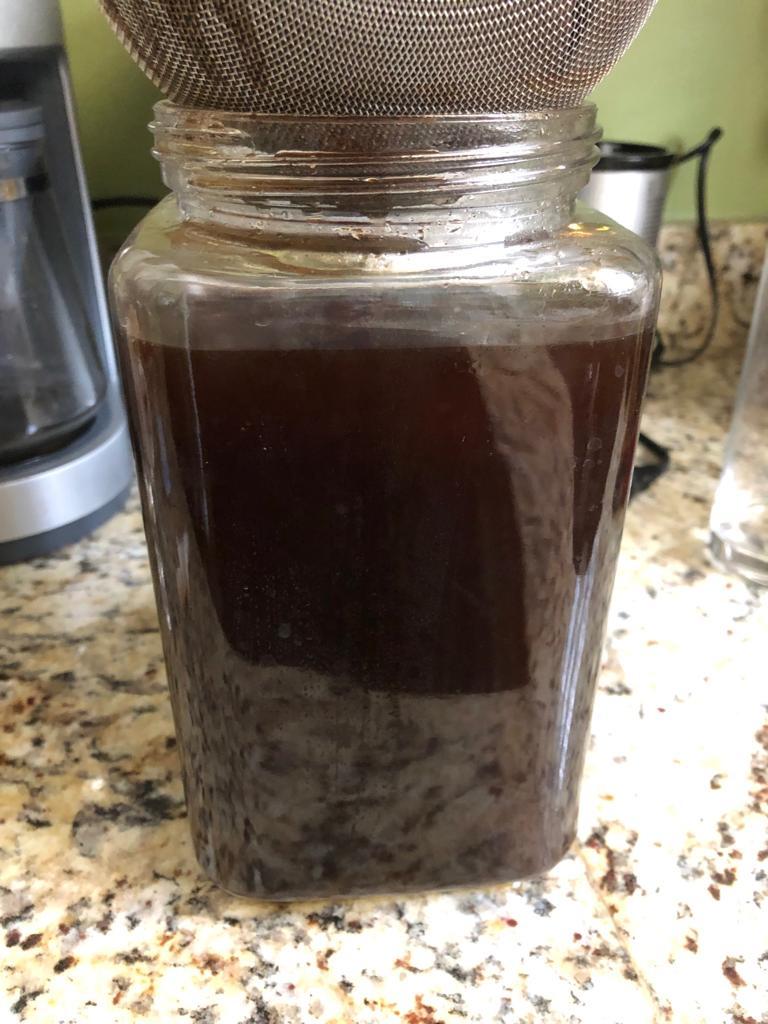
So I made my first batch of cold brew coffee in Italy, from store bought ground coffee and a paper coffee filter. I had a large glass jar.
That was like me being a kid scientist wondering if it would really work good enough to pass as a black coffee that I would enjoy.
…To my surprise, it did! And that became the beginning of cold brew coffee everyday. I think in some places they call that (manual) auto drip.
And I’m convinced this is how for centuries people have been making and drinking coffee long before fancy coffee bars and Mr. Coffee machines existed. …And before modern stoves and microwaves were invented..
With an easy homemade cold brew coffee from scratch, even a child can make the adult drink safely at home.
And if your power is out, unlike a pour over coffee, you don’t need heated water.
Below are the easy make cold brew coffee recipe steps to make an organic healthy batch you’ll enjoy. You may even find it preferable to your current way (when life gets back to normal).
Cold brew coffee is the easy coffee you can drink daily if you’re a cuppa joe in the morning type of person and want to be self-sufficient (without electrical machines).
But first, here are some cold brew benefits vs. brewing regular (hot) coffee and how to optimize…
Brewed coffee (or the regular coffee process) yields a more acidic coffee than cold brew in the process.
So if you want a lighter feeling coffee with a medium taste, then cold brew has its body health benefits.
…And why I do organic coffee cold brew daily.
Organic coffee is preferred because the bulk of coffee is sprayed with pesticides.
So if you’re noticing brain fog or blips in short-term memory has got you these days and you don’t know why, if you drink coffee, then the non-organic coffee could be the offender.
Just something to consider switching to organic coffee for a month to see if you feel a difference.
Organic coffee to buy can be more expensive and slightly harder to source, but you get to ask yourself what your health is worth and if you want to make the additional search effort.
What are the benefits of cold brew coffee?
☕️ You can make and drink cold brew coffee faster than you can wait for hot coffee to brew (and wait for it to cool some).
☕️ Cold brew is less acidic than regular coffee. It’s less acidic through the cold brew process than regular hot coffee or espresso. This is good especially if you have a sensitive stomach or gut lining, and feel heartburn effects from coffee.
☕️ With cold brew, you may not need to eat your first meal first before your first cup as it’s more gentle and doesn’t need the food buffer.
…Many of us wake up groggy and tired, and we want our coffee first thing. But first we need a soft pillow of food in our stomach, that’s not the preference when you’re not quite awake and ready yet for eating.
So that’s where cold brew ROCKS… and is ready for you as you can make the day before or batches days or a week in advance and refrigerate!
☕️ If you gave up on coffee because it tears up your stomach or gives you heartburn, then cold brew coffee could be a good option so you can bring the healthy drink back. This point can’t be emphasized enough. ‼️
Or if you want a lighter cup of coffee during your day that won’t affect your sleep at night, cold brew coffee could be the way to go!
☕️ Cold brew coffee is great for hot weather days as your coffee is served cold. You make at room temperature and then refrigerate.
Making homemade coffee from scratch at home is also a mindful, relaxing activity. And it doesn’t have to end there…
If you know me, you know I like to zhugh up any food or beverages (probably from my catering background), so I’ll share how I do that too below!
How To Make Foolproof Cold Brew Coffee At Home Without a Machine
What you will need:
-Ground coffee
-Mesh catcher (with a lip or rim)
-Coffee filters
-Spoon
-Water
-Deep bowl at least 6” high/deep OR pitcher with a large opening almost or just slightly larger than the mesh catcher diameter is ideal (but as long as most the mesh catcher sits inside the pitcher, it’ll work).
If you use a pitcher, you won’t need another pitcher to pour your finished coffee into as your cold brew coffee can go straight into the pitcher and fridge.
Setup for how to make homemade cold brew coffee from scratch:
These are the simple items you will need (and probably already have in your kitchen or home) 😊:
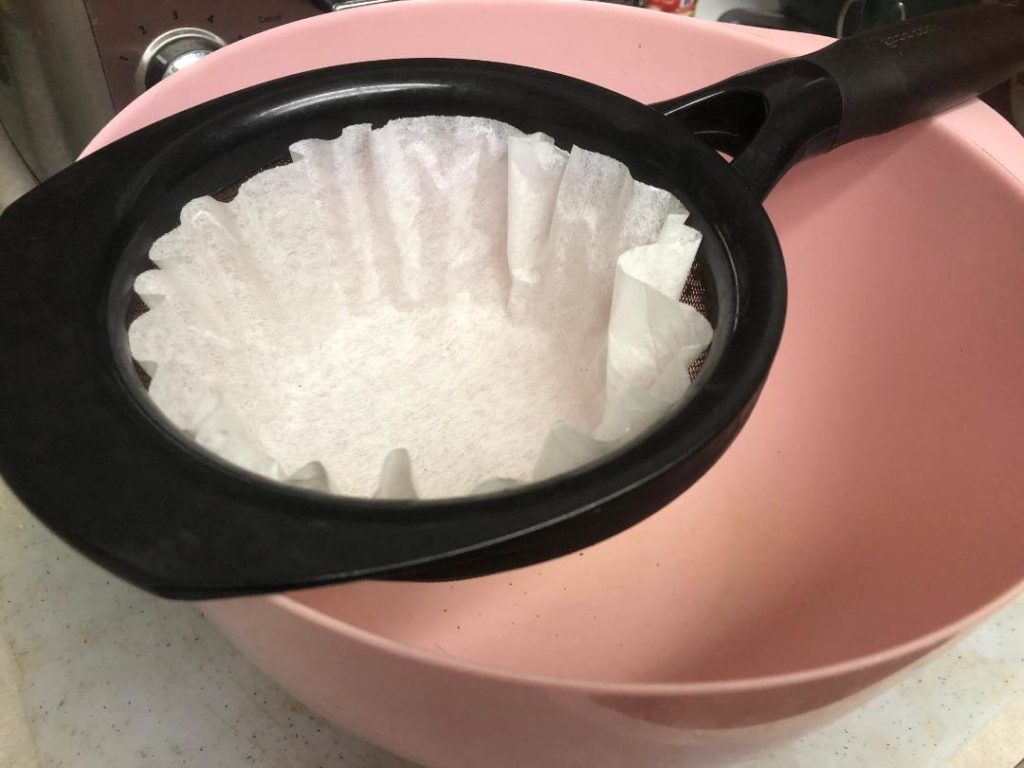
Bowl: Find or buy a right-size mesh catcher that works comfortably for your cold brew coffee prep setup, where the coffee filter fits in easily.
Rest the mesh catcher to then rest on top of the bowl.
Set the coffee filter to sit in the catcher as flat or parallel to the table surface as best it can, so you don’t have coffee and water in the filter dripping or tipping over. Then you have your bowl setup.
Or…
Pitcher: You can put your filter-catcher ontop of a wider-opening pitcher. If you use a pitcher, you want most of the bottom half of the catcher to sit inside the pitcher so your coffee brewing doesn’t spill over in the sides when you pour water in.
So then you have your setup from one of the options above.
Good job!
Next thing, you can bring on the ground coffee grinds. See what I did there… ground grinds. 😊
I like to make homemade cold brew coffee from scratch in the morning to get a good whiff of the coffee grounds, and as an aromatic sensory experience and relaxing mindful activity.🧡
You can even pull out your setup the day or night before if you just want to make a cup in the morning or a coffee batch for a couple days.
Mind you, the fresh-made coffee will be room temps warmer than when you refrigerate, but that warmer room temp way is actually better for your gut in the morning when you’re waking up your stomach and getting your day started.
What Coffee Type For Cold Brew Coffee?
So then in choosing coffee types, use “ground” coffee types. It’s easy to get enamored by coffee flavors, packaging, and brands, but be sure it’s “ground” otherwise they’ll be “whole” beans and you’ll need to make the grounds.
If you purchase pre-packaged coffee, look for “ground” on the label. And if you buy whole beans like in in bulk, you can grind at the store if they have the machines beside the coffee barrels or bins. Select “auto drip” as the setting. The perfect grind for cold brew coffee won’t be too fine like the “espresso” setting or too “coarse” on the other end of the spectrum.
If it looks like fine black pepper, then it should work fine.
You can also at home mix a super fine ground coffee and a coarser ground coffee so the grounds don’t fall through the filter. This can take a little experimenting with the coffee you have on hand, but when you get the right drip color, you’ll know. For a dark coffee, the first mug cup should fill to the top with a dark brown color like you would expect for coffee.
For medium and lighter coffee types, expect a more caramel color or a medium brown.
Now, here’s how to make your first batch of cold brew coffee from scratch:
To start making cold brew coffee, pour your ground coffee mix (about 1/2 cup to ¾ cup coffee grounds total for a large batch) in the filter. Every coffee grind is different. You can use less if you just want to make a cup.
You can start with 1/4 cup coffee grounds to make a cup or two of coffee. These will be the strongest cups from the grounds.
With a spoon, mix the ground coffees up a little in your catcher-filter setup before you pour in water to possibly prevent fine ground coffee from falling through the filter.
Pour cool water over the coffee grounds. Filtered water is good. The cold water is the process secret to keeping the coffee from becoming more acidic (healthy benefit). You can use room temperature water and it will be fine.
After you refrigerate, it will be served “cold brew.”
In the beginning, the water will go through the filter fast and you will get a light brown/caramel trail of coffee water in your pitcher or bowl.
That won’t be the final coffee you’ll be drinking.
But if it does, start over. In other words, get another vessel (or mug of any kind), and pour the cold brew made through a second time. This usually does the trick (or else add more coffee grounds). You’ll get the hang of it with your favorite coffee grinds after a few tries!
When you keep pouring into the catcher-filter, then the darker coffee color comes out that you were probably expecting.
Troubleshooting: If your ground coffee mix sends some of the grounds through the filter or you accidentally spill some grounds in your ready-made coffee, then you can simply start over with a new coffee filter in a second bowl.
The second bowl can catch the second round of cold brew coffee being made that sometimes can turn out better. Pour your first setup coffee and coffee grounds into the filter of the second.
So back on track… from time to time, take a spoon and stir the coffee ground and water in your filter, trying not to have coffee water overflow.
Keep pouring water as it filters down. And if you pour into a cup, watch it drip darker coffee after the first half of a cup or so.
More Cold Brew Coffee ideas and tips…
You can make and enjoyed iced cold brew coffee that’s different than iced coffee. Learning the difference between cold and ice is in the preparation and process of making a cup of coffee even thought they can be the same coffee beans and grinds.
And with your coffee grinds, when you’re thinking ahead for tomorrow…
If you want to prepare a cold brew coffee batch for tomorrow and possibly the next few days, add more ground coffee to your setup.
This less potent coffee is good for lighter coffees.
You can make lighter cappuccinos with foam froth after the first two cups of stronger cold brew coffee that you can enjoy as black coffee if you like.
Or add a dash of healthy cocoa, cinnamon, pumpkin spice, or cardamom to change the coffee flavor.
If you make homemade cold brew coffee from scratch, you’ll never again be without coffee on-hand with flavor of your choosing if a coffee machine doesn’t work! And the power goes out. 🔌 It’s a backup plan too.
You can always make your own instant coffee without a machine as a coffee insurance policy 😉
As a planner-at-heart and former catering planner, this gives a sense of relief and keeps the relaxed vibes soaring and the panic anxiety down.
You can also pair your plant-based coffee habit to some great plant-based breakfast ideas to break away from the sugar breakfast habits or adding sugar to coffee. Sugar we know accumulates and works to destroy the biome.
So learning how to make homemade cold brew coffee from scratch and healthy eating together can be a better morning and daily habit. ☕️ Enjoy!
How to Make Easy Cold Brew Coffee - Without A Coffee Machine (Good for When the Power is Out)
This is a recipe for how to make your first batch of easy and enjoyable cold brew coffee from your coffee of choice and whether you prefer a light or dark roast.
Course beverages
Cuisine American
Prep Time 10 minutesminutes
Servings 2cups
Author Brandy @ Healthy Happy Life Secrets
Equipment
1 regular paper coffee filter
strainer for filters
pitcher or large deep set bowl
Ingredients
¼cupground coffee for 2 cups of stronger coffee
water
Instructions
Setup your cold brew coffee maker with ar pitcher or deep bowl, metal strainer, and a paper filter,
Add ground coffee. Then pour fresh water through. The first 30 seconds of water pours will go right through. Examine if you're getting the medium to dark brown coffee color (if not, pour the watered down coffee into a temporary glass and then pour through again). If the coffee is too finely ground or too coarse, this can happen. If too fine, add/blend about a tablespoon of a slightly coarser ground coffee to the wet coffee grinds in the filter, and stir with a spoon. This should even out the coffee grinds.
Keep pouring water and pour your first cup of coffee (will be the strongest). You can keep going until the cold brew coffee is weaker strength or turning lighter color.
Notes
You'll notice the first pour of water goes through faster and then slows down as you pour more water and the coffee pouring out becomes less strong.
Home pizza crust is easy and fun to make as homemade pizza dough. And it can be made with any gluten flour like bread flour that I love as more universal to use. You can make other bread types and not just pizza like with 00 flour.
Neapolitan style pizza crust that looks wood fire oven charred, but is baked in an apartment oven.
Below you can learn step by step how to get the home pizza crust you want including a Neapolitan style crust that’s popular in restaurants with wood fire ovens… but that you can make even from an apartment oven! 👇
…Without waiting for one to be delivered.
This is impressive to your friends and learning how to make your own pizza crust is rewarding. 😋
…Pizza can be a healthy meal that’s filling for all ages. I have a homemade pizza recipe you can try along with all the detailed steps from scratch below…
And you can learn techniques from me, a once-upon-a-time pizza makerteenager for 4 years who worked at the busiest Domino’s Pizza store and franchise in the world 😊… yes, in the world. 🌎
Back then, we would crank out over 200 pizzas an hour on any given Friday or Game Day Sunday. This was when the 30 minute guarantee still existed and then became a well-known business case study.
It was the funnest job I ever had… and very memorable decades later where I use my pizza learned skills to make home pizza today. Like these thin crispy or regular chewy pizza crust styles.
Thin and crispy cracker-like crust.Thick chewy crust more like a pan-pizza style with a toasty bake.
And which btw you can make your own special pizza masterpiece from start to finish, faster than you can order a pizza and have it delivered.
So let’s begin…
First, you don’t need a pizza kit.
To make homemade pizza, you just need two essential simple ingredients (flour and water) you already have in your house (or can easily get) to make the dough.
Plus 4 ingredients if you want a bigger crust rise (flour, water, instant or active yeast, and salt). Or you can let room temperature act as the growing yeast (like in sourdough).
Homemade pizza needs no long prep time like pulling out ingredients in advance, like in other baking recipes. So it can be making and baking EASY.
It also has an advantage over breadmaking: you don’t need to wait for hours for the pizza dough to proof.
Making homemade pizza dough needs only a few minutes. You can simply prepare, bake, and enjoy in less than an hour.
If you’re not a planner this can be a winner.
But then again, you’d probably buy store-bought or order delivery. …but then that would be no fun, and you wouldn’t get the healthy, homemade pizza.
So I’ll assume you’ll give it a try at least at some point. You’ll be glad you did! 🎉
Here’s how to make homemade pizza…
Before you do anything, there is one area to plan. You should consider what you’ll add on top of your pizza crust.
If you load with gobs of cheese, then you’ve added fat and dairy (…that isn’t always a bad thing as cheese has vitamins, calcium, other minerals, and satisfies cheesy craving…).
For a healthy recipe, use fresh shredded mozzarella cheese or sliced buffalo mozzarella like on a Margherita pizza. It’s one of the healthier (less greasy) cheeses if your stomach is sensitive and end up sopping up the cheese grease.
Now you’re ready to start and pull out all your homemade pizza dough ingredients.
Instant yeast. I buy the small Red Star packets. The yeast balls look like microscope-tiny, perfectly round khaki brown color beads. And a tip is if you don’t have instant yeast on hand, you can use baking powder that you would use for cakes. Yes, baking powder!
Water. 1 cup warm or room temperature tap water is fine. You may want to experiment as you know what they say about the famously delicious New York pizza crust (the rumor is that it comes from the water).
I’ve used seltzer and filtered water for pizza crust, and I find tap is still the best all-around.
Flour. You have options. Bread flour is the one for Neapolitan-style airy pizza. You don’t need special “00” flour even though you’ll find many recipes with this.
With bread flour you can use for other breads and it’s generally less expensive.
And if you aren’t doing an airy crust, other options are:
You can use a mix of regular or all purpose flour with whole wheat flour (that has a higher bread protein content). Whole wheat flour dough will be less sticky.
And if you use semolina flour for your bench flour, then that will help your dough from sticking to the metal pizza pan you use.
Another reason to choose whole wheat flour is the slightly higher, healthy fiber content. There are also gluten-free options.
In total, use about 2-1/2 flour total, but you will need more when you’re working with the dough.
You get better with practice and experience. You may be able to later eyeball how much you need.
Salt. 2 teaspoon table salt. You can use a little more salt if you use sea salt or if you plan to use fresh mozzarella (or buffalo mozzarella) that doesn’t have as much salt as some other cheeses. Kosher salt or a coarser salt will work well.
Optional: 1 tablespoon EVOO (helps with adding taste and less sticky dough).
Here are the 5 easy home pizza crust steps (broken down in detail):
Step 1: Make the pizza dough.
Add the yeast to water and let it settle/dissolve for about 5-10 minutes. The mixture will have a milky color and consistency. Set aside.
Separately, add the flour or mixed flours of choice to your mixing bowl (I like half and half whole wheat and regular or all-purpose flour). Add 1 teaspoon salt or you can use 1-½ teaspoon sea salt (if you want to use non-iodized salt as I use). Then add EVOO if you’re using, and the water-yeast mixture.
Dough by hand method: You can make the dough by hand, and if you do it that way, I’d recommend creating a neat flour mountain on a shallow baking pan where the flour won’t stick to everything.
Using semolina flour as a lightly floured surface is a preference.
Then add a dip in the middle of the mountain where you would add the liquids, like you may have seen or done at home making pasta the old-fashioned way (except there are no eggs needed in pizza making).
Dough with machine (recommended): It’s easier to use a mixing machine with the dough hook, like the Kitchen Aid mixer (I have a baby pink Cadillac color one… Paris Hilton and I have something in common, lol).
With a machine, in a few quick minutes, the dough should be ready. You’ll know when it’s done when it’s not too dry, and not too wet, and has some good elasticity. Pizza dough is forgiving and is only part of the pizza pizzazz (say that 10 times).
Remember to scrape down the flour from the sides of the mixer. As you’re waiting for the dough to finish mixing, generously flour your pan.
I recommend a mix of coarser semolina flour and regular all-purpose flour for the bench flour.
When it’s ready, pull the dough out of the bowl. You’ll be able to form a small ball with the dough, and you may need to add more regular flour on the outside if it’s too sticky.
Form a dough ball and let it rest on the pan you’ve floured. Leave it sitting or resting at room temperature for 10 minutes.
Note, you don’t even need a plastic wrap or another container you’d have to clean like in bread making!
Step 2: Prep the toppings and the sauce.
While the dough is still resting, I get the topping ingredients ready.
I open the tomato sauce can (many restaurants use San Marzano tomatoes that I recommend), and I add finely chop anchovies with a serrated knife to the sauce as my secret ingredient (that’s not a secret anymore).
It adds salt and another flavor dimension (or you can just add a teaspoon of salt to the sauce if you prefer a saltier-tasting pizza).
Tomato sauce will add sweetness back. You can make your own tomato sauce but since it’s not the star of the dish, canned will work just great.
If you want a chunky style, Marzano tomatoes are plum tomatoes which are the kind commonly used in Italian restaurants. Or else use any tomato sauce or paste.
If you are using fresh cheeses like buffalo mozzarella, slice the cheese into smaller bits.
And if you use basil leaves, wet them a little like with a wet paper towel as they will settle a little better on the pizza. Alternatively, you can use spinach leaves like I use as healthy-alternative inspiration.
For any other wet ingredients like black olives, drain any excess liquid and dry them with a paper towel if you need to (as that would be a damper to your pizza… sorry, I couldn’t resist. Today is a fun day.).
By the time you finish this step, your pizza dough should be ready to work with.
A quick back story: I used to be a pizza maker (or pie maker as they referred to) as a teen before I could drive, and for the busiest Domino’s Pizza… not in the country, but in the world (yes the world! that is becoming smaller every day).
I stuck around for 4 years until I took on other food-related jobs in college.
So, I still make the dough the way I learned from the modern pros!
We used to crank out 300 or so pizzas in an hour as a team during the busy football nights, and during the 30-minute guarantee years (you probably don’t remember!).
Our heads were down but it was fun energy in the shop![OK back to the business of making your homemade pizza]…
Equipment you need:
-Pizza pan. Any metal pan will work.
-Pizza cutter or pizza wheel (optional)
You don’t need a pizza peel.
Step 3: Flatten the dough into the pizza pan, to get it ready for the oven.
You can turn the oven on to pre-heat or you can wait if it’s your first time or so baking pizza.
Regarding temps, if you want to use 425 degrees (Fahrenheit, just to clarify for my Brit friends), that will give you a crispier bake like a pizza oven would.
If you prefer to cook under 400 degrees because it’s a hot summer day or your fire alarm can go off in apartment living, then you can bake with standard 350 degrees/180°C.
So anything in between 350/180°F and 425/218°C degrees will work. Remember pizza crust is forgiving (and I dare say easy).
OK, so here’s how to make the home pizza crust…
Fancy hand way: Take your dominant eating hand and place ontop of your weaker hand. Put your dominant index finger and middle finger below your weaker hand index finger and middle finger (crossing your thumbs).
Or…
Simple hand way: Place your hands side-by-side, index fingers touching.
Either way, using your fingers, put pressure into the dough as you’re making hand imprints. Use enough pressure to make a dent, but make sure you’re not making holes in the dough, and it’s thick enough to hold the amount of sauce you plan to use.
If you get a hole in your dough, simply start over like you would with Play-doh. Roll the dough back into a ball and then flatten the ball with the palm of your hand (that you can coat with a little more flour as needed).
Push down on the dough and make handprints on every part of the dough.
Keep turning the dough 90 degrees while you move along and your hand is at a 90-degree angle (or at 3 o’clock clockwise or 9 o’clock counter-clockwise if you like clock descriptions).
For a right-handed person, you can turn the dough clockwise (and counterclockwise for a left-handed person).
Then flatten down the middle of the dough with your fingers and palm of your hand to get out all the trapped air bubbles.
Do this once and then flip the dough to the other side (back side), and do the same process. Add more bench flour underneath the dough as needed.
Keep working with it until it’s the right crust size for your pan or toppings.
If you want a super smooth dough crust without your handprints or blemishes, turn the dough with your gentle palms while lightly kneading, smoothing, and stretching the dough with palms (like you’re sanding it down).
I skip that part as a handmade-looking pie to me is part of the fun.
For basic round or irregular shapes, making the dough can take one minute or less with practice.
I know my instructions are descriptively long, but once you get the hang of it, it can be fast and easy!
In the beginning, take your time learning. It can be fun and maybe even a ‘lil therapeutic especially if you have some good music going on!
And, then here’s another important step/option that I recommend:
When you’re satisfied with your pizza dough that will be your topping base and crust, pre-bake the home pizza crust first (without toppings) especially if you are using lower baking temps.
This is necessary if you are using lower 350-degree temperatures, but you can skip this step if you want if you use much higher temperatures.
I use the prep-baking crust waiting time to clean off my dough hook, mixing bowl, and other supplies I’m finished with, so I have minimal cleanup later.
After 10 minutes (a magic number for pizza step waiting times), pull the slightly toasted home pizza crust out of the oven.
Let it cool for a few minutes, but you don’t have to wait until it’s room temperature again.
Then you can add your sauce with a spoon or ladle and spread evenly starting in the middle and applying less and less pressure towards the crust.
That’s the way we use to do it in the pie shop 😉
Btw, you can make other sauces like pesto, barbecue, or balsamic (that are other personal favorites of mine)! Maybe you too as you get to be a pizza pro?
…But here I’ll keep it super simple with the tomato sauce. And you can check out how to make a whole wheat flour veggie pizza.
Step 4: Then lay your toppings on.
The secret for better baking through is to put the quickest to cook items on the bottom. So any thin, flat veggies (like black olives and mushrooms) and flat meats like anchovies, and then add the lumpier foods on the very top layer.
If you use buffalo mozzarella (the white ball kind), treat it like a topping instead of cheese. For shredded cheeses like regular mozzarella cheese, add as the first layer over the sauce.
If you want to use tomatoes that aren’t finely diced (tomato concasse in fancy Italian restaurants), bake them on the side in another pan as they could be too wet and create a mess on your pizza in the oven or prolong your baking time (sundried tomatoes are ok on the pizza).
For any meats, cook them through in advance especially if you’re baking your pizza on 350 degrees.
Now you’re in the home stretch! You just have one more step.
Step 5: Bake your home pizza crust (or cook your pie 😉).
When you’re happy with your fully loaded Picasso-pizza art, put it back in the oven on your lowest or medium rack, and if you’ve pre-baked the dough then you don’t need the pizza pan anymore if you want.
You can just set your pizza right on the baking rack. Sometimes I leave the pan baking just depending on the crust I want. Try it both ways.
And then bake for another 20 minutes to your crispy done liking (all ovens are different and depend on your dough thickness, ingredients, etc.).
Check the crust bottom to determine doneness and if it’s not yet done, but toppings are done or shriveling/drying up, then add a piece of aluminum foil on top and keep baking until the crust is done.
Don’t leave the pizza in there after you’ve turned off the oven, like you could in baking other goods, as this can dry out the toppings and the fiery heat will be gone from the crust which usually takes the longest to bake.
When done, pull out of the oven. Presto! Let it cool and then cut and enjoy.
If you want to add individual flavors, like if you’re feeding a larger group, you can have side parmesan-reggiano cheese, oregano spice, red pepper flakes, garlic, drizzle or olive oil, or caper ingredients (just to name a few ideas)!
…And then you will have 100% impressed your friends with your rock star homemade pizza baking skills ⭐️
The sky’s the limit! And while you’re waiting on your baking oven, you can do a few baking yoga moves, if you’re so inclined.
Shiitake mushrooms and apple cider vinegar cracker pizza crust.
And then when you’ve made easy home pizza crust, you can make your own mushroom Neapolitan-style airy pizza crust from your home or apartment oven, like you would get out of a professional wood-fired pizza oven.
You can make this Italian style pizza crust at home in your oven with mushrooms or any of your favorite toppings.
Course lunch, Main Course
Cuisine American, Italian
Author Brandy @ Healthy Happy Life Secrets
Ingredients
1cupbread flour
1tspsalt (coarser kosher salt works well)
water (start with 1/4 cup and add more)
1/4tspinstant yeast
toppings (e.g. mushroom, buffalo mozzarella cheese, and sauce).
1tbspextra virgin olive oil
bench flour (e.g. semolina flour or bread flour)
Instructions
Make the dough. Add flour, water, salt, and yeast ingredients to a mixer bowl or bowl if you are making the dough by hand. You will use about 1/2 cup water per 1 cup flour.
Knead the dough, until a cohesive pizza dough ball can be formed. With a bread dough hook on a mixer, this will be about 5 minutes on high, 7 minutes on a medium setting (and about double time by hand).
Add some olive oil to a plastic container with a lid.
Place dough in container and let proof for at least 2 hours. Can be left overnight in the refrigerator and be sure to not let the dough dry out.
Then add some bench flour to your pan to prevent sticking (semolina flour is classic for Neapolitan pizza but any flour will do). I suggest a baking pan with a Silpat setup ontop to prevent the pizza crust from sticking to the pan.
Flatten the dough into the shape you want with your hand and fingers. Avoid the crust edges to create a more airy crust.
When you're happy with your pizza shape pre-baked, then place in center of the oven bottom rack and bake for about 20 minutes on 350°F/180°C oven. The pizza crust will not be finished but it will be hard enough on the crust bottom to be able to broiled without a pan.
Add sauce, cheese and pizza toppings.
For the airy crust and charring pizza crust marks, broil your pizza. For preparation, remove Silpat (if using)and your baking pan, and slide the pizza to the top oven shelf at least 6-8 inches away from the top of the oven where the oven heat will be coming from (not the bottom like baking settings). In most common ovens, the 2nd rung down for the top adjustable metal rack works well. Turn on the broil (caliente hot!) setting for 2-5 minutes until crust is slightly charred giving the wood-burned fire "effect." You'll see the heating source from the oven lines above that could take a minute to heat up (indicated by the top red heating element). Safety tips: Be careful and watch the broiling the entire time with the oven light "on," so you can be fully safe. Do not open the oven door at any time that the broil setting is fully heated or turned on. And do not turn your pizza without turning the broiling setting off and waiting for the oven to cool down before opening the oven door (and then turning back on). Test your oven for the best broiling time for your pizza crust, and do not overcook.
Notes
You don't want your dough to dry out, so be sure to add enough water so it's more like an elastic smooth skin versus stringy dough. And be sure to cover the dough.If you do not have instant yeast on hand, you can use baking powder.
Fresh orange juice is a popular, year-round favorite. In the winter, oranges are in season, so you can find an abundance of oranges.
That’s also when most people load up on Vitamin C that they associate with orange juice, and why orange juice grocery shelves can be full or running empty.
And summer is a popular time too as it’s served in vacation towns and resorts.
I share below how you can optimize an entire orange in homemade fresh orange juice squeezed by hand.
If you’re inspired by fresh juices, this is a smart idea to save money, be healthy, and enjoy conveniently at home.
And speaking of enjoyment, last week I had a nice surprise.
I won a gift card to a local smoothie place I’m inspired by. They are my inspiration for tropical smoothies.
One day I saw someone coming out of a yoga studio in my town who was carrying this mermaid blue color bowl that’s the size of a large yogurt container.
I had to find out what this healthy ingredient is!
I learned it comes from an ingredient called blue majik (that’s the magic in the blue bowl). 🥣
The South Block smoothie chain also uses ingredients like camu camu and maca root.
You feel like you’ve been invited to a new array of rainforest superfoods shipped from an exotic locale in the world and infused in your made-to-order bowl or smoothie.
It’s dreamy, no?
OK, I could go on and on excited!…
But, today I also wanted to share how you can optimize oranges in a house-made fresh orange juice.
I’ve become super sensitive to how much sugar I consume and that’s healthy motivation.
And that hopefully inspires you to think healthy food and drinks at least most of the time (as it does for me).
Next time you think about getting orange juice from the store, consider making your own fresh orange juice from whole oranges where there’s no added sugar.
Fresh Orange Juice
Look for heirloom, organic, or local farmers market produce as in season (free of pesticides, good for us and the environment)
And oranges are one of my favorite fruits as I love the smell of oranges. Here’s why…
They are good for calming anxiety, aromatherapy, and if you’re leaning into the Vata mind-body ways or wanting to restore any Vata imbalance.
If you can’t get the work life balance or life is stressful, keeping an orange near you to sniff and that’ll help calm you.
And making fresh orange juice will also in its healthy-balancing effects.
And if you feel it in your nervous digestive tract, you can try an orange elixir like this recipe:
5 Spice blend (Five spice is star anise, cloves, cinnamon, fennel, and black pepper) - (amount adjustable to liking)
water (dilute as needed)
Instructions
Zest and peel an orange. Keep all the parts. Tip: use navel, Cara Cara, blood, or heirloom oranges. They are good for the calming (and good for parasympathetic nervous system also affecting good digestion).
Squeeze the pulp into your orange juice container (or enjoy).
Add your zest and peels to the container.
Add five-spice blend.
Add apple cider vinegar
Fill up with water. Shake and refrigerate. Enjoy when you have an upset stomach.
There are so many orange varieties to choose from. I love the Cara Cara sweetheart orange variety (common around Christmas) that can be juicier and sweeter than a California navel orange that’s in season a little earlier.
Plus fresh orange juice makes me think of my second home, staying in nice hotels! Once upon a time I worked in hotel catering management where I got my first taste.
And you may have seen out and about those gigantic commercial machines that crank out fresh orange juice from whole oranges. That would be a fun job for a day!
You may have seen one of these at selective grocery stores if you live in a larger metro area.
Fresh orange juice definitely ruined me for any added sugar orange juice that comes from a carton (like I grew up drinking).
Concentrated is high sugar and harsh on the stomach, and especially along with a morning coffee routine that Americans commonly do. That’s double acidity.
👉 You can opt for making your own organic cold brew coffee and diluting orange juice with water.
So let’s begin and get your fresh orange juice-on!
For equipment, you can use a citrus squeezing tool, which is one of my favorite kitchen tools because it’s bright yellow so I have no choice but to be sunny with the brightening citrus when I use it 😉.
And a zester microplane tool that looks like a zester.
These are the parts of the orange.
Orange Zest (essence). Before I cut into the orange for orange juice, I go around the orange peel, grating, and capturing all the outside orange zest as essence for zhughing up other sweet morning smoothies, dishes, and garnishes (that’s where my former-catering mind goes and yours can go wild too!).
Orange Pith. Most people throw the spongy, slightly bitter part out, but consider keeping.
This would good in the orange digestif recipe mentioned already.
The orange pith is high in Vit C (as is the juicy pulp) and anti-inflammatory flavonoids. For those reasons alone, it’s worth considering mixing in foods and drinks/smoothies.
Plus leaving no traces of fruit is good for not attracting critters. 😉
Orange Juice and Pulp. Then cut the orange in half (perpendicular to the top or the stem or from left to right).
I know it’s tempting to cut the orange any which way since it’s perfectly round, but cutting the right way lets you cut through each orange segment to maximize juice.
Otherwise you could get stuck on a pillowy-feeling orange segment.
Now you’re ready to squeeze each orange half or use a citrus squeezer tool, and squeeze away the juice into a tall glass.
Let go of all your stress squeezing oranges. Activating calming oranges around you is a relaxing sensory exercise.
Keep repeating until you have the amount of juice you want. Add back pulp as desired if you like high pulp juice.
You can also add some water to dilute some or stretch the juice out for more.
And enjoy!
No-Waste Eco-Friendly Ideas: Save the orange pulp if you prefer high-pulp OJ and add small orange pieces to your drink.
Save the seed to grow a plant. Save the pulp and zest for cooking and baking recipes. Save the pith that has the most nutrients for digestifs and foods. Save the orange sticker as a reminder for getting the Produce LookUp (PLU) item again. 😉
If you like fresh juices, you may want to give Fresh Peach Juice and Mango Juice other sunny yellow inspiring fruity juices a GO.