
Home pizza crust is easy and fun to make as homemade pizza dough. And it can be made with any gluten flour like bread flour that I love as more universal to use. You can make other bread types and not just pizza like with 00 flour.
Below you can learn step by step how to get the home pizza crust you want including a Neapolitan style crust that’s popular in restaurants with wood fire ovens… but that you can make even from an apartment oven! 👇
…Without waiting for one to be delivered.
This is impressive to your friends and learning how to make your own pizza crust is rewarding. 😋
…Pizza can be a healthy meal that’s filling for all ages. I have a homemade pizza recipe you can try along with all the detailed steps from scratch below…
And you can learn techniques from me, a once-upon-a-time pizza maker teenager for 4 years who worked at the busiest Domino’s Pizza store and franchise in the world 😊… yes, in the world. 🌎
Back then, we would crank out over 200 pizzas an hour on any given Friday or Game Day Sunday. This was when the 30 minute guarantee still existed and then became a well-known business case study.
It was the funnest job I ever had… and very memorable decades later where I use my pizza learned skills to make home pizza today. Like these thin crispy or regular chewy pizza crust styles.

And which btw you can make your own special pizza masterpiece from start to finish, faster than you can order a pizza and have it delivered.
So let’s begin…
First, you don’t need a pizza kit.
To make homemade pizza, you just need two essential simple ingredients (flour and water) you already have in your house (or can easily get) to make the dough.
Plus 4 ingredients if you want a bigger crust rise (flour, water, instant or active yeast, and salt). Or you can let room temperature act as the growing yeast (like in sourdough).
Homemade pizza needs no long prep time like pulling out ingredients in advance, like in other baking recipes. So it can be making and baking EASY.
It also has an advantage over breadmaking: you don’t need to wait for hours for the pizza dough to proof.
Making homemade pizza dough needs only a few minutes. You can simply prepare, bake, and enjoy in less than an hour.
If you’re not a planner this can be a winner.
But then again, you’d probably buy store-bought or order delivery. …but then that would be no fun, and you wouldn’t get the healthy, homemade pizza.
So I’ll assume you’ll give it a try at least at some point. You’ll be glad you did! 🎉
Here’s how to make homemade pizza…
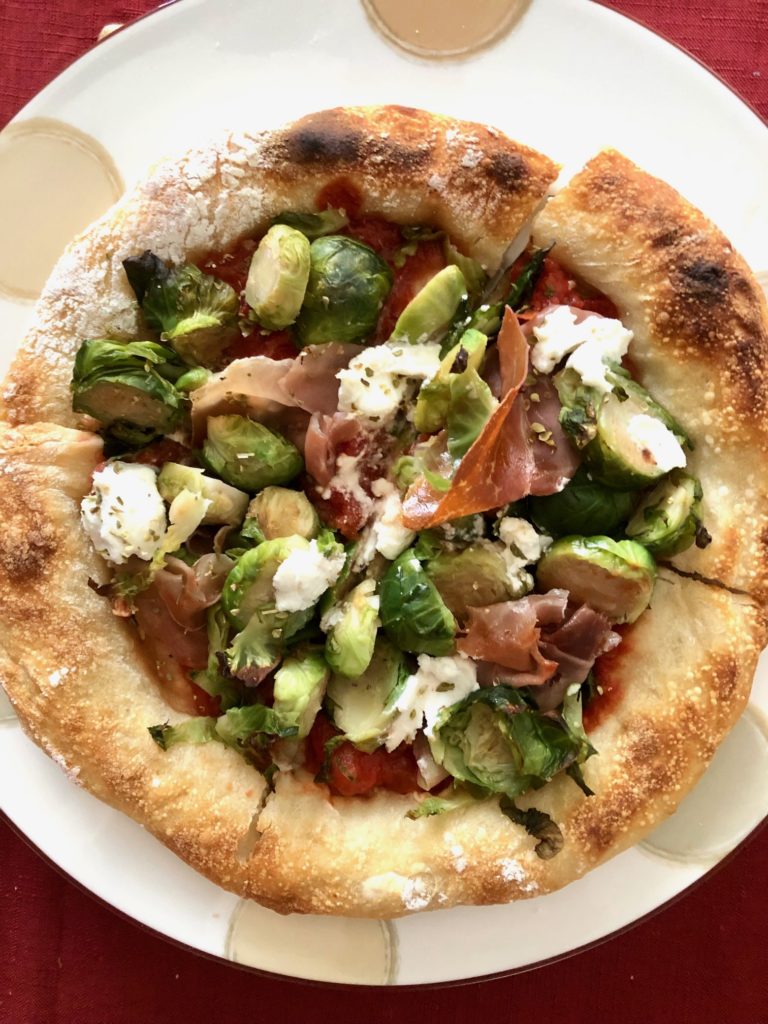
Before you do anything, there is one area to plan. You should consider what you’ll add on top of your pizza crust.
If you load with gobs of cheese, then you’ve added fat and dairy (…that isn’t always a bad thing as cheese has vitamins, calcium, other minerals, and satisfies cheesy craving…).
For a healthy recipe, use fresh shredded mozzarella cheese or sliced buffalo mozzarella like on a Margherita pizza. It’s one of the healthier (less greasy) cheeses if your stomach is sensitive and end up sopping up the cheese grease.
Now you’re ready to start and pull out all your homemade pizza dough ingredients.
Instant yeast. I buy the small Red Star packets. The yeast balls look like microscope-tiny, perfectly round khaki brown color beads. And a tip is if you don’t have instant yeast on hand, you can use baking powder that you would use for cakes. Yes, baking powder!
Water. 1 cup warm or room temperature tap water is fine. You may want to experiment as you know what they say about the famously delicious New York pizza crust (the rumor is that it comes from the water).
I’ve used seltzer and filtered water for pizza crust, and I find tap is still the best all-around.
Flour. You have options. Bread flour is the one for Neapolitan-style airy pizza. You don’t need special “00” flour even though you’ll find many recipes with this.
With bread flour you can use for other breads and it’s generally less expensive.
And if you aren’t doing an airy crust, other options are:
You can use a mix of regular or all purpose flour with whole wheat flour (that has a higher bread protein content). Whole wheat flour dough will be less sticky.
And if you use semolina flour for your bench flour, then that will help your dough from sticking to the metal pizza pan you use.
Another reason to choose whole wheat flour is the slightly higher, healthy fiber content. There are also gluten-free options.
In total, use about 2-1/2 flour total, but you will need more when you’re working with the dough.
You get better with practice and experience. You may be able to later eyeball how much you need.
Salt. 2 teaspoon table salt. You can use a little more salt if you use sea salt or if you plan to use fresh mozzarella (or buffalo mozzarella) that doesn’t have as much salt as some other cheeses. Kosher salt or a coarser salt will work well.
Optional: 1 tablespoon EVOO (helps with adding taste and less sticky dough).
Here are the 5 easy home pizza crust steps (broken down in detail):
Step 1: Make the pizza dough.
Add the yeast to water and let it settle/dissolve for about 5-10 minutes. The mixture will have a milky color and consistency. Set aside.
Separately, add the flour or mixed flours of choice to your mixing bowl (I like half and half whole wheat and regular or all-purpose flour). Add 1 teaspoon salt or you can use 1-½ teaspoon sea salt (if you want to use non-iodized salt as I use). Then add EVOO if you’re using, and the water-yeast mixture.
Dough by hand method: You can make the dough by hand, and if you do it that way, I’d recommend creating a neat flour mountain on a shallow baking pan where the flour won’t stick to everything.
Using semolina flour as a lightly floured surface is a preference.
Then add a dip in the middle of the mountain where you would add the liquids, like you may have seen or done at home making pasta the old-fashioned way (except there are no eggs needed in pizza making).
Dough with machine (recommended): It’s easier to use a mixing machine with the dough hook, like the Kitchen Aid mixer (I have a baby pink Cadillac color one… Paris Hilton and I have something in common, lol).
With a machine, in a few quick minutes, the dough should be ready. You’ll know when it’s done when it’s not too dry, and not too wet, and has some good elasticity. Pizza dough is forgiving and is only part of the pizza pizzazz (say that 10 times).
Remember to scrape down the flour from the sides of the mixer. As you’re waiting for the dough to finish mixing, generously flour your pan.
I recommend a mix of coarser semolina flour and regular all-purpose flour for the bench flour.
When it’s ready, pull the dough out of the bowl. You’ll be able to form a small ball with the dough, and you may need to add more regular flour on the outside if it’s too sticky.
Form a dough ball and let it rest on the pan you’ve floured. Leave it sitting or resting at room temperature for 10 minutes.
Note, you don’t even need a plastic wrap or another container you’d have to clean like in bread making!
Step 2: Prep the toppings and the sauce.
While the dough is still resting, I get the topping ingredients ready.
I open the tomato sauce can (many restaurants use San Marzano tomatoes that I recommend), and I add finely chop anchovies with a serrated knife to the sauce as my secret ingredient (that’s not a secret anymore).
It adds salt and another flavor dimension (or you can just add a teaspoon of salt to the sauce if you prefer a saltier-tasting pizza).
Tomato sauce will add sweetness back. You can make your own tomato sauce but since it’s not the star of the dish, canned will work just great.
If you want a chunky style, Marzano tomatoes are plum tomatoes which are the kind commonly used in Italian restaurants. Or else use any tomato sauce or paste.
If you are using fresh cheeses like buffalo mozzarella, slice the cheese into smaller bits.
And if you use basil leaves, wet them a little like with a wet paper towel as they will settle a little better on the pizza. Alternatively, you can use spinach leaves like I use as healthy-alternative inspiration.
For any other wet ingredients like black olives, drain any excess liquid and dry them with a paper towel if you need to (as that would be a damper to your pizza… sorry, I couldn’t resist. Today is a fun day.).
By the time you finish this step, your pizza dough should be ready to work with.
A quick back story: I used to be a pizza maker (or pie maker as they referred to) as a teen before I could drive, and for the busiest Domino’s Pizza… not in the country, but in the world (yes the world! that is becoming smaller every day).
I stuck around for 4 years until I took on other food-related jobs in college.
So, I still make the dough the way I learned from the modern pros!
We used to crank out 300 or so pizzas in an hour as a team during the busy football nights, and during the 30-minute guarantee years (you probably don’t remember!).
Our heads were down but it was fun energy in the shop![OK back to the business of making your homemade pizza]…
Equipment you need:
-Pizza pan. Any metal pan will work.
-Pizza cutter or pizza wheel (optional)
You don’t need a pizza peel.
Step 3: Flatten the dough into the pizza pan, to get it ready for the oven.
You can turn the oven on to pre-heat or you can wait if it’s your first time or so baking pizza.
Regarding temps, if you want to use 425 degrees (Fahrenheit, just to clarify for my Brit friends), that will give you a crispier bake like a pizza oven would.
If you prefer to cook under 400 degrees because it’s a hot summer day or your fire alarm can go off in apartment living, then you can bake with standard 350 degrees/180°C.
So anything in between 350/180°F and 425/218°C degrees will work. Remember pizza crust is forgiving (and I dare say easy).
OK, so here’s how to make the home pizza crust…
Fancy hand way: Take your dominant eating hand and place ontop of your weaker hand. Put your dominant index finger and middle finger below your weaker hand index finger and middle finger (crossing your thumbs).
Or…
Simple hand way: Place your hands side-by-side, index fingers touching.
Either way, using your fingers, put pressure into the dough as you’re making hand imprints. Use enough pressure to make a dent, but make sure you’re not making holes in the dough, and it’s thick enough to hold the amount of sauce you plan to use.
If you get a hole in your dough, simply start over like you would with Play-doh. Roll the dough back into a ball and then flatten the ball with the palm of your hand (that you can coat with a little more flour as needed).
Push down on the dough and make handprints on every part of the dough.
Keep turning the dough 90 degrees while you move along and your hand is at a 90-degree angle (or at 3 o’clock clockwise or 9 o’clock counter-clockwise if you like clock descriptions).
For a right-handed person, you can turn the dough clockwise (and counterclockwise for a left-handed person).
Then flatten down the middle of the dough with your fingers and palm of your hand to get out all the trapped air bubbles.
Do this once and then flip the dough to the other side (back side), and do the same process. Add more bench flour underneath the dough as needed.
Keep working with it until it’s the right crust size for your pan or toppings.
If you want a super smooth dough crust without your handprints or blemishes, turn the dough with your gentle palms while lightly kneading, smoothing, and stretching the dough with palms (like you’re sanding it down).
I skip that part as a handmade-looking pie to me is part of the fun.
For basic round or irregular shapes, making the dough can take one minute or less with practice.
I know my instructions are descriptively long, but once you get the hang of it, it can be fast and easy!
In the beginning, take your time learning. It can be fun and maybe even a ‘lil therapeutic especially if you have some good music going on!
And, then here’s another important step/option that I recommend:
When you’re satisfied with your pizza dough that will be your topping base and crust, pre-bake the home pizza crust first (without toppings) especially if you are using lower baking temps.
This is necessary if you are using lower 350-degree temperatures, but you can skip this step if you want if you use much higher temperatures.
I use the prep-baking crust waiting time to clean off my dough hook, mixing bowl, and other supplies I’m finished with, so I have minimal cleanup later.
After 10 minutes (a magic number for pizza step waiting times), pull the slightly toasted home pizza crust out of the oven.
Let it cool for a few minutes, but you don’t have to wait until it’s room temperature again.
Then you can add your sauce with a spoon or ladle and spread evenly starting in the middle and applying less and less pressure towards the crust.
That’s the way we use to do it in the pie shop 😉
Btw, you can make other sauces like pesto, barbecue, or balsamic (that are other personal favorites of mine)! Maybe you too as you get to be a pizza pro?
…But here I’ll keep it super simple with the tomato sauce. And you can check out how to make a whole wheat flour veggie pizza.
 Step 4: Then lay your toppings on.
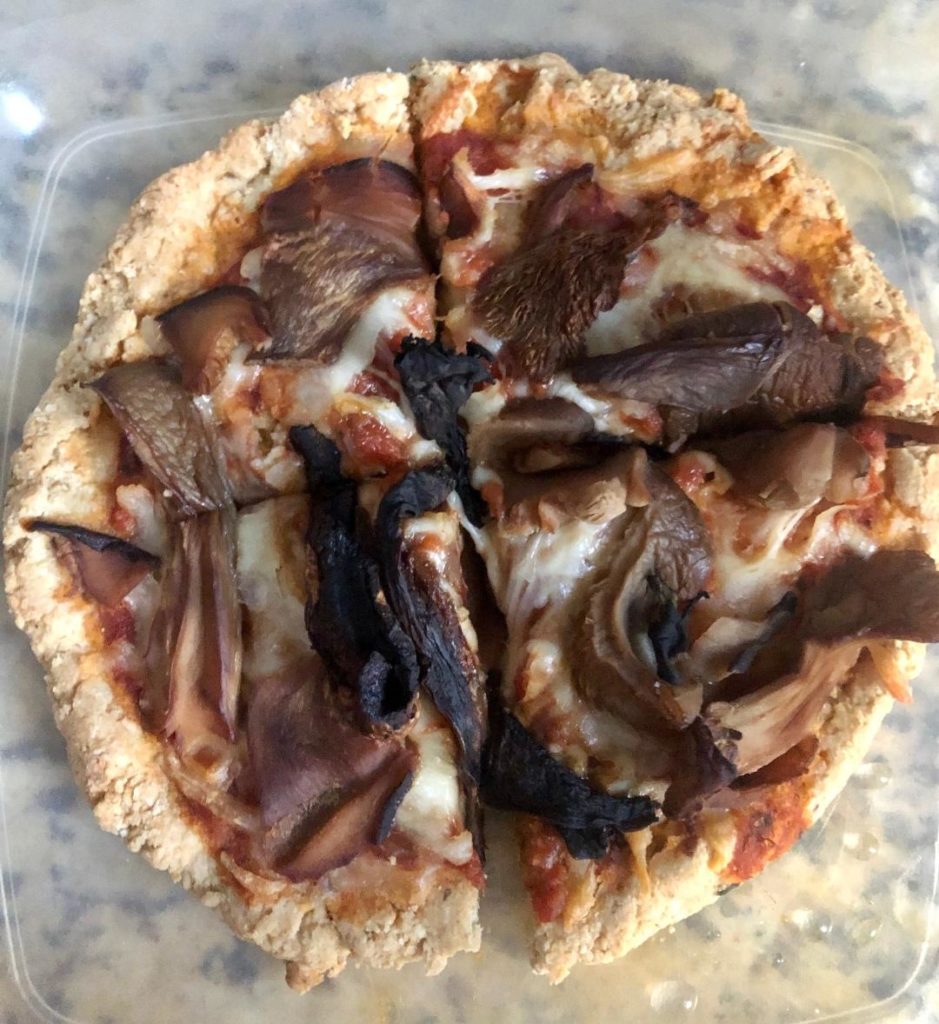
The secret for better baking through is to put the quickest to cook items on the bottom. So any thin, flat veggies (like black olives and mushrooms) and flat meats like anchovies, and then add the lumpier foods on the very top layer.
If you use buffalo mozzarella (the white ball kind), treat it like a topping instead of cheese. For shredded cheeses like regular mozzarella cheese, add as the first layer over the sauce.
If you want to use tomatoes that aren’t finely diced (tomato concasse in fancy Italian restaurants), bake them on the side in another pan as they could be too wet and create a mess on your pizza in the oven or prolong your baking time (sundried tomatoes are ok on the pizza).
For any meats, cook them through in advance especially if you’re baking your pizza on 350 degrees.
Now you’re in the home stretch! You just have one more step.
Step 5: Bake your home pizza crust (or cook your pie 😉).
When you’re happy with your fully loaded Picasso-pizza art, put it back in the oven on your lowest or medium rack, and if you’ve pre-baked the dough then you don’t need the pizza pan anymore if you want.
You can just set your pizza right on the baking rack. Sometimes I leave the pan baking just depending on the crust I want. Try it both ways.
And then bake for another 20 minutes to your crispy done liking (all ovens are different and depend on your dough thickness, ingredients, etc.).
Check the crust bottom to determine doneness and if it’s not yet done, but toppings are done or shriveling/drying up, then add a piece of aluminum foil on top and keep baking until the crust is done.
Don’t leave the pizza in there after you’ve turned off the oven, like you could in baking other goods, as this can dry out the toppings and the fiery heat will be gone from the crust which usually takes the longest to bake.
When done, pull out of the oven. Presto! Let it cool and then cut and enjoy.
If you want to add individual flavors, like if you’re feeding a larger group, you can have side parmesan-reggiano cheese, oregano spice, red pepper flakes, garlic, drizzle or olive oil, or caper ingredients (just to name a few ideas)!
…And then you will have 100% impressed your friends with your rock star homemade pizza baking skills ⭐️
The sky’s the limit! And while you’re waiting on your baking oven, you can do a few baking yoga moves, if you’re so inclined.
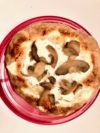
And then when you’ve made easy home pizza crust, you can make your own mushroom Neapolitan-style airy pizza crust from your home or apartment oven, like you would get out of a professional wood-fired pizza oven.
Neapolitan-Style Home Pizza Crust
Ingredients
- 1 cup bread flour
- 1 tsp salt (coarser kosher salt works well)
- water (start with 1/4 cup and add more)
- 1/4 tsp instant yeast
- toppings (e.g. mushroom, buffalo mozzarella cheese, and sauce).
- 1 tbsp extra virgin olive oil
- bench flour (e.g. semolina flour or bread flour)
Instructions
- Make the dough. Add flour, water, salt, and yeast ingredients to a mixer bowl or bowl if you are making the dough by hand. You will use about 1/2 cup water per 1 cup flour.
- Knead the dough, until a cohesive pizza dough ball can be formed. With a bread dough hook on a mixer, this will be about 5 minutes on high, 7 minutes on a medium setting (and about double time by hand).
- Add some olive oil to a plastic container with a lid.
- Place dough in container and let proof for at least 2 hours. Can be left overnight in the refrigerator and be sure to not let the dough dry out.
- Then add some bench flour to your pan to prevent sticking (semolina flour is classic for Neapolitan pizza but any flour will do). I suggest a baking pan with a Silpat setup ontop to prevent the pizza crust from sticking to the pan.
- Flatten the dough into the shape you want with your hand and fingers. Avoid the crust edges to create a more airy crust.
- When you're happy with your pizza shape pre-baked, then place in center of the oven bottom rack and bake for about 20 minutes on 350°F/180°C oven. The pizza crust will not be finished but it will be hard enough on the crust bottom to be able to broiled without a pan.
- Add sauce, cheese and pizza toppings.
- For the airy crust and charring pizza crust marks, broil your pizza. For preparation, remove Silpat (if using)and your baking pan, and slide the pizza to the top oven shelf at least 6-8 inches away from the top of the oven where the oven heat will be coming from (not the bottom like baking settings). In most common ovens, the 2nd rung down for the top adjustable metal rack works well. Turn on the broil (caliente hot!) setting for 2-5 minutes until crust is slightly charred giving the wood-burned fire "effect." You'll see the heating source from the oven lines above that could take a minute to heat up (indicated by the top red heating element). Safety tips: Be careful and watch the broiling the entire time with the oven light "on," so you can be fully safe. Do not open the oven door at any time that the broil setting is fully heated or turned on. And do not turn your pizza without turning the broiling setting off and waiting for the oven to cool down before opening the oven door (and then turning back on). Test your oven for the best broiling time for your pizza crust, and do not overcook.