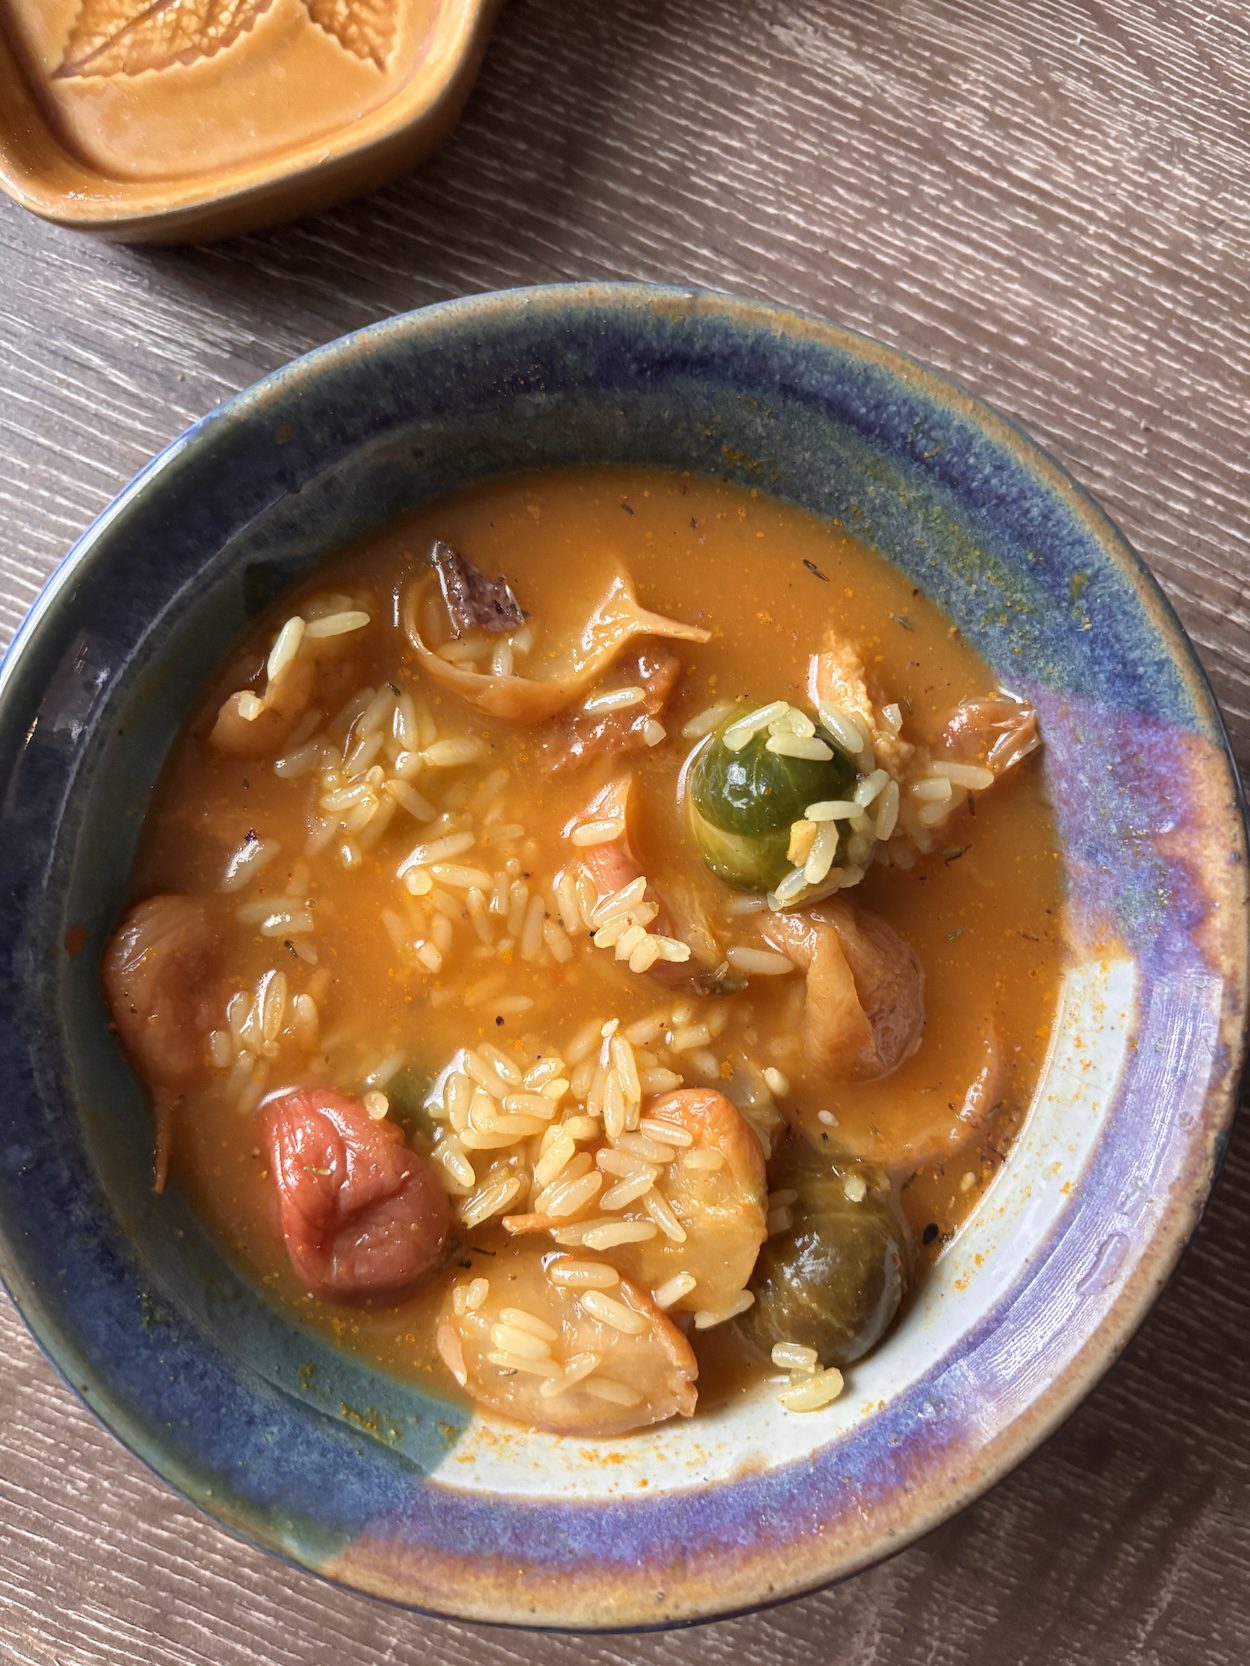
Turmeric soup is one anti-inflammatory soup that’s so easy to make. All you need is water and turmeric spice. But you can add so much more (see below)! And it’ll be comforting for fall and holidays… and healthy good year-round (as I share how it has helped me). And why you want to use the turmeric spice vs. fresh turmeric for this soup bowl. 🥣
Turmeric is good for inflammation that can mean so many irritating (Pitta) things. For me, I have found it has healed joint pain from climbing big boulders and doing thousands of steps that’s exercise healthy. But over time, knee joints and other joints need some healing.
And when I say healed, I mean within a day or two I felt good and was able to do yoga. Before I added turmeric to my daily diet, I didn’t feel that way.
Another time, same season, I had gum inflammation. Along with mouth rinses from salt rinses and medicine cabinet bottles, I added turmeric as medicine. And within two days, the redness on my gum disappeared. That saved me a trip to the dentist.
So now you have heard two examples of how turmeric soup can be a bowl of medicine and deserves its anti-inflammatory reputation.
And you can make your own bowl of turmeric soup. 🥣
I like rice for texture substance that adds nutrients and is hearty filling. And goes well with the smokey tasting spice. Plus, reasonably priced per serving.
The spice or powder is more savory flavor bold vs. the fresh turmeric root vegetable version (that’s more pricey and harder to find sometimes). Just be sure to use spice that hasn’t expired.
Fresh turmeric looks a little like ginger, and that’s because they’re related!
Turmeric is in the ginger family. 🫚 They are both rhizomes (as is asparagus, a prebiotic food). These are options to add to your healthy turmeric soup.
And you can first start with the rice that’s easier to digest (as gluten-free). For foolproof fluffy white rice, you can read my notes.
Brown rice and wild grain rice are whole foods great on an anti-inflammatory diet because they’re less processed.
The rice bran and germ are kept intact where additional B-vitamins are.
You can add your protein choice, and include 15-beans for one potent protein bowl. You can also make a Magic Bullet dip with the beans.
In the bean mix, some are actually legumes and not beans.
Just remember, all beans are legumes, but not all legumes are beans.
Remember those school grammar lessons?
How fun to practice on peas (that are legumes) with fruits in pods (or seeds). 🫛 And lentils and peanuts are also legumes (not beans!).
Lentils are easy to point to by their half shapes.
And not to get too technical, but a chick pea is a bean: a chic garbanzo bean.
But you already knew that!
And all these are in your 15-bean (or 16-bean) packages. I wouldn’t be surprised if there’s a 33-bean one as there are hundred of beans in the world and some even say like 40 thousand that’s surprising to hear!
The list is long, and from that lens short on a 15-bean bag.
If you read the label, actually you’ll notice there are more than 15 named, but actual only 3 lines long: northern, pinto, large lima, yelloweye, garbanzo, baby lima, green split pea, kidney, cranberry, small white, pink, small red, yellow split pea, lentil, navy, black, and white kidney. They sound like organs or colors on a college jacket.
Did you find the ones that are non-beans?
And since we’ve gotten technical, there are more than 15 listed (there are 17 if you’re counting). This has to do with variety. But from school-me class 😊, we just learned that some legumes are not beans, so maybe it should be called 17 legumes soup? 💭 …Not as catchy though.
And would make a great school project. And if you want to give a school grader a project, have them separate the types.
Either way, it’s a great lesson in food variety and would make for nice art work in a bowl. 🥣
One that I do is turn it into a turmeric bean soup.
To make this:
Soak the beans in room temperature water in a bowl covered overnight so they expand and soften.
Then cook the 15-beans on medium heat until soft. This usually takes over an hour. If you want to lean into the smoky tastes, you can let the water run out on the beans. Then add back before it blackens.
You’ll get a nice smoky aroma and taste that makes it very warming and inviting. This is a great fall soup. The colors look like leaves turning and it’s comforting.
Then turn your soup into an easy Magic Bullet dip.
Comment below what are your fave ways to add turmeric. 🧡
Personally, I can’t douse enough of the anti-inflammatory turmeric on my savory foods.
…On my longevity mission and hundreds of up and down hill mountain hiking miles, I’ve crossed over many stones (some big boulders) and that adds to harsh knee impact. Adding turmeric to my diet, I’ve found those pains have subsided. Turning the stones in life to healing is victory in my book.
What if your destiny on the planet we live on isn’t the one you’re seeking and have been led toward? By no fault of your own.
What if you and I are actually here to learn more about our core being, and who we really are when the masks are off.
And the person we show up as to our friends and co-workers, is temporarily the placeholder today.
Until ding-ding-ding a revelation bell goes off?
…Well, that was my life experience in a nutshell.
This for me (like many other people), took many relationships and situations before I realized I was doing life all wrong.
I was living according to the desires and aspirations of the culture I’m in and from. That’s what most of us do.
And in America, we have choices and aspirational options.
Looking back, I lived like most my peers and people I grew up with that went to college, graduated from business school, and then entered the corporate ranks.
In management roles, I looked good on paper.
And initially I took a sideway bend off the beaten path in hotel catering where I knew no one else who joined that field.
That was my first adult work start after cutting the college cord.
Those early years, I often felt alone and at odds from my peers that were just work miles away, but whom I rarely saw.
I was in my work bubble and they were in their life and work routines.
When my friends were at happy hours and hanging out, I was working in a nearby hotel whose doors never closed to the public.
And behind closed doors, I had all kinds of work and growing pain life problems that socializing couldn’t solve.
I was finding a new grown up identity.
…That I learned only Destiny calling could help me with.
I believe Destiny first showed up then in those seasons.
Destiny to me is the place where you turn to when you don’t know where else to go and no one can help you.
Then several years later, with a little internal digging for answers, I felt like I had it together… at least on the outside.
I found a 9-5 professional office gig that put my college degree to work and started to chip away at the college debt I amassed.
Finally, I had made it to a “real job” like my peers. 🎉
I was able to relax more with some much needed work-life balance and even owned my first home that a few years earlier I thought would never happen.
In my off-work hours I felt like I could tap into my spiritual-me sides that I had put aside in my early adult years.
I also made new grown-up friendships.
Those were still external growth pursuits, but I was headed in a healthier personal growth direction.
But Personal-me still needed to change and heal.
That I didn’t know yet. You don’t know what ya don’t know.
But I still had time on my side being young learning life’s ropes.
Ummm… until I came head-on with my Authentic Self when the life rug was pulled out from under me.
Only when I lost a job, and then a second and third from economy layoffs, did I catch on.
I was devastated and humbled to my core.
Now what?
I took one step in front of the other to progress.
Years later, I chose to go on a sabbatical in-between jobs and moved away from everyone I knew.
I was already “off-course” so I had nothing to lose.
It was the opposite of busy seasons I was used to, and what the culture I lived in revered.
My life wasn’t the way I had imagined life would go. At all.
Life wasn’t supposed to be quiet around me, especially since I grew up in a busy culture.
And that’s how I felt Destiny came nudging at my door, again.
Without cultural judgments to satisfy, I could find myself getting closer to understanding core reasons for being in this life and getting to know my deeper lifeline (where our source is not earthly).
In those seasons without busy distractions, I was able to pause, reflect, and find authentic answers.
But then seasons turned into years of contentment.
And in those years, I found yoga and hiking.
I became more patient and calm.
Hiking solo is a quiet activity that’s a good metaphor for what I was going through in life. It’s also a challenging pursuit.
And one that I got good at.
Hiking taught me to stretch beyond comfort and also to calm down… just like every season and job in life that stretched and stressed me so I could learn better ways to adapt.
But hiking is a choice.
Tough life situations are not.
Hiking new mountains taught me that discomfort means thriving and getting closer to my destiny. Like reaching a summit climb. ⛰️
And that I get to go through the tough moments to build grit and character traits so that I can enjoy the top summit.
That was a flip from what I grew up believing, where I lived anxious often in survival mode in my home. Not good for Vata bodies who are born naturally more anxious.
The mountain summit is like Destiny because I know that’s where I’ll end up.
And that’s where all of us will end up in our personal destinies.
The difference is we can recognize that as a gift and enjoy the process on the way up if we are looking!
And you can also look at every uncomfortable situation in your life as helping you stretch and edge a wee bit closer to your summit, and your higher deeper self-identity… the one that you didn’t know to seek earlier on.
That’s your true calling destiny.
How you find that and get there is never easy.
But it’s totally worth the journey you’re here for.
Remember the motto, it’s about the journey and not the destination.
The steps you take in the moment help you grow.
And then from that framework, you can appreciate that you’re always being re-routed. It’s another way of making positive change that otherwise wouldn’t happen.
Avoiding the detours isn’t the name of the game to win (that I used to think).
And in life, when you lean into tough situations benefitting you even when they don’t look that way initially and you wouldn’t haven’t chosen, you move closer to your Destiny. You come out on the other side as a Victor.
One example we all have, is our challenge stories from 2020 that taught us more about ourselves and this life.
Those days were akin to being in a routine that was working. And then one day didn’t. Or the opportunities changed or dried up.
Somehow situations and seasons always come to a halt.
And when they do, in those times, you’re then facing not a fork in the road… nooo, you’re at the end of the cliff.
You’re at the end of the road, and the only choice is to find another way entirely. That helps you find your better ways.
And that’s when you’re nudgingly forced to do what Destiny shows you in its whispers and signs.
So like a treasure hunt, the next step forward is made easy as you look for your next clue. That’s all you can do. Keep going.
But it’s hard because it’s not what you would’ve done or where you would’ve gone before… and you don’t have the tools to navigate in front of you (like future uncertainty).
You don’t know what it is you’re looking for.
You just trust it’ll work out. Because Life is rigged in your favor and you’re hopeful because there’s organization in the chaos.
And Destiny is trying to teach you in a new way so you make the right step.
…In your One life.
Initially it feels like you’re starting over as an adult, a lot like when you were a child that was helpless and small but got local help.
But Destiny’s calling is not the type of school where you get grades to prove your worth.
Your past accolades don’t matter or help your inner growth.
And how smart and attractive you are doesn’t help you progress.
As long as you try, you succeed to the next level. And you don’t have to prove yourself because we’re all worthy.
You move onto the next season with flying colors as long as you don’t give up.
And you can speed up your progress and grow in peace if you don’t resist.
In between, you’re pressed to dig deep inside for new answers. And you’re invisibly guided, so it’s a given if you pay attention.
Imagine that it’s like being shuffled into a solo detour hiking path where you see no one on the path, but you do see random rock writing clues meant for you. Just look for the breadcrumbs that may or may not be there.
You’re no longer in control with anything you’re doing… and as a metaphor to life, I mean anything, such as concentrating like you could before and remembering what you ate or watched.
…It’s like you’re in a funk that you know is what life is leading you to by no fault or doing of your own.
And Life around you gets super quiet and no one in your sphere is reaching out to you or even replying when they used to.
You know something is up.
And it’s not that your devices aren’t working.
You know it’s a higher calling from the wiser Universe above whispering that it’s time.
Time for what?
You slowly learn as the days go by.
And if you stay sober, you’ll discover some profound wisdom about your life that’s shared from within you. Like it was hidden and now in clear view.
This is how you learn life’s meaning: why you’re here (that’s not what you thought earlier on in life and that no one taught).
And you also learn a little more about what you need to learn about yourself while you’re here.
It’s like a movie titled Your Life. Where you’re the star.
And if you haven’t crossed this bridge in your life yet, then it’s not your time.
But it’ll come looking for you someday.
And that day and time is different for everyone.
Could be at 40 or 80 years old. Only the Destiny higher ups know (the source that isn’t earthly).
But when it does, you’ll not regret that you leaned in.
In the meanwhile and for all of us today, an easy exercise to live more meaningful by choice is to think of 3 good things that happened to you last week. And do this weekly (like your yoga).
A gratitude exercise like this makes you feel good about yourself. It also puts your mind in the healthy growth mindset.
All you do is intentionally recall 3 specific things you’re thankful for that are not generic, and are unique items to last week.
That takes some conscious thinking. And when a gratitude memory pops up, immediately you shift to appreciation and smiling in your mind.
…Even if it’s just a coffee shop encounter you had, a small lucky win, or a gesture toward your progress.
You’ll find teeny things to be thankful for as a week is not much time and usually flies by. Things you probably never thought about before.
By keeping short stretch time spans to record your gratitude helps you find contentment: a life calming way that helps activate Destiny.
I started my gratitude practice around 2011 when I was starting over (like I described) in most life buckets. My life had already been uprooted.
Everything had changed from the two years prior from the life I was used to in relationship, work, and state where I lived.
I was abruptly sent back to where I grew up when I had no plans to do so. Without any work.
I had just been laid off from a job of 6 years and I gave up my blooming and successful blog at the time because of my move.
Destiny found me a small room that I rented in the house of a past friend that showed up like an angel.
My friend disappeared in my 20s, helpfully re-appeared in my 30s, and then poof… disappeared from view again as I moved away again.
In my soul, I knew I was being taught to surrender my life.
And in all these life clues, 6 moves and 10 or more jobs later, I learned to do so for inner alignment.
And not live the previous prescribed life I had in the past.
It was death and birth at the same time.
And bittersweet with some good and some tough things.
Since I crossed that bridge years ago, walls inside me have come down.
…I’m more whole and polished (or less rough around the inner edges). I developed deeper sides that I didn’t have before.
And if I were a diamond, I’d have more facets that make me more sparkly. 💖
Today I don’t have the same wants and desires as the y0unger adult-me version.
But I’m also still the same planner and life balance-seeking person I was in my younger years. And I still strive to enjoy life every day and have future goals.
And I still research everything…
For personal travel and hiking, it’s not so much that I need to know where I’m going because it’s always an exploratory adventure.
…But about not missing anything I would want to see while I’m there.
Or end up wasting valuable time on event day deciding what to do.
I never have regrets spending extra minutes days before planning and researching. You find time for what’s important to you.
And on event day’s life-in-play, I’m more calm and enjoy myself more from the surprising elements that unfold on the journey. That’s what’s important to me.
Where I appreciate the waterfall and trees I come across even more.
I learned in my catering work days that something always changes along the way. It’s a given you can count on too in life. So no need to worry you’ll be bored if you’ve plotted your steps.
Seeing new places is bound to be exciting. And people watching along the way is the spice of life. You never know what characters you’ll meet. It’s sometimes more fun than going to the mall.
It’s a welcomed interruption to get to talk to strangers. Some on the path may be angels, I believe.
And you never know when and how Destiny will show up.
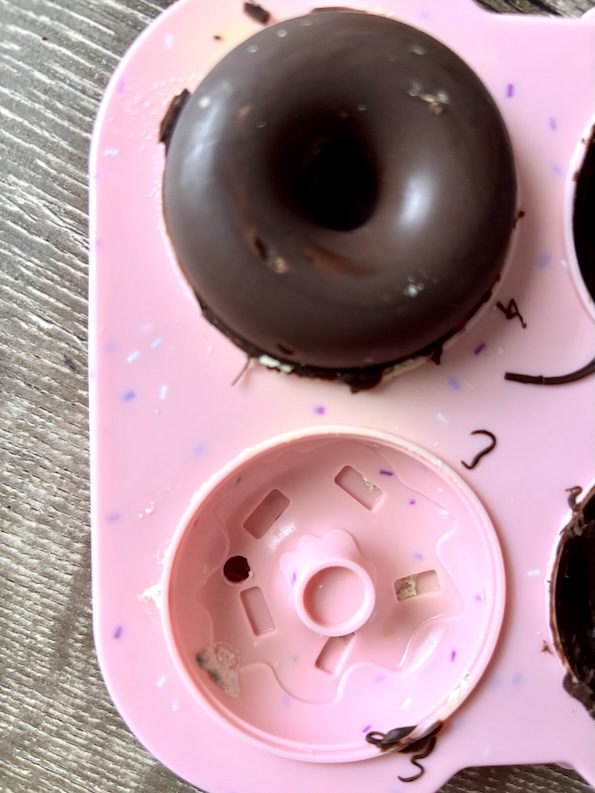
Chocolate donut is one you may be familiar with. That you may remember from childhood. Or maybe just saw some at a grocery store. They’re still around and you can make them yourself.
With a tempering process that gives chocolate a smooth, shiny coating. And you can make homemade chocolate frosted donut with no baking at all. The filling is a no-bake healthy cake recipe, called “a rainbow cookie.”
And in a chocolate donut you get donut, cake, and a cookie, all-in-one (explained below). Plus you learn the tempering dark chocolate easy process below.
These are all the steps… here we go!
For starters, you’ll grab the ingredients. And I mean grab from the pantry. You don’t need to remember to bring butter out to room temps. Because there is no butt-ah!
The ingredients are room temp pantry items: almond flour, olive oil, dark chocolate morsels, and almond extract.
How’s that for ease?
And for a healthy and happy donut (that’s the only kind I like to make).
The frosted donut filling is an all almond cookie/cake. It’s one-bowl and hand mixing easy. No fuss, no muss.
Almond cookie no bake Cookie: and 1/2 cup almond flour, 1/8 cup light EVOO and 1 tsp almond extract
Over the rainbow, it’s good for everyone and you decide if the cake filling is more of a vanilla-almond or pure almond tasting one.
And since the cake (or cookie) is simple and easy, you can make and set aside. Then work on the fun tempering chocolate part.
I recommend dark chocolate, 70% or higher, that’s anti-inflammatory good.
And for practicality, different chocolates have a different melting and tempering point. So the recipe below is for dark chocolate.
And you can bring out the nostalgic frosted donut taste and look with a contrasting dark tempering chocolate shell.
And it’s worth the small extra effort, as you get this nice shiny finish no matter what shape your donuts are.
A healthy dark chocolate makes a reminiscent fun frosted donut.
And tempering chocolate is fun…
You can do this process with dark chocolate morsels or baking squares.
They will turn into another shape…
Which btw, you can find chocolate molds( to shape your frosted donut) that have a top and a bottom, so you can fill the middle with cake filling.
And how I found you best do it consistently without burning chocolate is in the double boiler method on the stove.
To get the right heat, you make a double boiler setup on the stove with a heat-proof bowl that can fit ontop of and fully cover a cooking pot rim. This way you help keep the chocolate away from the steam (by blocking the steam).
I actually setup up a triple boiler (to be triple proofed 😊). I put a bowl inside of a bowl that sat ontop of the pot rim.
It didn’t take (much) longer because the water in the larger bowl heated up the smaller bowl quickly (instead of just steamed water).
And that worked great as the chocolate got heated but was shielded from the elements of burning (🔥) and steam (💧). Neither of which are good earthly touching elements for chocolate.
…Maybe chocolate is heavenly?
And if you can keep the chocolate to intense summer body tan heat and room air only elements, chocolate rewards you by giving a shine at the end.
…Like shined leather shoes that gets looks for all the right reasons. 👞
It’s chocolate magic since you needed no buffing tools/appliances, or additional ingredients. With just the right temps, you have tempered chocolate ready for your frosted donut.
And in the end, you gain an acquired tempering chocolate whisperer skill.
Frosted Chocolate Donut - No-Bake, Vegan, and Gluten-Free
Tempering chocolate is an easy way to get a shiny look and make a frosted donut. This Is for 2-mini donuts or 1 larger donut catering to the size of your molds.
Author Brandy @ Healthy Happy Life Secrets
Equipment
pot
heat-proof bowl that can sit not the rim of the pot
kitchen-use temperature gauge
chocolate or silicone molds
Ingredients
1cupdark chocolate morsels
4Tbspcake filling (gluten-free recipe below)
Instructions
Set 1/3 "seeding" chocolate aside and put 2/3 chocolate into heating bowl. You can start with one cup for easy measuring.
Heat the chocolate: Using your stove top, heat chocolate using a double boiler method, so you don't burn the chocolate. Set chocolate inside the heating bowl that is best to sit ontop of the rim top of a pot filled with water 1/4 to 1/2 way up in the pot. Be sure to prevent the chocolate from getting wet or steam coming in contact, or the chocolate could seize up (turn grainy and the opposite of shiny). Heat chocolate to ideally 118°F/47°C
Cool the chocolate: Finish tempering the chocolate by adding "seeding" chocolate and letting it cool to ideally 86°F/30°C or slightly lower (but not lower than 80°F/26°C).
Use the chocolate immediately. Pour into top and bottom molds. Leave enough unused tempered chocolate for piping or "glue-ing" the two halves together after the filling is added.
Refrigerate molded chocolate for at least 30 minutes.
Make the cake filling In a bowl. Combine 1/2 cup gluten-free almond flour, 1/8 tsp almond extract, and 2 Tbsp neutral oil or light olive oil.
Pull out chocolates out of molds and add cake filling in both halves.
Glue the two chocolate halves with a piping bag with the tempered chocolate or smear with a decorating spatula.
Refrigerate again until chocolate halves are sealed and dry.
Enjoy right away or refrigerate for up to 2-3 days.
Notes
For the frosted donut cake filling, see the instructions and/or recipe for the rainbow cookie.
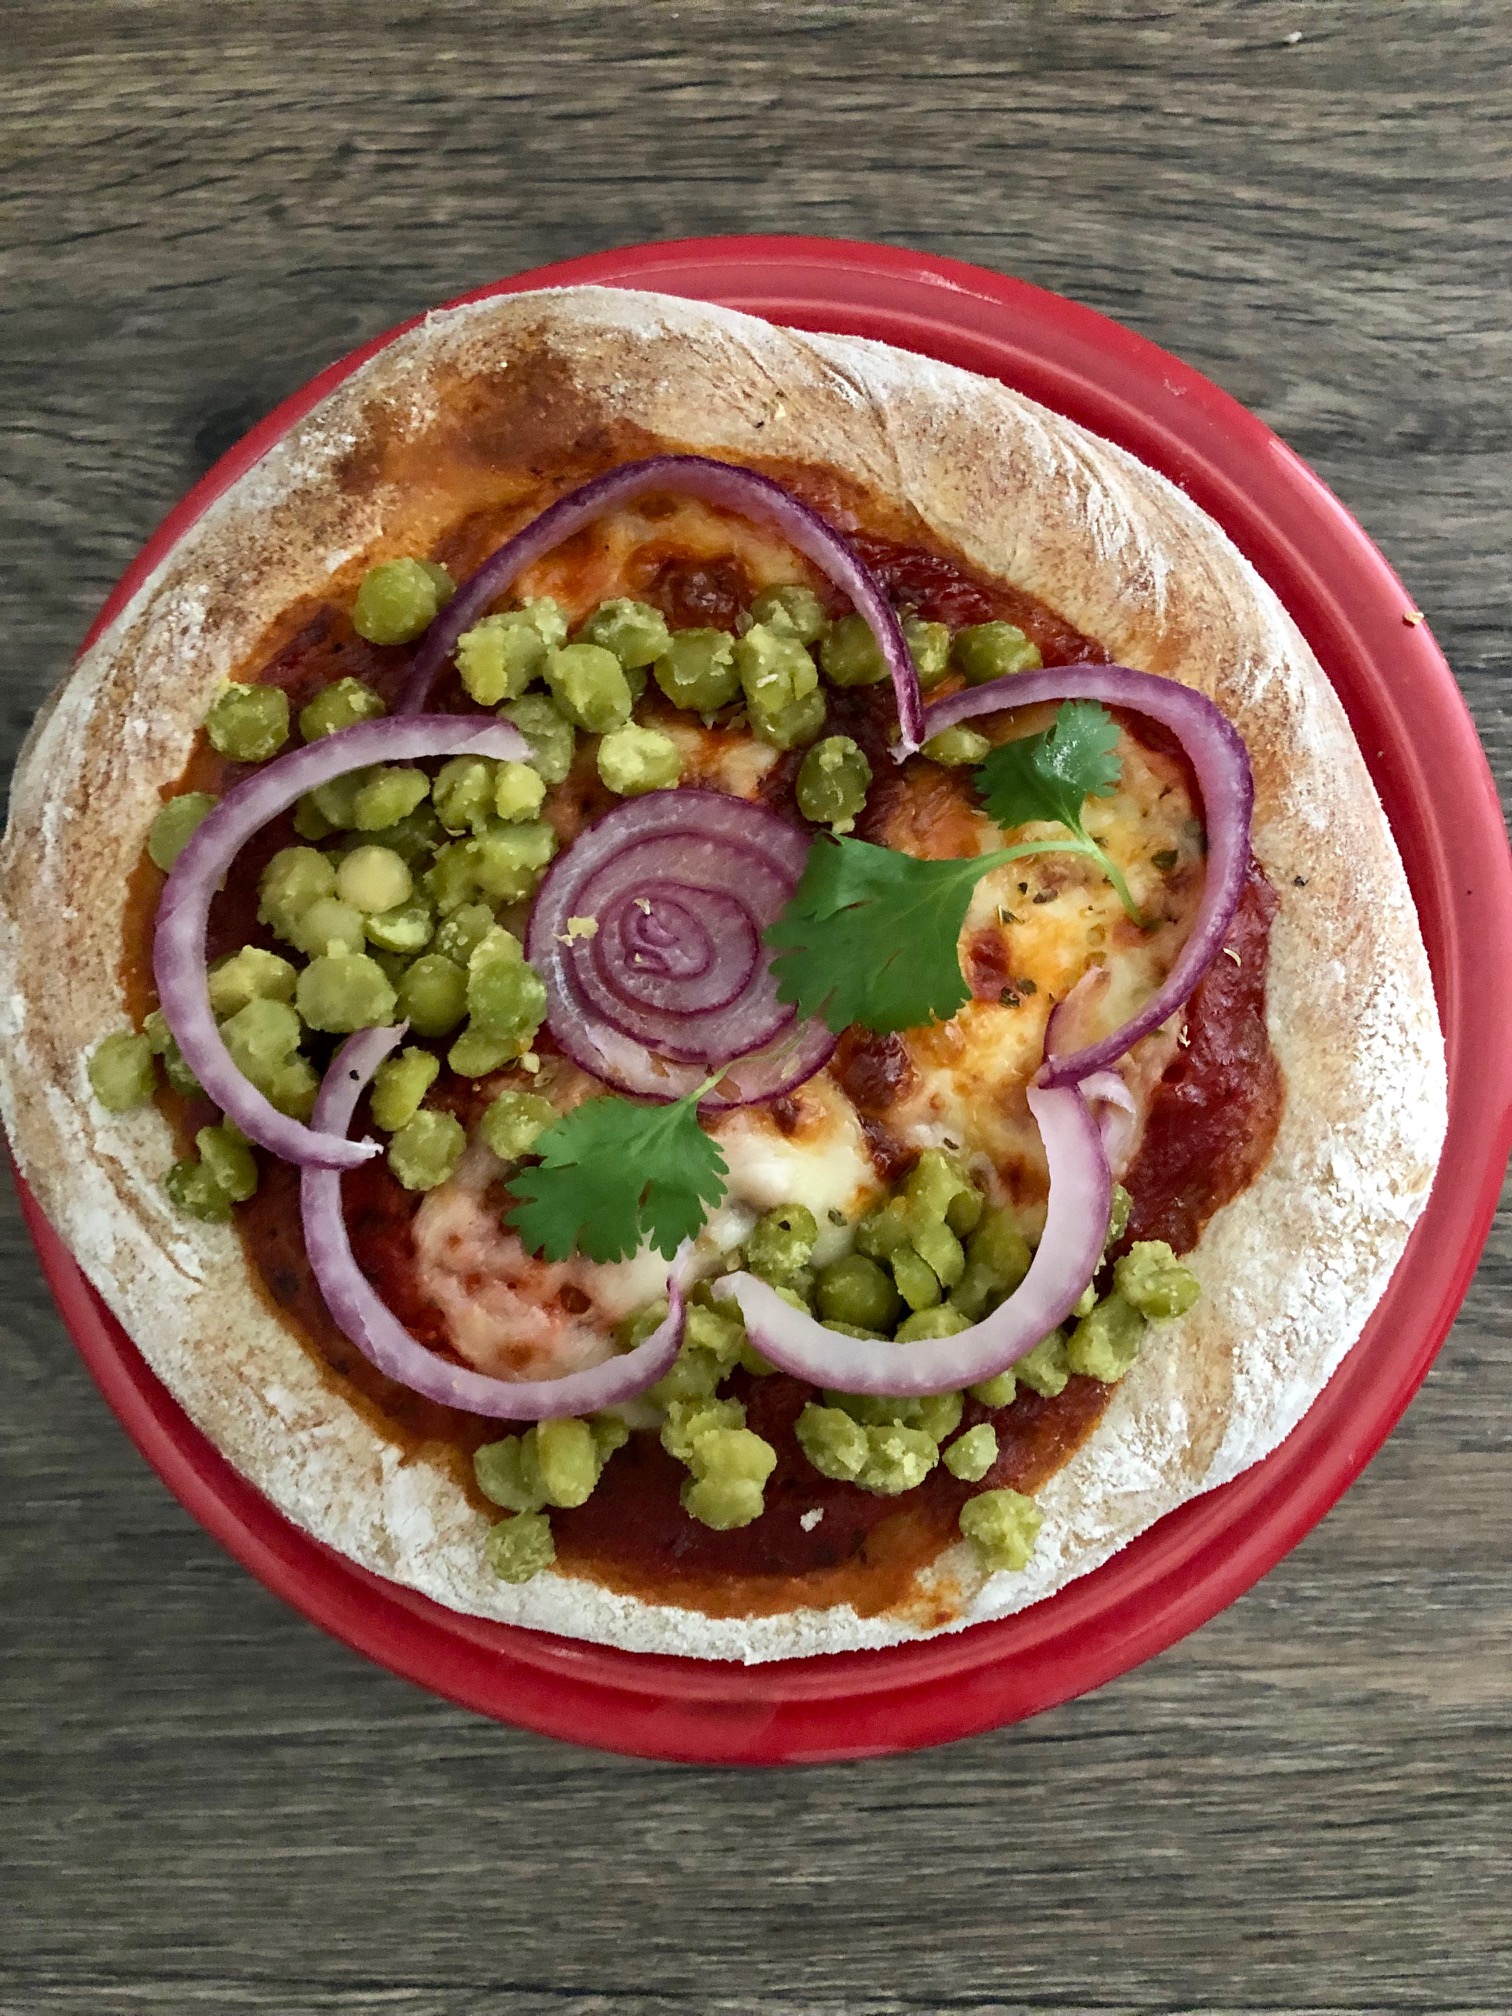
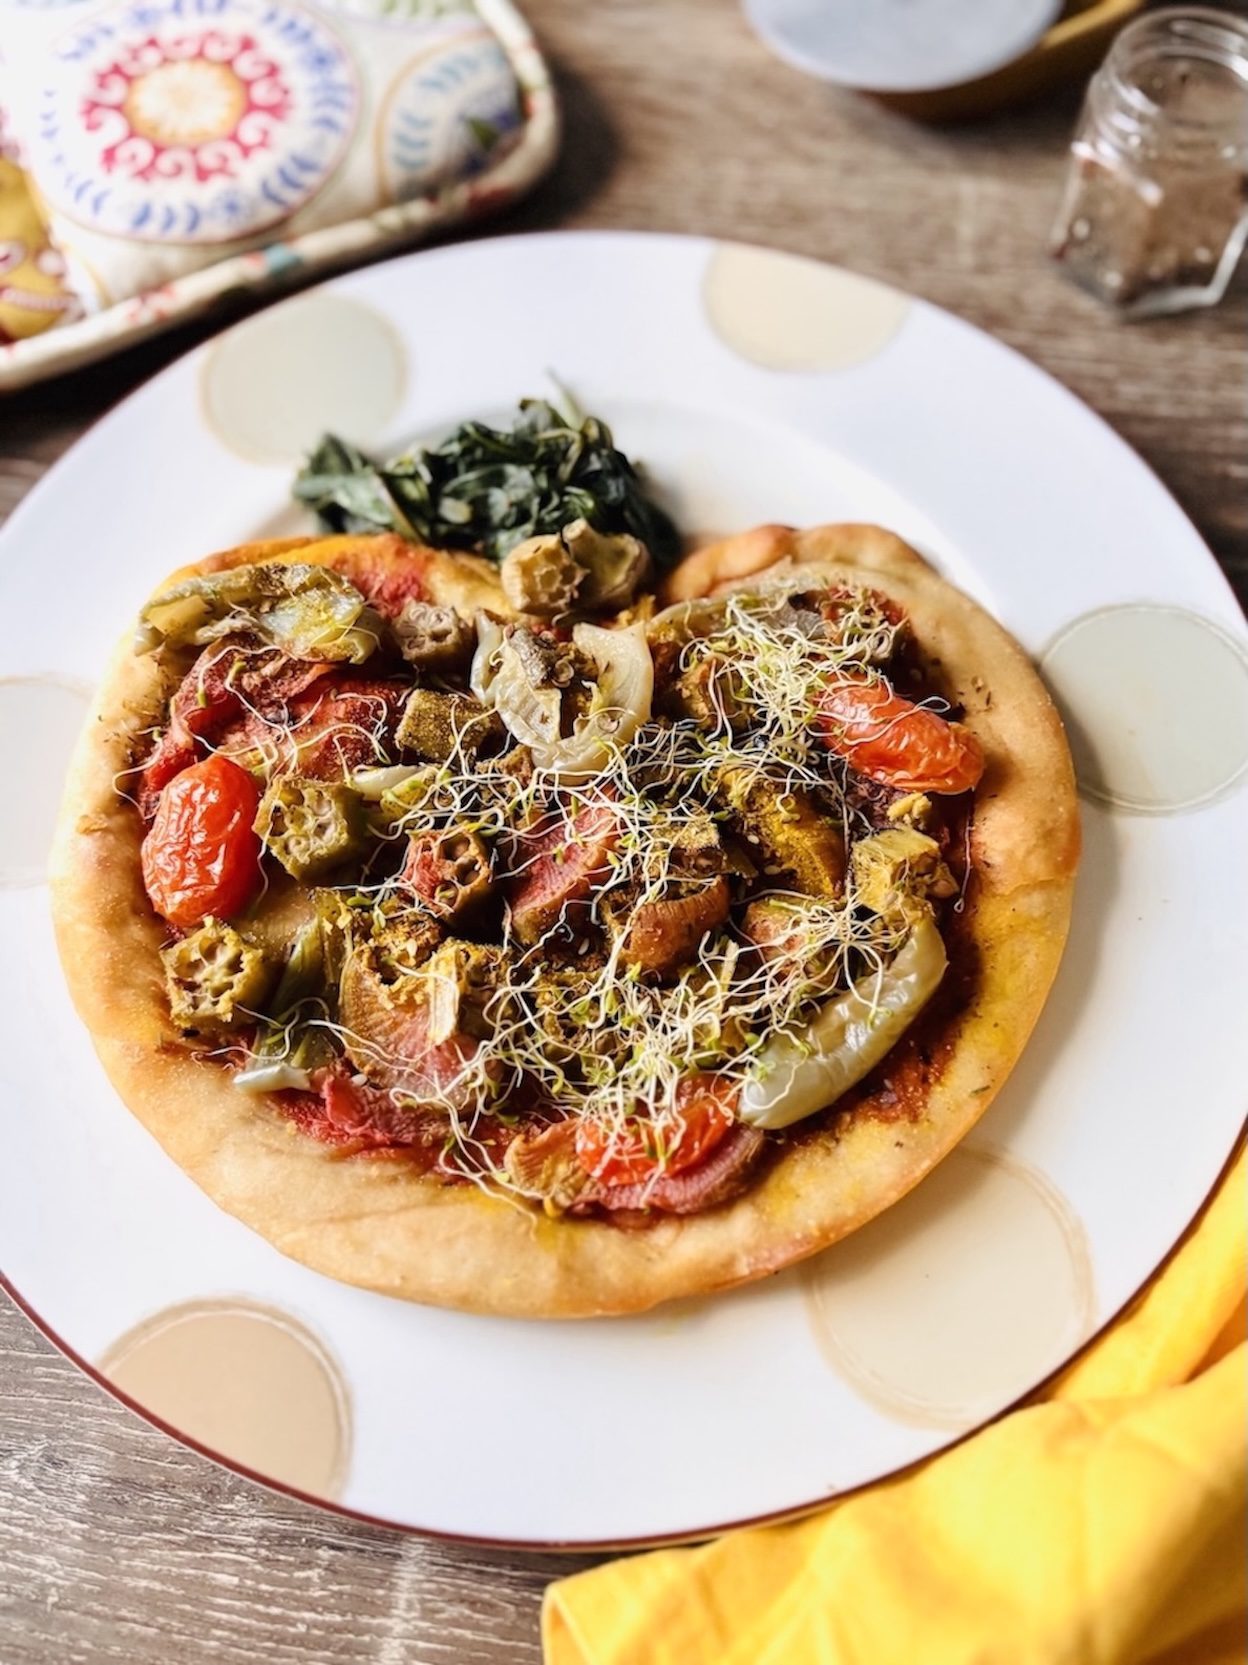
Vegetable pizza is a plant-based pizza that can be made easy, savory, and interesting from a home oven. Like this whole wheat flour pizza crust…
Or like this tomato-shaped farmers market okra, peppers, beets, and alfalfa sprouts pizza.
Microgreens like sprouts 🌱 are a great add to a veggie pie.
This one was made same-day and with “00” pizza flour that makes chewy crusts like those found in frozen pizzas. That’s what I found from baking in my home oven on regular baking temperatures.
That’s different than a commercial oven that I’m also familiar with.
You see, I’m not a beginner pizza maker or vegetable pizza maker…
I spent 4 of my pre-college years working for Domino’s Pizza making pizzas in busy stores around the DC metro suburbs.
The crusts were more like softer warming bread crusts, the kind that I am used to making at home these days. 😋
At the pizza shops, they were called the regular handmade pizza crust. Bread and handmade made for good comfort food. It made the bread soft and a little airy inside.
I was glad I could achieve a similar crust at home from techniques I tested and learned.
And similarly there’s no reason why you can’t make your own handmade pizza dough from your home or apartment oven. 💭
The recipes and steps for how to turn your pizza ideas to dream reality are easy to follow and you can also check out myHome Pizza Dough Beginner guide.
You can make your own easy pizzas from you home oven. And you can see some of my fall pizza regular and soft bread crust examples for ideas.
And you can also make slightly more advanced light and airy, charred pizza bread crusts (like those from wood-fired pizzas or “professional” pizza equipment).
Those are impressive and deliciously satisfying Neapolitan-style pizza that can come easily from your home or apartment oven! …Yasss! 🤸🏼♂️
I think pizza is an easy add anyway.
Especially because food costs have climbed a lot over the past years, and making your own home pizzas is a good way to save food and pizza money… and still get your satisfying pizza-fill on Game and pizza craving days.
Making pizza bread is as easy as 1-2-3 once you get the hang of it. It can be an auto-no-brainer with a few tries.
And that can be a regular healthy meal for you (more on this below)…
It’s also a way to impress your friends with your pizza kitchen skills like with this pizza that you may be surprised to know was made in my apartment oven with just a regular baking pan:
…So no fancy tools. And no wood-fired or outdoor pizza oven. What’s not to love? It did get gobbled up – leaving no crumbs.
And pizzas are also such an easy way to add more anti-inflammatory healthy plant-based foods to your diet.
A vegetable pizza is an easier sell than a plate of veggies (for any age) because not one ingredient is the star.
It’s the salty, savory ingredient melange that makes a pizza.
And it wins points for this old vegetable pizza maker! It’s happy and oh yeah, healthy…
Pizzas can be very healthy and low-fat if you don’t add as much “greasy” cheese as you see on most pizzas on the planet. In the pizza shops, our rule of thumb was one layer of oily cheese and no gaps. And that was a good amount of cheese you can pull apart.
But you can use a lot less cheese like in a Margherita pizza where healthy Buffalo mozzarella (yum!) slices are randomly added and the melted cheese patches don’t cover the entire pizza. It’s what you make it!
We also used in the pie shop, all our healthy scraps that fell in the pit for the everything pizzas. Those ingredients are just as healthy!
And you can do the same at home with very little pitfalls.
…Only pizza benefits.
Especially vegetable pizzas that make good beginner pizzas and are good opportunities to use all those veggies that the gardens are abundantly growing. 🍅 🥬
Pizzas are a great way to ramp up on onion and mushroom pairings as powerful immunity foods, especially during cold and flu season. 🧅🍄🟫
And if you’re dairy-free, you still can enjoy a pizza.
I remember there were always people who ordered no tomato sauce or no cheese… and even no dough…whaaat? That was before gluten-free was a thing.
And subbing those ways is all covered in my little 17-page guide. Because I believe there’s a pizza for any occasion! And can be enjoyed by anyone who can eat solids.
Oh, and I almost forgot… if you like sourdough or have never made before but interested in beginner learning skills, adding starter to your pizza dough is a great way, and for the crust’s sake that I cover as well.
It’s much easier adding sourdough starter in a pizza where it’s just a little bit and not a whole sourdough bread commitment.
Sourdough is also healthy because it’s lower glycemic index than doughs made from just commercial yeast. And that’s good for not spiking blood sugar (and helping prevent lifestyle/Diabetes 2 on the rise).
That’s just one reason why people are still so wild about the wild yeast and an added benefit for those who didn’t know!
That’s healthy food inspiration and ideal weight aspiration for anyone who has a gut and wants to keep it healthy. I’m pretty sure that’s all of us 🧡
An easy and delicious pizza crust you can make in a couple hours to accompany veggie toppings you choose.
Course pizza
Author Brandy @ Healthy Happy Life Secrets
Ingredients
1cupwhole wheat flour (or combine with bread flour)
water (enough to combine and have a slightly moist dough)
1tspsalt (kosher salt recommended)
1/4tspinstant yeast
Instructions
Incorporate ingredients with either a mixer with a bread hook or do by hand. By hand, create a well (that looks like a volcano) in the middle of flour, yeast, and salt (like you would in homemade pasta making). Gradually add water and mix in.
After combined, knead dough. Roll with hand and flatten with palm of hand. Do not be gentle. Do this for 5+ minutes.
Let dough rest for at least 2 hours in a plastic container. Be sure the dough is moist. If baking same day, pull out and shape/flatten dough with hand leaving about 1/2" edge crust untouched.
Bake at 350°F/180°F for 20 minutes and then pull out of oven and add sauce and vegetable toppings. For wet or frozen veggies, cook those separately in a pan before adding to pizza. Bake for another 10-15 minutes or until bottom of crust is fully baked.
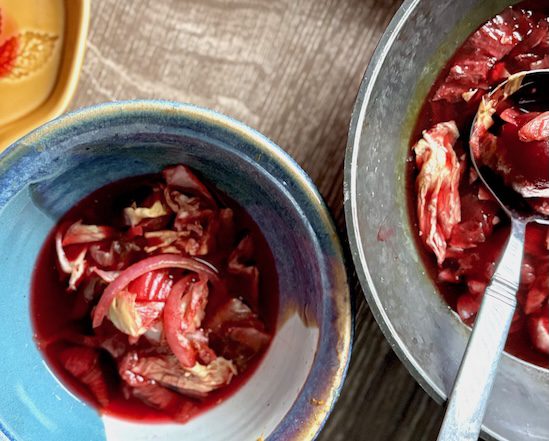
Cabbage soup is a great fall soup and for year round. When you add beet juice, you get a beautiful color… and you can’t beat that in a bowl!
This is an Ayurvedic melody. You can get your sweet vegetable, savory, sour, and umami tastes in one bowl. You can also add some heat if you’re feeling cool (and more Kapha or Vata in fall Vata season). Most Ayurvedic balancing foods are also anti-inflammatory healthy.
Tamarind is one ingredient with a tart-sour taste that’ll set your soup apart from the rest. It’s commonly used in more exotic sauces and dishes.
If you buy tamarind paste that has seeds, to remove the seeds: pull apart taffy-texture-like pieces. Then place the tamarind paste in a bowl with heated water (just below boiling water is good). You can leave for a few hours or even overnight. Then the tamarind taffy-sticky texture should slip off more easily.
Add go right into your warming cabbage beet soup. You can make this soup without beets if you’re not a fan. And use red cabbage.
But if you’re a beet lover, this is the fall color you can BEAT!
And at the farmers markets or maybe your own farm
Cabbage soup is a healthy and light soup you can enjoy year round. It’s better warm, but you can enjoy it cold too. Either way, it’s LOW SODIUM healthy.
Cabbage is a great veggie to lose weight. And in a soup, it’s soup-er tasty. When cabbage is raw, it has a crunchy texture that can be satisfying like chips.
And what you don’t use, you can save for a future cabbage soup or dish. Or a lettuce wedge salad.
Iceberg lettuce is the common cabbage head. Sometimes they’re the size of a head or a volleyball.
It’s a filler that’s a good way to stretch a grocery bill, like the cost of a common loaf of bread..
And since cabbage is over 90% (and mainly) water, it’s underestimated as a healthy food.
For starters, it has K vitamins, some B vitamins, and minerals. It also has Vitamin C, that’s an antioxidant.
And best of all, cabbage is a high source of fiber, so it’s great for digestive reasons and losing weight.
The cabbage soup that my mom used to make did not have tomatoes. She used soy sauce that gave it a umami taste.
And instead of just heating the cabbage to soften, you can do what I call the radish method. Which is adding the cabbage to the freezer overnight and then bringing to the fridge or in room temp when you’re ready to work it in a soup.
It will turn mushy and you can cut into strips like for a radish salad.
You don’t want to skip cutting down the cabbage into smaller pieces as it’s hard to swallow fibrous whole cabbage leaves. Like a palm leaf, it would be good shade cover.
So to avoid a big mass wad of cabbage, you can take a pair of kitchen shears and cut, cut, cut… similar to as if you were trimming hair, making many micro-cuts. Keep cutting through the fibers.
And this will allow for an enjoyable soup experience that you can serve as an appetizer or starter bowl.
For a little heat that creeps us, wasabi powder (or horseradish powder that’s white color) is a sharp and pungent way or cayenne pepper for more heat.