Cinnamon biscuits are a healthy way to welcome in May that’s Mental Health Month and remembered year round.
One way to do that is to add cinnamon to your diet to replace refined sugar (aka table or white sugar).
Cinnamon is good for calming anxiety. It’s a good sweet substitute instead of refined sugar. And it may not be the first sweet you ever knew or came to love… I know it wasn’t for me.
But over the years, the cinnamon sticks and cinnamon ways intertwined with me like in these bakes and makes. It was bound to catch up with me as I’m a Vata and maybe you are too?
braided cinnamon bread sticks
Cinnamon is also good for our memory boost and because of the anti-inflammatory properties, helps our cognitive abilities to learn.
That’s the basis for healthy growth and how we can protect our minds from drifting away from good mental health or moving toward depression.
It’s worth a reminder to daily renew your mind and celebrate everything you have to be grateful for.
Changing perspectives and thoughts changes your day.
And if you’re like me who loves sweets and controls the sugar with low-sugar recipes, cinnamon biscuits are good for a May occasion, brunch, or afternoon tea. 🫖
Even if you don’t have your own… there are plenty going on globally. In America where I live, there are annual events like the Kentucky Derby 🌹, Mother’s Day 💐, Met Gala 🤩, Memorial Day 🇺🇸, or just celebrating life 🎉
The healthy type you can consume regularly is Ceylon cinnamon that you can add to your hot beverages.
It’s okay to use the traditional Cassia cinnamon (more reddish brown and powdery than Ceylon) common in stores, but not regularly.
Because it has a flavoring substance called courmarin that can damage liver in large quantities.
And we don’t want to hurt our physical health while we keep our mental health and mind-body balanced.
If you limit to using Cassia cinnamon to baking, you’ll be fine and also enjoy how it tastes divine with apples and pear pairings.
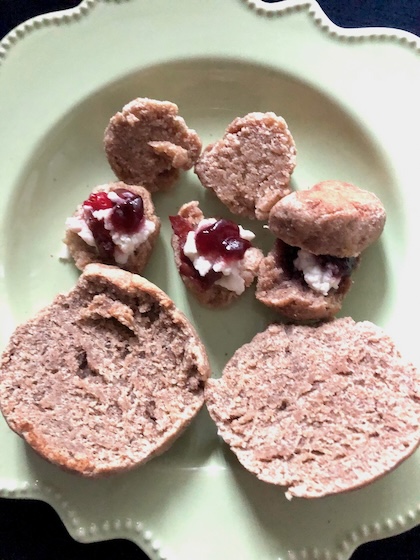
This recipe is for two sandwich size biscuits so multiply the ingredients for the number of biscuits you want to make.
Course brunch
Cuisine American
Author Brandy @ Healthy Happy Life Secrets
Ingredients
1cupcombined flour (whole wheat and almond flour are recommended
1tbspcinnamon (or adjust to taste liking)
1tbspall purpose flour
1/2tbspbaking powder
pinch of salt
1-2tbspcold butter, small pieces
buttermilk (or milk and apple cider vinegar)
Instructions
Combine ingredients until they are combined and dough is cohesive and not too moist. You should be able to easily make a ball without much effort.
Tip for liquid: start with 1/4 cup of milk and look at the dough. If it's too dry, add a little more milk. If it's a little too wet (milk is coming out of the dough after mixing), then add a little more flour. Do this until you have the right consistency dough (not too moist).
Use oil to coat a pan and then bake in oven on 350°F/180°C for about 25 minutes. About 10 minutes before finish, check the bottom. If toasted, you can flip so the bottom is on the top so it gets baked evenly through.
Fill your sandwiches with seasonal fruit and ricotta or Greek yogurt.
Mindful thinking can break you out of your stuck shell areas. And taking a mindful break can provide a simple solution to some of your life’s biggest challenges.
Delicious healthy parfait sundae 🍨 recipe below 😋 (and maybe you’ll change your mind from a high calorie sundae).
You can take a break with this banana-Greek yogurt bowl with cherry and berries. It’s not only a happy sweet, but a healthy snack loaded with prebiotic-probiotics.
The sundae puts a sun to my day ☀️ And the healthy to my happy joy.
Can you make a list of ordinary mindful 5-minute micro-moments that bring you happy and healthy joy daily? I’m sure you can!
In the past, I would have dismissed the smaller items on my list below as I only saw the bigger happenings worth noting, but that was missing the point of mindful micro-moments.
Our brains are wired to sometimes focus on what we don’t have which only makes for souring the day. So when I focused on little life joys, I noticed the outcome and outlook of the day changed for the better.
And when you adopt good lessons you’ve learned from your life experiences, focusing on what you DO HAVE, then you too appreciate simple and ordinary day things. And, appreciation for small things makes a big difference.
How?…
For one, you’re less disappointed about expectations that didn’t happen. You get off the life roller coaster you can’t always control, and where you’re relying on your situations to bring happiness.
Secondly, you find internal happiness and peace with yourself. You silence the unhelpful noise and have the opportunity to learn to drown out and replace negative mind chatter.
Then you experience more meaning about what this life can grow into for you that’s different than what you started out thinking it would be.
That can happen by changing and developing more loving attitudes that affect your feelings and moods… and make bigger waves in you, than in the situations you experience.
So on that note, this is a page from my daily inspired healthy, and joyfully mindful minutes:
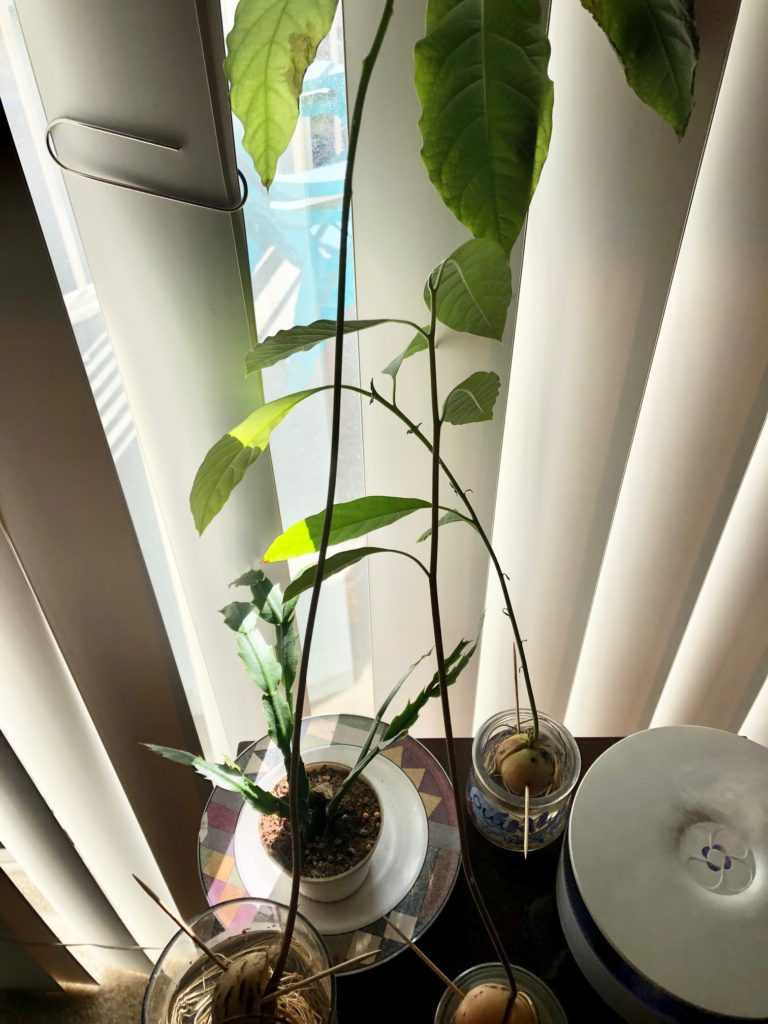
Daily, I check on my avo-plants that came from delicious avocados.
They’re daily living organisms that don’t need any type of green thumb. They remind me of living more eco-friendly and #earthday every day.
These plants have food names based on the flavor of the Oui glass they started their roots from. That’s too cute (or nerdy), right?
…That was the only way I could keep their starting growth dates straight as I had multiple seeds growing at the same time. “Lemon” was the first one I started in 2020.
The naming exercise helped me keep track of dates as 2020 was an off-year for all of us (but not the avocados). The seeds grew despite the major world happenings.
Plus, it didn’t need any kid-glove attention. So, I grew out of the date recordkeeping stage and just started enjoying their presence.
And that’s a good lesson on how our lives could be: more mindful focusing on the enjoyment of the moment, and less on detailed minutiae facts that won’t matter in years to come or even tomorrow.
Most of our memories fade and what you do on most days, you forget. And that’s why the only time that really matters is now. You appreciate and let the present moment pass through you.
And if you don’t want a memory to fade, you could take photos, or make journal entries and share posts– as great memory reminders.
So, now I’ll remember these plants for years to come. 🥑
…And then sitting next to the indoor plants are a table humidifier that’s another mindful break.
Filling room humidifiers with clean water is another way to appreciate the moment.
When I pour fresh water from a reusable water bottle, I stay mindful that clean water gives our bodies and our planet, LIFE.
Water is a source for regeneration: if we had more water to support healthy soil and plants, then we’d help keep new carbon in the ground.
Moisture from the plants and trees would allow more humidity into our air and help lower our climate temperature. Just like the small room humidifier does, but on a much grander scale.
And since I’m on the sustainability topic and #stopfoodwasteday is tomorrow, consuming and buying organic foods from farms that don’t use harmful pesticides helps our health and the planet. Or better yet, grow your own.
Thankfully we’re starting to take this seriously. And as consumers, we have a say and can live out our part.
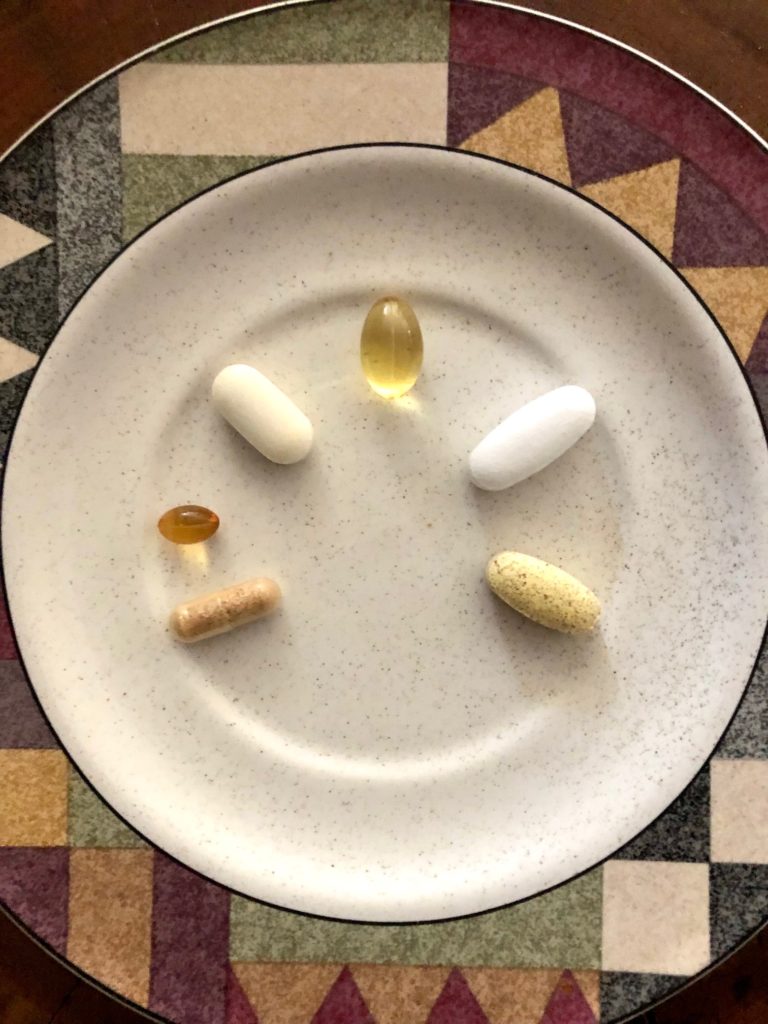
Another mindful ritual is taking daily supplements.
Like the yogurt photo above, which has healthy fats (almond butter and nuts), I combine the meal with Vit D and A vitamins so they’re better absorbed. There’s an order that matters.
And I make sure I have filling lunch food in my belly before having a multi-vitamin as a general rule, but mostly just to keep a daily routine reminder (i.e. habit stacking).
Clockwise: Mushroom complex, Vit D-3, Vit C, Cod liver oil/Vit A, Magnesium-Calcium-Zinc, and a multi-vitamin.
Then later I take my magnesium (which has an optimized ratio of calcium and zinc) with my mid-day “red wine.”
…It’s actually a pure cranberry-tart cherry blend, water, or water spritzer blend. But, I had you there for a second in case you were mindfully drifting off! 😉
And, I know there’s so much controversy today about vitamins. For them to work they have to be absorbed by the body or else they become expensive pee.
I see and use them as a backup plan and a supplement to prevention. They don’t hurt in approved low doses, but they can help. So they’re worth time and money.
A good multi-vitamin to take is a prenatal vitamin with extra B-vitamins (we all need a lot of B-vitamins to run properly).
And adaptogens that are the rage these days, like a ‘shroom complex to support wellness, immunity, and to help fight off environmental stressors to our bodies.
So now I’m done describing these quick healthy rituals, and moving on to daily writing…
Writing, of course. …Oh yes, duh, that’s a no-brainer on the list. And there’s nothing quick about writing. It’s not a 5-minute ritual. It’s also a labor of love that takes energy and passion. And why a robot can’t replace me (at least not today). 🤖
Robots also don’t have moods, so they wouldn’t want to sing along with me to music tunes like Sam Smith’s version of “Time After Time,” which is a 5-minute break.
You probably have a different jam or song you hum to.
Finding a personal way to express yourself by singing or in another outlet you enjoy, breaks up the day.
Even if this is spending 5 minutes looking out the window. Those few minutes get remembered more than the hour you spent doing any unrewarding jobs you don’t look forward to.
And maybe you have a deeper side passion you spend more time with like dancing, exercising, yoga, playing an instrument or sport, cooking, drawing, or painting, to name a few ideas. The list of possibilities is endless.
These are all good mindful breaks you can build into your balanced and reshuffled day.
Doing your preferred activity helps you bypass the negative emotions, thoughts, or worries at any moment, and can break you out of any ego-mind drama that definitely doesn’t serve you.
What does serve you is feeling better as one of your daily goals.
I can pull together ingredients for a lazy recipe in 5-minutes and that pulls me away from a lazy Kapha mood.
Baking and coming up with baking ideas is one of my fun weekly leisure activities, plus keeping up with a community that does also. You could probably guess my favorite flavor is healthy bakes. And that leads me to the last mindful activity on my list…
Feeding my sourdough. Are you part of the sourdough cult (I mean culture) that came out in 2020?
I can’t exactly say that I am. And I’m glad that it only takes less than 5 minutes to make a starter from scratch.
I kinda have a love-hate relationship with sourdough (even though I don’t like the word hate for anything).
I love the healthy baked dough that benefits the gut (and have even researched/written in well-known healthy pubs about the health benefits).
The problem is I don’t prefer the sour “gone bad” aroma that lingers in the air. It’s strong and irks the Pitta body out of balance.
Pitta is the fire dosha in us. If you learned about Ayurveda or have read other posts I’ve written about using balance to improve life, then you know that you and I can shift in and out of Vata, Pitta, and/or Kapha imbalances at any time.
But back to the homemade sourdough starter… it’s a healthy reminder of bacteria living among us as a breathing organism that’s omnipresent in the air (and plus our bodies are mostly made of bacteria).
So, the “newish” sourdough bread idea can take a bit of adjustment, especially growing up in an ideal germ-free society.
The sourdough plan is to adjust and make enriched doughs like in a sourdough brioche.
And to continue to make my weekly sourdough on demand and not grow a starter pet in the fridge. No reminders are needed.
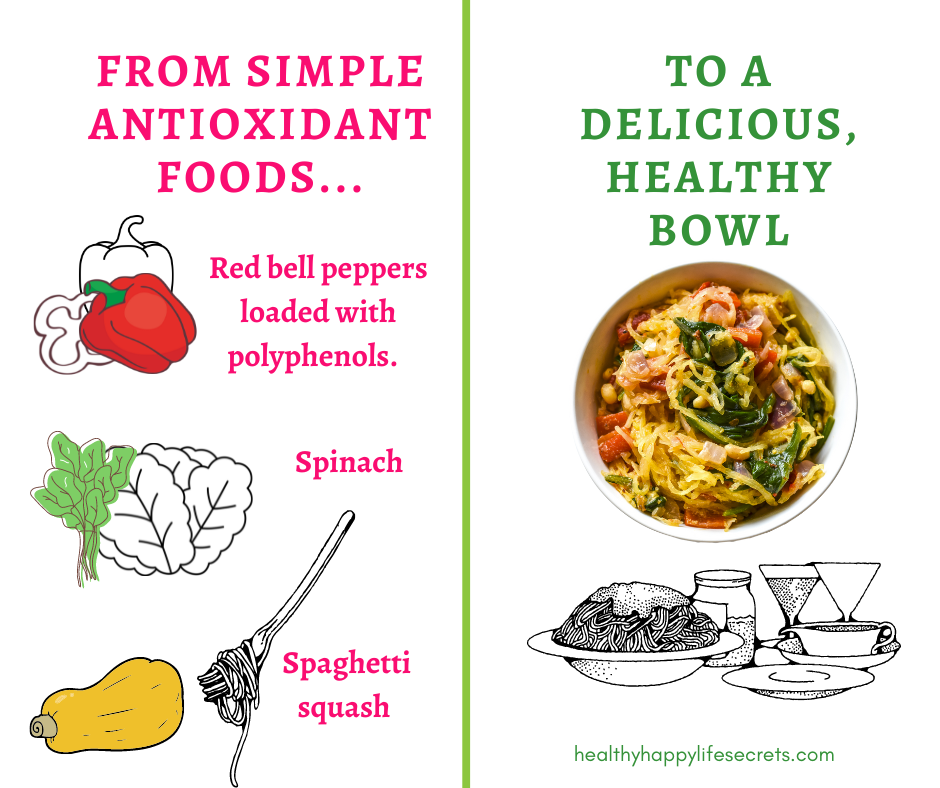
Butternut squash is a low histamine food that’s good for seasonal allergies.
Food does make a difference and you can mix in your veggies and lean into more squash with spaghetti squash.
Often we ignore some produce foods in the grocery store, heading for the ones with marketing words and labels.
But the best seasonal foods (like butternut squash) and those for seasonal allergies don’t have ingredient labels. They don’t need them.
And they contain vitamins and minerals, and healthy food body benefits that are contained inside the food.
The PLU, color, and skin often give away what that can be.
But then there are other food benefits like low histamine that is underrated for seasonal allergies.
If seasonal allergies has got you, you’re in good company and I have a list of natural above-the-neck soothing tips below…
Before 2015, I never felt outdoor seasonal allergies living on the east coast. Now, they linger around year-round and I’ve learned to manage them… and maybe you manage yours.
Tree pollen (e.g maple, juniper, elm, oak, etc.) found in most U.S. areas is the main culprit for spring seasonal allergies that starts as early as February these days.
Allergies are your body’s annoying, but healthy response to your immune system working. 🌱
Reducing histamine can be the difference of low congestion, itching, aches, and digestive issues.
Sneezing is the body’s natural way to rid of allergens in the body, but some congestion days that doesn’t always work.
If that’s you, you can keep a black pepper tin nearby and peppermint essential oils are good to sniff and use in your steaming shower.
You have a choice to stay indoors for high allergy days which is really the most effective way to dodge seasonal allergies. Try to do your outdoor walks earlier in the day. I know that’s still a bummer. So another idea is you can jump or stay in the pool. You may be able to pull it off like this unicorn making the most of it! 🦄
And when you’re indoors, stay further away from the open window if you’re super sensitive or keep the blinds semi-shielding.
These are 10 Tips For Seasonal Allergies:
✅ Change your clothing and take a shower as soon as you can or remember to. The steam will help you feel better faster. A night shower will help especially if your seasonal allergies feel worse in the afternoon or evening.
✅ Weekly, use a neti-pot to clean out nasal passages. This helps you get some relief naturally and prevents nasty sinus infections and your taking unnecessary antibiotics. That’s probably the best tip I can give you! Water is your friend away from pollen.
✅ Also, use a natural saline nasal spray to clear your nose as needed e.g. 2-3x per day for relief. Look for grapefruit seed extract with microbial properties that help prevent bacterial, viral, and fungal infections.
✅ Use a free-standing daily air filter machine with a HEPA filter for pollen (not just dust). Pollen kicks up in the afternoon and evening so it’s good to have the machine cranked up while you’re sleeping.
Change your house air filters as needed and vacuum the filters regularly as they will work better dust-free.
✅Use a desk humidifier or have one set in each room. Moisture like this works especially well during spring allergy season.
✅ Keep eucalyptus or mint oil essential oil drops close at hand. They work well in the steamy shower. You can put a few drops in a small vessel of water and sniff. Unlike a nasal spray, the oil drops don’t enter directly into your nose.
✅ For foods, add fresh horseradish or spicy wasabi that’s great for clearing nasal passages. Also increasing Vitamin C and bromelain helps. Pineapples are a good source.
Disappointingly, local honey doesn’t work the way that maybe you hoped it would for seasonal allergies.
Honey comes from flowers, and tree pollen comes from trees so there’s no cross-pollination… or an ex-pollinating effect that would be helpful for spring seasonal allergies.
But raw honey is a good natural sugar substitute and a natural humectant that when topically used on the skin help prevent dryness and other light skin inflammations or itches.
Honey also has other “anti” properties that are good for you… antioxidant, anti-bacterial, and anti-fungal.
✅ Keep up your vitamins and minerals, especially Vit C, D-3, Calcium, Zinc, etc. Butternut squash is loaded with Vitamin C and A. And a tropical fruit smoothie is a great way to help soothe seasonal allergy symptoms.
✅ Drink teas. You can try a good green matcha tea or black tea (Vata preference) early in the day and then switch to decaf/herbal teas in the afternoon. You can do decaf all day if you prefer.
✅ Keep eye drops close by for dry eyes. You can wear blue-light-blocking glasses, so you don’t have to strain on devices that worsen dry eyes (and they help you sleep better).
✅ Keep cough drops nearby, in case you get a dry or itch in your throat. And menthol cough drops help to open up passages.
Seasonal allergies don’t have to be the daily annoyance that runs your life. You can have a much smoother season if you stay informed.
✅ And finally, bring in more healthy anti-histamine foods such as bell peppers, squashes, and eggs. You can incorporate a butternut squash spaghetti recipe that you can blend with regular egg pasta or spaghetti squash. 🍝
Wild Thing Pose is one of the most interesting name yoga poses. And it’s a beautiful pose like this wild natural artwork up the side of a bridge.
Sometimes you just need to let your hair down. So today I’m sharing two yoga poses that let you do just that, and maybe give you a few minutes of creative joy if you haven’t felt that in a while. One is called Wild Thing pose.
You may know the pose (or vintage song titles 📼 with the same name). The Wild Thing pose helps unleash your creativity, especially if you feel like you’re in a rut or ready to pivot. This pose can help you feel a little happier.
…On Fridays especially, don’t you feel like a little weight has been lifted off your shoulders from the weekly grind?
With more freedom where you can express your more fun side, in friendly conversation, wearing fun clothing, or even get around on different wheels 🛼 🛹 🚲
People on the receiving end are even in a better mood if you work in customer service. Friday makes up for Monday when stress is highest.
And it’s not easy to be creative when you’re feeling stressed. So, you may need to unwind between the two opposing moods.
If you feel irritated, anxious, or resistant (that’s Vata, Pitta, and Kapha all rolled up in one in varying degrees), then your body may be playing detox wellness catchup. There’s a delay in the mind-body connection.
So whether you’re ready to try the Wild Thing pose has a lot to do with how you’re feeling. Relaxed, calm, and a bit daring is a better time. It’s also a great pose to do after you’ve fully woken up and taken a shower to stretch your body and mind.
When you’re present in this moment, then this is a great way to celebrate. If say you’re still rehashing what happened or how a day or a happening could’ve gone better, then you’re probably better off to calm your mind down first and wait until later to do this pose.
And when you’re ready and refreshed, then you can start with a blank slate that works best for most creative endeavors.
At corporate work and public environments, they love rules, structure, and close-ended goals. In creativity work, it’s a white piece of paper or canvas waiting for you to come up with something new and unique.
So, the Wild Thing Pose is a great way to get in the spirit of your creative intention. Especially if you’re a content creator or share artistic expression, and today is a creative day. Anything goes.
You ready?
How to Do the Wild Thing Yoga Pose:
Basically, the Wild Thing pose is a backbend and you decide what it looks like. It can be easier said than done…
One foot, two feet, and one hand or on all fours. It’s up to you. One way to find your Wild Thing pose, is starting in Downward Dog and then you peel one arm off your mat and look up or face up to the ceiling or sky.
Reach that arm up in the air. The other arm is grounded on the mat or floor. Then you decide how you position yourself and the rest of your body. There’s no definite structure. This is a common start. And you can work on your Wild Thing (but it shouldn’t feel like work).
For a present awareness move, then plant the foot already closer to the floor flat down. And you could rest the other leg out with the outer foot touching or resting on the floor.
There are no limitations or rules. And you can also get into this pose from Wheel Pose. Gymnasts do really well with these poses as it helps to be flexible. But not needed for home or studio yoga.
One thing’s for sure though… in the Wild Thing pose, you will definitely get off your mat, a metaphor for thinking outside the box. You get to express freedom and creativity.
And if you have a chance to look around at another Wild Thing pose like I did in a yoga studio and saw other Wild Things in the class, you see how differently wired and designed we are as unique humans. Use your Wild Thing pose as your creative expression that stretches your body, sides, and mind.
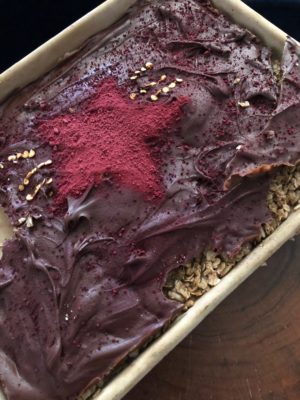
And when you’ve had enough of your Wild Thing pose, you may not want to stop just yet. You can find your Falling Star pose from there.
A falling star has a curvy trajectory so you could model after that. Like these curves made with chili pepper flakes for a chocolate granola snack. I made the star from beetroot powder that’s a great balancing ingredient.
Falling star beet granola recipe below. 🌟
In the Falling Star pose, like the Wild Thing pose, you choose. You can slightly adjust your Wild Thing pose into a Falling Star to get pose variations. Vatas love that 😊. You can stay on the floor with your legs and arms widely spread out… or leave just one foot and one arm touching the mat.
When mindfully present, this is a great way to empower yourself and use your body and yoga pose to show off your intention in case you’re wondering what practical application this pose has.
And you can also choose to start over in a grounded standing position. Start in a Five-Pointed Star Pose where your two legs are spread wide apart beyond hip width, two arms stretched out to the sides. And your head makes up the fifth-star point.
You are a star! ⭐️
For your freestyle Falling Star, maybe you’re leaning or swaying even if ever so gently to one side, comfortably balanced, and letting go of the opposite leg and foot from resting on the floor beneath you. You don’t need a mirror to feel lighter and to trust your instincts.
This is a good metaphor for how letting go can be freeing in your life. You can fall away from getting in your own way of anything holding you back.
Letting go of outcomes is one of the hardest things in life I found. It’s not easy to let go of something you want to happen, especially when all your life you’ve been groomed to be in control. But that openness allows for something better to come along.
Sometimes we’re not thinking big enough. So in those times especially, being in a Falling Star yoga pose can be therapeutic and a good reminder.
Another Falling Star variation is to sway and bend your torso to the side a little or a lot (like how a palm tree can bend to withstand tropical storms). 🌴
You can also reach your helicopter arms out or up to help you balance. It’s not about how bendable you are. It’s that you’re willing to even try it!
You’ll get more flexible as you stay in the pose longer. It’s your unique Falling Star creation. 💫Just be sure to have fun! 🌟
And you can do that with this fallen star beet granola pan you can make in minutes with a few ingredients.
Combine dry ingredients and then mix in wet ingredients.
Bake granola for about 25-40 minutes at 325°F or until toasted.
To make chocolate topping. Prepare chocolate on display pan you will be using. Take a piece of plastic wrap and put on top. Add melted chocolate and pour onto plastic wrap. Refrigerate until chocolate is hard. After granola is baked and cooled, you can pour into the pan and then add the hardened chocolate ontop removing the plastic.
To make beet heart: take a star stencil or make a star cutout with cardboard. Add beet powder to create star shape. For fallen star effect, use tweezers to pull out the yellow pepper flakes (found in crushed red pepper flakes) to make a fallen line.
Positive thoughts like “you got this” can make a positive impact in your day.
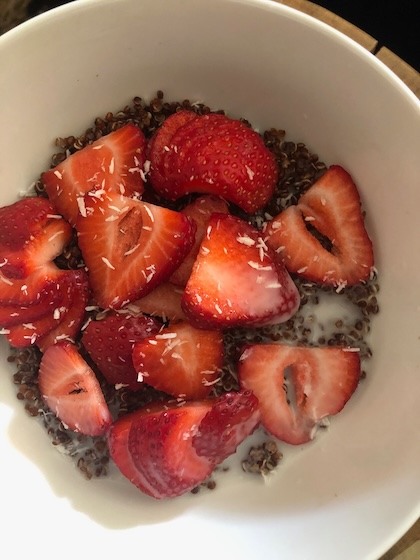
And starting your day with a heart healthy recipe (🍓 below) like this delicious quinoa bowl breakfast idea to get excited about.
Easy strawberry quinoa cereal recipe below. 🍓
If you’re wanting a better day, you recognize the difference between positive thoughts and negative ones.
Thoughts all start in the divided minds we’re given, that’s either hurting or helping us. And if this is new territory for you, start there.
Maybe you recognize which bucket your negative or positive thoughts belongs in, but you don’t know how to toss out the draining ones.
They can show up anytime: when you wake up on the wrong side of the bed or when triggered by a memory, situation, or person.
And then the subconscious mind (ego) feeds off the nourishment of holding onto negative feelings or pain as a form of protection and masks its agenda from you. But now you know better.
Bypass the unnecessary time wasted in dramatic sorrow. Be proactive with positive affirmations, meditation, yoga, or healthy distractions that are great ideas to reset and get rid of thoughts that have no good business being with you in the first place.
Sounds like a plan, right?
But then going about your day or even seconds later, new thoughts occur from news headlines you read, someone offends or irritates you, a situation stirs an emotional chord, and then you’re right back to negative thoughts and moods. It’s daily and non-stop.
Your mind and the negative thoughts grow even if you think you’re living in a safe bubble.
The unhelpful thoughts never have a chance to go away until you decide the one thing you can change and have in common in every thought is YOU.
And so, I share in this detailed blog article what needs to change to get the happy and helpful thought life you want.
This is the second part of the article from last week on relaxing your mind for the best ideas.
Managing thoughts is essential for lifelong learners, and as a prerequisite to being your most productive self, unleashing your creative self, attracting people to your energy, and living your optimal life.
Years ago, I thought traveling to exciting, new places and feeling in woo would conquer negative thoughts, as they temporarily disappeared when senses were heightened (like when you’re newly in love or starting passion work). But those fickle feelings don’t last and things always change after the newness wears off.
So then I dipped my toe in collaborating and aligning myself with the Universe and how to manifest the best life (that’s woo woo to some).
For me, I was on the right path and things were looking up, but I still had to do the inner core work in my mind.
When all that eventually clicked together, then I could feel the woo hoo! And that’s what we all can celebrate in our lives if and when we get there.
It takes all the pieces–knowledge, process, and application. And if you’re feeling lost, it helps to have a guide.
These are a few guiding and starter points that helped me and hopefully can help you or anyone else who’s trying to figure out a better (thought) life.
The first part can be the hardest–knowing that it all starts in your mind and not someone or somewhere else.
This seems elementary after you learn this, but the ego wants to steer you in another direction like something else is the cause or problem.
So if you’re busy or not paying attention, that can happen and go on until you’ve had enough.
Another point is, don’t let nagging thoughts (or drama in your mind) that won’t leave you alone play out for longer than needed which is no more than a minute.
And in relationships, especially. It takes just one step to cross the invisible boundaries of another person with your words that originated from thoughts.
Walk away from your thoughts to give yourself more peace. Below I have some suggestions on what to do.
So, How to Change From Negative to Positive Thoughts…
Our thoughts are natural to us, and they cause us to take action that can appear inconsistent or as disconnects to others.
To change this, operating from awareness is imperative. Initially, this may feel like work and working harder (like walking uphill with heavy boots instead of sliding downhill). But it’s totally worth it.
You learn a life skill to purge those unwanted thoughts that pop up impromptu and when triggered.
I think there should be a required course on this that you learn early on (and would solve some of the world’s problems as people are the problem or solution).
But anyway… changing thoughts gets easier when you’ve learned the skill and it becomes more automatic.
The negative thoughts won’t disappear immediately, but much quicker than before in your thought choice, and you’ll be wise enough to know you don’t have to act out or say aloud negative thoughts.
Which btw, doesn’t change your personality. It makes you more attractive to the right people.
And that’s part of what separates our discerning brains from animals, young children, or when we were younger…
We all started out immature compared to who we’ve become today.
So here’s how you can reset and get your loving daily juice. To promote loving thoughts, witness your thoughts (I’m sure you’ve heard of this).
Practice being aware of what’s coming in. If it’s garbage, then reject or walk away.
If it’s something that you have feelings about and need to process or work through, then allow yourself that grace.
Again, you don’t have to air your thoughts to anyone, and not putting energy into negative thoughts is going to help you avoid wasted time.
Let them pass through and find the loving side of those thoughts (i.e. how can these thoughts help me?).
In the beginning, as you’re learning or practicing, you want to draw a line in the sand and separate thoughts as helpful or hurtful, good, or bad.
Make it easy on yourself and not leave thoughts in the confusing gray zone that’s part of the baggage carried around.
And let’s be clear, these are thoughts and not the actions that could follow. We want to nip them in the bud.
The good thoughts you accept and the bad ones you reject for your own good. If it hurts others, then you toss in the reject pile and you figure out a win-win or kinder way to confront if that’s needed.
Ask yourself daily and often: What just came out of my mouth and what’s going on in my head? Hit the archive button if it’s a worry thought until you can find answers, and hit the delete button if it’s a harmful thought to you or anyone else.
Know those thoughts will still be there if you need them, which you won’t, but your brain tries to convince you that they’re important to protect you when they’re not needed (for survival). You can blame the ego (yet again) on that.
So, after you start to live life this deliberate-thinking way and focus on positive thoughts, you can see the difference in the quality of your life and the better air that’s there.
You’ll feel more peace, and that helps your stress level and health.
You allow room for ideas to come in, and you become more useful to the world with your abilities. You become part of the solution.
Find A Mantra for Positive Thoughts
Pre-social media days, we were not part of an aware culture like we are in today.
In those days along my journey, I came across these words: “Whatever the question, love is the answer.”
I don’t know who the author is that wrote that, but I knew back then that I wanted that. So I printed out and framed those wise words that are now ingrained in memory.
With intention, I used that as my mantra. And even though I didn’t know how to apply it in every difficult situation.
I knew that if I aspired to the meaning behind the words, it would one day catch up with me and my self-actualized desires.
So, if you have similar aspirations of a learner mindset, find a mantra or intention (or use the one I used) to go to if you’re trying to change to more positive thoughts and aspirations.
It can be used as a distraction from negative thoughts. And you eventually become your words and what you think of.
Use Your Internal Guide
As mentioned, it can be helpful to have a guide and for those ahead of us in certain areas and times in our lives.
But the best overall guide is your internal compass.
But we want to change them because sour moods can crowd out positive thoughts and exacerbate our need to judge, be critical of others or ourselves, and get easily irritated, which can cause our negative words or actions.
Being in healthy alignment with yourself is better because, in the end, you and your caretakers are the only ones that will be with you.
You’re the only one that’s with you (and your thoughts) always, wherever you move or travel to.
Sometimes, listening to your internal guide can be countercultural and a bit uncomfortable when you make decisions that aren’t popular or go with the flow.
And especially if you’re a harmonious or extroverted person who just wants to get along or people please.
That can make it difficult to live in integrity (doing, saying, and thinking the same thing).
Robots will have it easier than us in this way, but sadly the tin man is missing a heart. 🤖
As humans, when our thoughts don’t align that’s when we have a new chance to re-adjust.
Years ago, no one talked about mental health or wellness as part of the daily talk. Now we embrace “knowing better” in our lives.
We don’t have to just take our thoughts (or others at face value) that turn into actions that don’t always get good results and can even get us in trouble in a hyper-sensitive society.
Plus, we have more options to change the channels in every sense. And we’re more accountable.
We need this accountability. It makes us better as individual people and all together in our complex world.
So these are some accountable thoughts and maybe some personal growth homework (should you choose to accept the mission?) for turning sour cherry thoughts into sweet ones.
As a bonus, you’ll become a better person as a byproduct. I know because this is all stuff I went through. It takes one to know one, and we’re all here to figure out our best life and selves.
So, no judgment here (and actually that’s one of the assignments) 🧡 That’s a balanced Pitta way.
Pause on the gossiping:
Here’s the better way: if you wouldn’t share the news with others and the person you’re gossiping about in the room, then find a way to filter and say less.
If you’re not sure, ask.
More likely you’ll just zip your lip and that’s fine too. It’s really that simple. But even simpler is just not gossiping at all.
That becomes an automatic, better way.
When you find you can’t sit and talk in the same conversations with those who gossip, then you know you’ve changed that about yourself.
You end up productively filling your time with better ways that lead to better things.
Learn to not judge:
We never know the full picture of what’s going on with anyone else no matter how much we think we do.
Take the objective and loving-kind stance.
If you want to have an optimal life, the sooner you learn to let go (of judgment) and to stop controlling so much, the sooner that will start.
A prerequisite for this type of freedom (that it is), is to stop judging others at the first judgmental thought that enters and let the negative thoughts pass through.
Quit complaints:
If you say negative things, then you become a negative person when what you really want is happiness.
So if the first thought that enters your mind is to emphasize complaining, that hurts you.
Maybe you’re used to complaining to get your way (and learned the squeaky wheel gets the grease).
But also what’s happening in the process is you’ll be seen as a complainer.
People who don’t complain will stay away from you, so you’re in company with complainers or those who want you to complain for them or their causes, bringing more negativity in your life and less in theirs.
…If you can make these 3 life changes, you’ll be well on your way to a more peaceful life. It’s simple, but not always easy in the beginning.
It takes desire, self-control, and holding yourself accountable. Be patient and easy on yourself. The good news is these traits are changeable with practice.
And if you find people to support your efforts (and let go of the ones who aren’t), it’s easier.
Your supporters are your best allies.
Ultimately you decide what type of life you want to live. You get to decide what thoughts you keep. Copy that. 😉